| | Utility MX |  |
|
+9redzz02 Deluxe66 Thunderdivine redlinemotorsportts jamcco jonjunk willis923 Doc Sprocket MoMower 13 posters |
|
| Author | Message |
|---|
Deluxe66
Member

Join date : 2014-05-23
Posts : 120
|  Subject: Re: Utility MX Subject: Re: Utility MX  November 26th 2014, 5:31 am November 26th 2014, 5:31 am | |
| Now the front axle is cloce to the finish line. Today I get all welded in place. Now I just need to weld all seams and it done. Here is couple of photos about the arms and joints. IMG 2519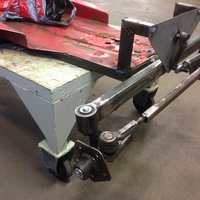 IMG 2518 IMG 2518 Wheels turn as I expected. When wheel are turned for example 45 degrees the wheels are turning only when front axle tilting on the other direction. Front axle titling has no effect when wheels are straight. I accept this design and just need to remember not to have thumbs inside of the steering wheel. Next I will weld the front axle and after that continue with the rest of the steering parts. | |
|
| | |
Deluxe66
Member
Age : 47
Join date : 2014-05-23
Points : 3745
Posts : 120
Location : Finland
| | Subject: Re: Utility MX November 27th 2014, 5:31 am | |
| Hello again. Here is some updates. I desided to recycle and went to my bicycle spare part collection  I used one steel front wheel and made steering hub from that like this. IMG 2520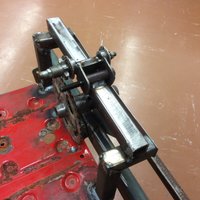 IMG 2521 IMG 2521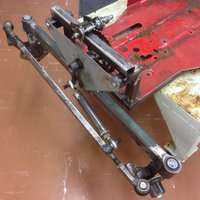 IMG 2522 IMG 2522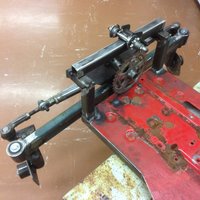 I made hinge point to subframe so that when I adjust the chain tension the whole streering axle is moving also. I might use car alternator belt tensioner parts for this chain tensioner system. Subframe will be bolted in final version. Little welds helped me on getting all in place and now it is easy to drill holes through both tubes. Triangle shape plate will be also welded to subframe with some extra tube on that gap that you can see on the photo. When this is ready I can take off the whole front axle with all streering parts just to opening some bolts. Front wheel hubs are now almost ready. I noticed that I need to make some wheel turning stoppers system so some more things to do with the hubs. Until next time. | |
|
| | |
redzz02
Site VIP

2014 Build-Off Entrant
2014 Build-Off Entrant
2016 Build-Off Top 3 Winner
2016 Build-Off Top 3 Winner
2021 Winner of Winners
2021 Winner of Winners
1st Place Build-Off 2015
1st Place Winner Build-Off 2015
1st Place Build-Off 2017
1st Place Build-Off Winner 2017
1st Place Build-Off 2018
1st Place Build-Off Winner 2018
Age : 29
Join date : 2010-05-12
Points : 6160
Posts : 899
Location : PA pittsburgh and pymatuning
| | Subject: Re: Utility MX November 27th 2014, 9:10 am | |
| definitely not what i was expecting from the title, but looks like you got your fab skills down and itll turn out good, good luck looks good! | |
|
| | |
Deluxe66
Member
Age : 47
Join date : 2014-05-23
Points : 3745
Posts : 120
Location : Finland
| |
| | |
Thunderdivine
Veteran Member


Join date : 2012-12-21
Points : 6327
Posts : 2101
Location : Norway, Europe
| | Subject: Re: Utility MX November 29th 2014, 8:51 am | |
| Yeah that worked, nice work. | |
|
| | |
Deluxe66
Member
Age : 47
Join date : 2014-05-23
Points : 3745
Posts : 120
Location : Finland
| | Subject: Re: Utility MX December 1st 2014, 5:08 am | |
| Thanks. Some progress. I used road car parts to make the steering axle. I welded the sprocket first to the hub axle "bolt" and then welded the steerin axle directly to the sprocket and just hope that this will be strong enough design. Some wobbling might occur but this is rotating only few rounds so hopefully it does not matter. IMG 2554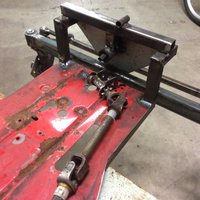 IMG 2555 IMG 2555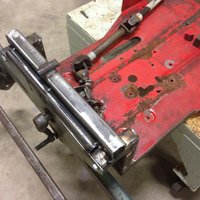 I also welded two more tubes. One short tube between subframe and that hub where bigger sprocket is. Other to the cap at front between the trianlge plate and subframe. Now I can drill holes through subframe and main frame. After that I can take front end in pieces and weld all seams. I have front axle skid plate in paper so that will be also next on the working list. Finally it seems that the list is getting shorter. | |
|
| | |
Deluxe66
Member
Age : 47
Join date : 2014-05-23
Points : 3745
Posts : 120
Location : Finland
| | Subject: Re: Utility MX December 3rd 2014, 5:07 am | |
| Now I managed to weld all in place so that I am able to take front axle in pieces. I made the chain tensioner system also. One part of that is missing from the photo. I have used and will use welded nuts in all possible places. IMG 2557 IMG 2558 IMG 2558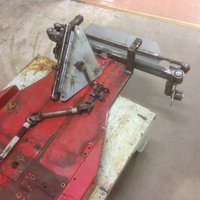 I started to work also with the front axle skid plate. That needs more supports. I will take the front axle off so I am able to make supports more easily on table Next I will finish all work with front axle and after that start to work with steering collum, seat and pedals. I have desided to use Honda + yardman rear axle combo. With those I might have this ready until next spring otherwice my motivation might end before this is ready. Other reason is that my son keeps asking when I am going to work with JEEP project. I have desided to use the original plan with that and just make modifications afterwards if needed. | |
|
| | |
Deluxe66
Member
Age : 47
Join date : 2014-05-23
Points : 3745
Posts : 120
Location : Finland
| |
| | |
Doc Sprocket
Site VIP
2018 Build-Off Entrant
2018 Build-Off Entrant
2021 Winner of Winners
2021 Winner of Winners
1st Place Build-Off 2016
1st Place Build-Off Winner 2016
Age : 51
Join date : 2013-04-21
Points : 7102
Posts : 2914
Location : Ontario Canada
| | Subject: Re: Utility MX December 8th 2014, 8:16 am | |
| This is looking pretty serious. I'm diggin' it! | |
|
| | |
mr.modified
Veteran Member

2015 Build-Off Top 3 Winner
2015 Build-Off Top 3 Winner
2016 Build-Off Top 3 Winner
2016 Build-Off Top 3 Winner
2018 Build-Off Finalist
2018 Build-Off Finalist
2022 Build-Off Entrant
2022 Build-Off Entrant
1st Place Build-Off 2014
1st Place Build-Off Winner 2014
2023 Build-Off Entrant
2023 Build-Off Entrant
Age : 34
Join date : 2013-11-02
Points : 6947
Posts : 2906
Location : New Jersey USA
| | Subject: Re: Utility MX December 8th 2014, 1:04 pm | |
| Pretty cool looking skid plate. | |
|
| | |
Deluxe66
Member
Age : 47
Join date : 2014-05-23
Points : 3745
Posts : 120
Location : Finland
| | Subject: Re: Utility MX December 9th 2014, 5:06 am | |
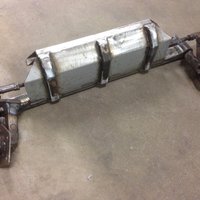
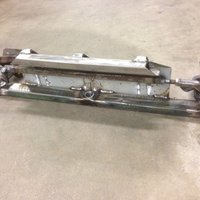
| Thanks a lot. I am satisfied so far about the build. I am posting quite often but soon there will be break. Skid plate 100% and front axle almost ready. Some grinding and steering stoppers and thats it. At the beginnig I wrote that I will use as much as possible Yardman original parts. There is little parts made from YardMan on this front axle. During the build my ideas changes sometimes ( everytime is more true) and this front axle is totally different than I first thinked about. IMG 2635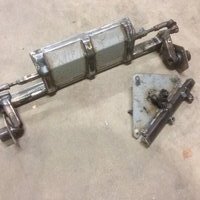 IMG 2636 IMG 2636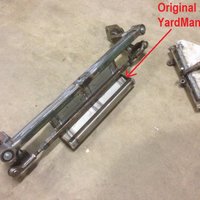 Next I will remove more parts from the axle so that I can grind and make the rest of the supports. | |
|
| | |
Deluxe66
Member
Age : 47
Join date : 2014-05-23
Points : 3745
Posts : 120
Location : Finland
| |
| | |
Deluxe66
Member
Age : 47
Join date : 2014-05-23
Points : 3745
Posts : 120
Location : Finland
| | Subject: Re: Utility MX January 8th 2015, 4:58 am | |
| New year new ideas. I desided to drill sort of sideways to the rim to be able to get air indise of the inner tube. I drilled directly at the same place as the original car tubeles valve was. Not the nicest one but easy to make and this gives space for the inner tube valve. IMG 2747 I have started to make frame a bit more. IMG 2748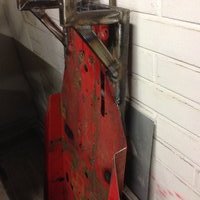 Next I will weld small round tube so that I do not get sharp edges and plate to get the side closed at the same hight as the original frame is. | |
|
| | |
Deluxe66
Member
Age : 47
Join date : 2014-05-23
Points : 3745
Posts : 120
Location : Finland
| | Subject: Re: Utility MX January 13th 2015, 5:08 am | |
| Here is the round tube + plate design for the frame. Not ready but an starting point at least. IMG 2759 Because I have been working with the front so long time I wanted to change to rear. I welded the rim plates in place with bolts. After some welding this rear axle is ready. I used small mertic standard bolts and use road car wheel nuts as washers to get the rim in place. Some wobling was left after welding those rim plates but I am sure that it will not affect the driving. IMG 2760 Another reason for welding the rear plates is that I would like to install temperarily all in place to get better feeling about how this is going to look. At this moment I only have pile of parts but no idea about the look or dimensions. Seat and steering wheel place would be nice get figured out. | |
|
| | |
Deluxe66
Member
Age : 47
Join date : 2014-05-23
Points : 3745
Posts : 120
Location : Finland
| | Subject: Re: Utility MX January 21st 2015, 5:55 am | |
| Slowly progress with seat and streering parts. I started with original seat mounting parts and bolted all seat related parts to frame. After that tryed to figure out where should I put the steeering wheel. I figured out that it is easier to handle the tractor if the steering wheel is in front of me I used this design and start welding. Here is photos about the steering collumn. This is only an layout. IMG 2817 IMG 2818 IMG 2818 I used road car streering collumn with lenght adjust. Now I can adjust the streering wheel closer when my kids are driving. I will use the modified chain hoist to change the direction and ratio. I have modified the chain hoist so that streering wheel can be bolted on. I have modified the car streering collumn so that there is some steel where I can weld the chain hoist. Next I need to figure out how I can connect the axles together. IMG 2818 has red marks on the axles. I will use some round bar and lot of good luck After all is rotating and strong enough I will make some protection around the hoist and stuff so that there is not an hole where to put finger between gearings for example. Also this should give more cleaner look. | |
|
| | |
Deluxe66
Member
Age : 47
Join date : 2014-05-23
Points : 3745
Posts : 120
Location : Finland
| |
| | |
Deluxe66
Member
Age : 47
Join date : 2014-05-23
Points : 3745
Posts : 120
Location : Finland
| | Subject: Re: Utility MX February 5th 2015, 5:44 am | |
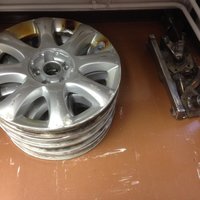
| Finally rim issue solved. Here is to do list from my post earlier: - work with grinder => done - drill hole for inner tube valves => Done - sandblasting => I kind of skip this - painting => done - enjoying the result of hard work => done - tire mounting => this is the next job - enjoying the result of hard work => definitely will be done again Here is one photo about the painted rim. This is acceptable result. These are covered by mud anyway. IMG 2858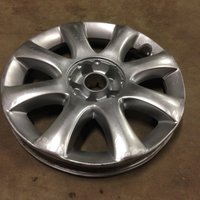 | |
|
| | |
Deluxe66
Member
Age : 47
Join date : 2014-05-23
Points : 3745
Posts : 120
Location : Finland
| | Subject: Re: Utility MX February 9th 2015, 8:29 am | |
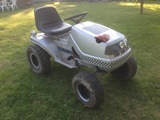
| Three ready and air in. Almost like putting tire to MX rim so center groove and all other dimension works. IMG 2877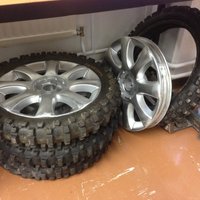 Next I really would like to see how this tractor is looking so I will bolt on axles, seat and steering collumn. I think that this is going to look bit different than other machines that I have Sometimes I keed thinking that would it be possible to buy something ready to go from some shop. Maybe not then you have similar than others and the feeling is great when you get something ownmade ready | |
|
| | |
B440
Member
Join date : 2014-01-22
Points : 3988
Posts : 226
Location : Thompson, CT
| | Subject: Re: Utility MX February 9th 2015, 10:00 am | |
| I'm really digging those wheels! Now I'm thinking how I could make a set and use them on my machine. | |
|
| | |
Deluxe66
Member
Age : 47
Join date : 2014-05-23
Points : 3745
Posts : 120
Location : Finland
| | Subject: Re: Utility MX February 10th 2015, 6:28 am | |
| Thanks now all wheels are ready. This project will continue next week. I have already different machine in my design table for these tires  | |
|
| | |
Deluxe66
Member
Age : 47
Join date : 2014-05-23
Points : 3745
Posts : 120
Location : Finland
| |
| | |
redlinemotorsportts
Moderator


2014 Build-Off Entrant
2014 Build-Off Entrant
Age : 27
Join date : 2013-03-18
Points : 7267
Posts : 3131
Location : raleigh nc
| | Subject: Re: Utility MX February 17th 2015, 5:44 pm | |
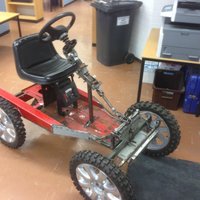
| Wow! This is pretty sweet, sweet to see it together as a hole (for the most part). The tire/rim combo it pretty rad, and looks pretty comfortable for driving. I love how beef that front is, should be able to really beat it up, i think im going to steal that tie rod protector for mine...  | |
|
| | |
Deluxe66
Member
Age : 47
Join date : 2014-05-23
Points : 3745
Posts : 120
Location : Finland
| | Subject: Re: Utility MX February 18th 2015, 4:51 am | |
| Thanks my motivation got an boost after bolting some parts together  Right now I really would like to go for an drive Feel free to copy. I try to make this as heavy duty as possible but off course weight can not be too high. I do not drive nicely and this frame most likely has more horse power some day. Today I got the steering wheel at better place. Next week I will try to get wheels turned from that black round thing which is in front of seat. It seems that there is even room for pedals | |
|
| | |
Deluxe66
Member
Age : 47
Join date : 2014-05-23
Points : 3745
Posts : 120
Location : Finland
| | Subject: Re: Utility MX March 3rd 2015, 5:06 am | |
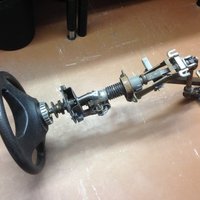
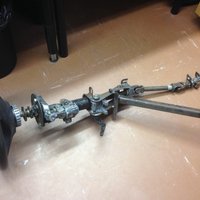
| Streering collumn is now quite solid and there is just the space for me to sit. If needed I will move the seat litlle bit to rear. I do not like this idea because then my weight is going more to rear also. Maybe 5hp is not so wild for wheelies = steering collumn ready. Wheels turns from center to left or right about 1,5 streering wheel turns= streering ready Some photos about the custom streering and front axle. IMG 3037 IMG 3038 IMG 3038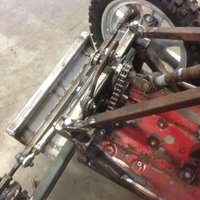 IMG 3039 IMG 3039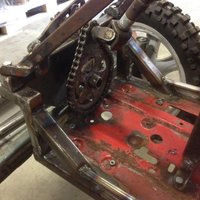 Moving and rotating parts needs some guard and at the same time it will be some kind of rain protection for joints and chain. Soon I can proceed to engine mounting with varidrive system. After that I can more easily figure out how the pedals are the easiest to make. After these are solved I can proceed with the rear skid plate. I have some parts and main design ready. I am still trying to make rear fenders from the original engine guard. | |
|
| | |
redlinemotorsportts
Moderator
2014 Build-Off Entrant
2014 Build-Off Entrant
Age : 27
Join date : 2013-03-18
Points : 7267
Posts : 3131
Location : raleigh nc
| | Subject: Re: Utility MX March 3rd 2015, 8:50 am | |
| Very impressive, I really like this setup. Looks like you won't have to worry about breaking. It's like my steering, bunch if moving parts but makes one killer setup. | |
|
| | |
camomanusa
Member
2014 Build-Off Entrant
2014 Build-Off Entrant
Age : 25
Join date : 2013-09-15
Points : 4363
Posts : 467
Location : Greensburg, PA
| | Subject: Re: Utility MX March 3rd 2015, 3:54 pm | |
| My Stallion tractor came stock with a sprocket setup quite similar to that. That's a nice setup and I planned on doing that for mine since I seen it on the Stallion. Ill have to take a picture of it when the weather calms done. | |
|
| | |
Sponsored content
| |
| | |
| | Utility MX | |
|