I was just wondering how is this thing geared as far as top speed goes?
Wow, top speed? I don't quite know yet. I got GPS on my phone with a speedo app, but that won't be till it's running and moving. Don't quite know if I got enough of hp either for something serious. I might even have to gear the hell out of it to even move let alone turn. But how it stands now, if I got the hp and everything works decent enough, I have a choice of 1 to 1 or 1.5 to1 (belt) from engine to jack shaft, then jack shaft I think is 1 to 1 (#35 chain) going into gearbox. The peerless gearbox, I don't know if 3rd is 1 to 1 (I'm sure it's higher) but the rearend axle pinion is 4 to 1. Then the out put transaxle pulleys to sprocket axle pulleys are 1 to 1. Engine is goved at around 2700 too. I'd be happy at 15 mph if everything works for the build off. If it's faster then that, I'll gear it higher at the sprocket axles to slow it down to 15 mph probably. Never drove anything with tracks before and there's going to be a learning curve for it. So for the build off, the speed will be around 15 mph, if I get use to it quick enough or if it's controlable enough, I'll bring up the top speed to whatever.
redlinemotorsportts Moderator
2500+ Posts
2500+ Posts!
2014 Build-Off Entrant
2014 Build-Off Entrant
Age : 27 Join date : 2013-03-18 Points : 7275 Posts : 3131 Location : raleigh nc
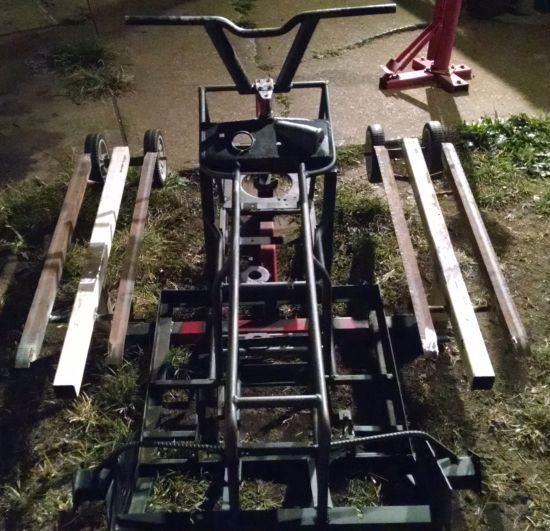
Hay People, Got plenty more pics this time, 13 total. Tried to upload them last night on one post but couldn't do it. So I'll be doing it in multiple posts. 2 now and the 3rd, maybe the 4th when done. Too much, I guess, at one time. I was literally on the last sentence when the whole thing crashed. So..........
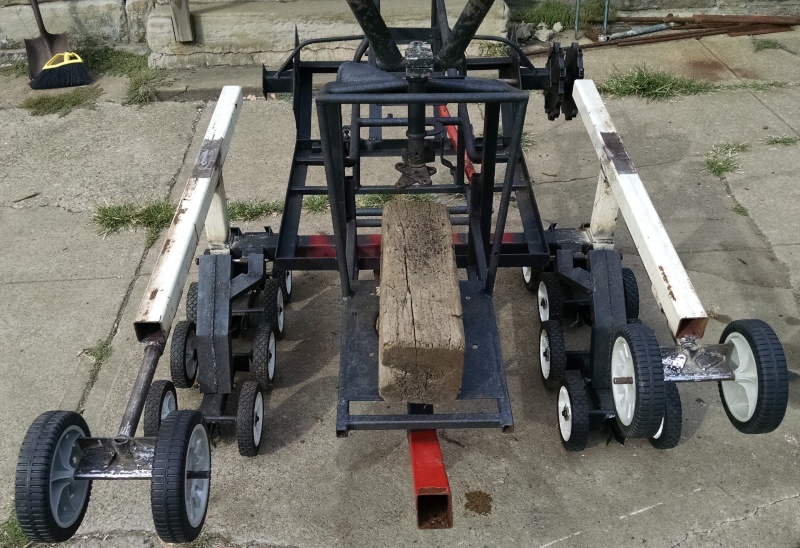
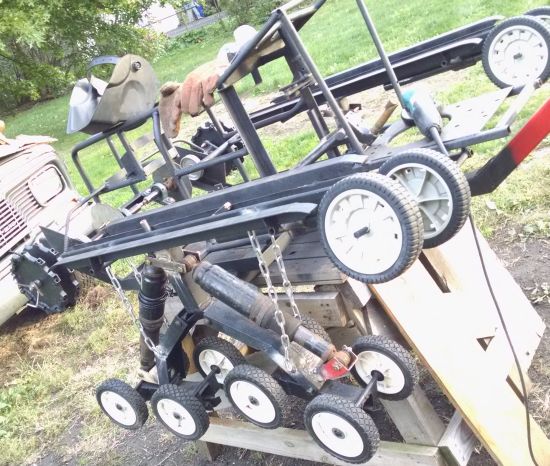
I'm working on the top part of the frame that holds the tracks and the front wheels. These wheels will be keeping the tracks in constant tension, think of the tracks as a belt and the front wheels as being the belt tensioner, which means, yes, spring loaded to keep the tracks tight. I don't like the idea of adjusting the tracks with a fixed tensioner. Make it spring loaded so no hassles.
This is my 3rd attempt at this part. The first never made it past the design state. The second, well worked with it off camera and out of sight because I had my doubts from the start but needed the experience of building it even though I kinda new I was going to fail. To much work involved with no time but was a good idea. Sometimes you just need to fail to move ahead just for the experience of doing it. I think you learn more from failing then from succeeding sometimes. Anywho....
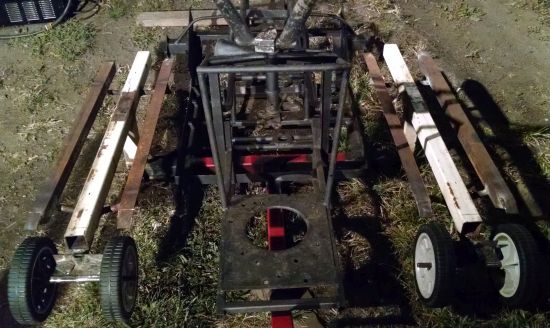
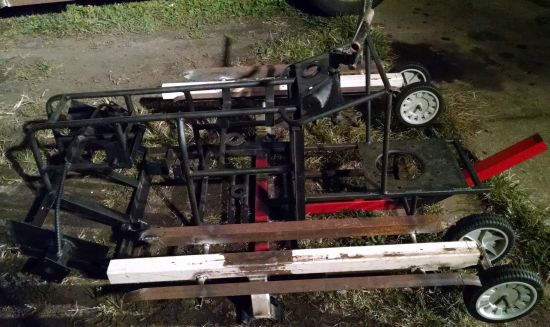
Here's pics of my 2nd failed attempt. I was planning on the whole thing moving with the wheels. The problems were the guides was dragging in the guide channel which will cut apart the assembly. Next, the assembly would have been too tall to fit in the frame, there would be no room for the shocks. And last, the tracks might bounce out of the guides and snag the assembly, it being open, as it is. But some parts will be reused for the 3rd assemble though, like the wheel axles and the side draggers, I'll call them. The draggers is what the ends of the tracks, where the road wheels ride on, will be dragged on since there will be no wheels on the top part to hold the tracks up.
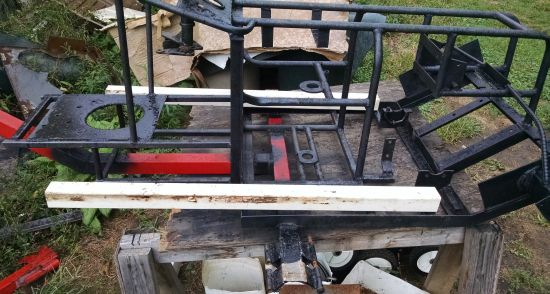
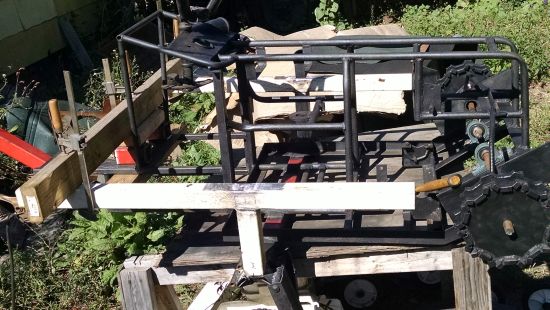
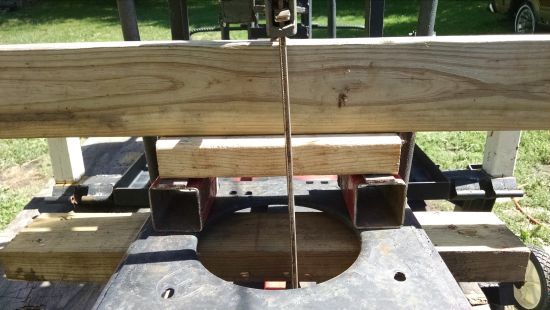
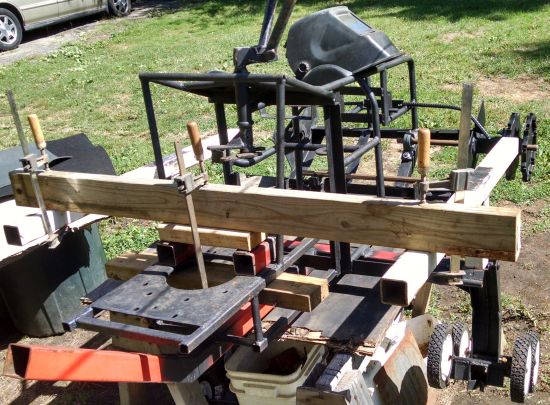
The start of the 3rd attempt to finishing this section. I start with the guide channel. The guide channel needs to be attached to the frame to save on space for the shocks to attach to this part. I use square tubing, 2x2 and the top part will be cut out to make it a guide channel later. Off camera I figure out how tall I need to make tubing going up from the suspension bar to the guide channel which is 7 1/2 inches, and weld them onto the guide channels. I'll call this up tube the shock tube. Ok, pic of the guide channels with the shock tubing welded together and sitting on the suspension bar for alignment. The sprockets and axles with bearings are put back into place for alignment purposes of guide channels. Note axles are cut to the 19 inches now for this at this point. Next few pics are about the jig holding the guide channels in place. No high tech frame holders here, back yard know how at it's finest. It's the know how that gets it done. With the knowledge, you can use anything laying around. In my case, I used wood 2x4's, pieces of square tubing, and flat steel stock for shimming, with wood clamps to hold things in place. The other side. And yes, I checked the long 2x4 to make sure it's straight and flat. Surprised that it was considering it came off a scrap piece of fencing. NO EYEBALLING ALLOWED HERE! I've been hit in the head and electrocuted too many time to know not to use my eyes to align anything like this, LOL. Everything was measured to death to make sure that one side was right on. I had to mock up both sides just to get one side burned in right. I also put the rear A frame on with the bogies for clearance checking. Comes close but no contact with the A frame completely compressed. I'll be putting stops on so the A frames won't be compressed all the way like this but good to know that it can. A closer look at how I shimmed the long 2x4 and held it in place. Just little pieces of 2x4, left over pieces of square tubing , flat stock steel, and a clamp. Everything is ready for welding. I tack weld the shock tube to the suspension bar with 4 tack welds, one in each corner quickly. Let it cool and remeasure everything again. I measure to specific spots on the frame that are the same on both sides. Then finish weld the one side in. Let it cool and remeasure again to make sure it is right in the frame. I did it successfully by the way.
This pic is the guide channel final welded in place and with the sprocket in place. Looks good to me. And yes, the sprocket is turned a little bit because the bearings was removed and put back into place. The pillow blocks have adjustable slots in them and I just threw them on for mock up. No worries, the sprocket axles will be realigned again eventually. I'll eventually cut out the top of the tubing to make the guide channel. Don't quite know how yet but will be one of the last things I do for this section. In the background are the springs for the tensioners. They're spring helpers that you slide over shocks. 3 inches in diameter and around 18 inches long. I start setting up for the other side to burn in. I make a mark, where my finger is pointing, and make a mark on the other end of the tubing in the same spot. Right on the top flat part of the curve of the tubing. Measure across to the other tubing in the back to get the measurement after I setup where I want the assembly to be in reference to the sprocket. I put the shock tube where I want it too. I then measure the front part and match the numbers. This ensures the 2 guide channels are parallel to each other but not to the frame. That was the goal of the first guide channel, the second guide channel is based off the first. If the first guide channel was done right, the second will be too. I weld in the shock tubing to the suspension bar the same way. So far everything looks good. Here's where I ran out of time Sunday night. The frame is pointing up and welding in the supports for the tensioner rod. 2 pieces of tubing where the rod should be telescoping thru but when I welded the second piece of tubing in and must have shifted because the rod binds up. I had to hammer it out of the tubing. The rod will slide thru the first tubing but not the second. That's OK, been there, done that. I just need to cut the second tubing down the center to shift the tubing over a little. Then reweld the tubing up. No big deal. The wheels will be on the top of the rod.
I didn't make a video of me doing the work, The video is how I come up with the design to do the work. A little insight on how I design things.
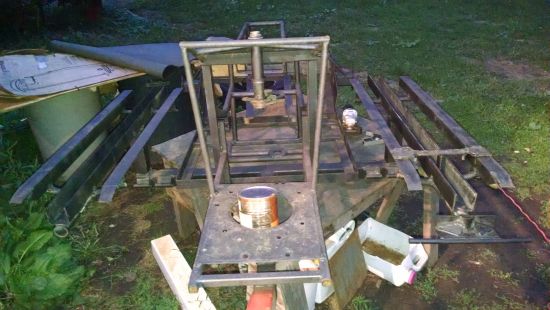
Hay People, I left off at just starting the front Idler wheel track tensioner rods. I had a problem welding this part together onto the frame. As for the chassis, the main frame structure is complete. everything else left is stuff that gets mounted, even though parts still need to be made, these parts will attach to the chassis somehow.
Back to the tensioner rods, welding shifted the second tube the rod slides through from heat distortion. Don't think there was anyway to prevent this. Been there, done that, sort of thing.
Ok next set of pics on this subject.
These 2 pics show the problem. You can see barely see the misalignment on the bottom tubing. From both sides in the pics.
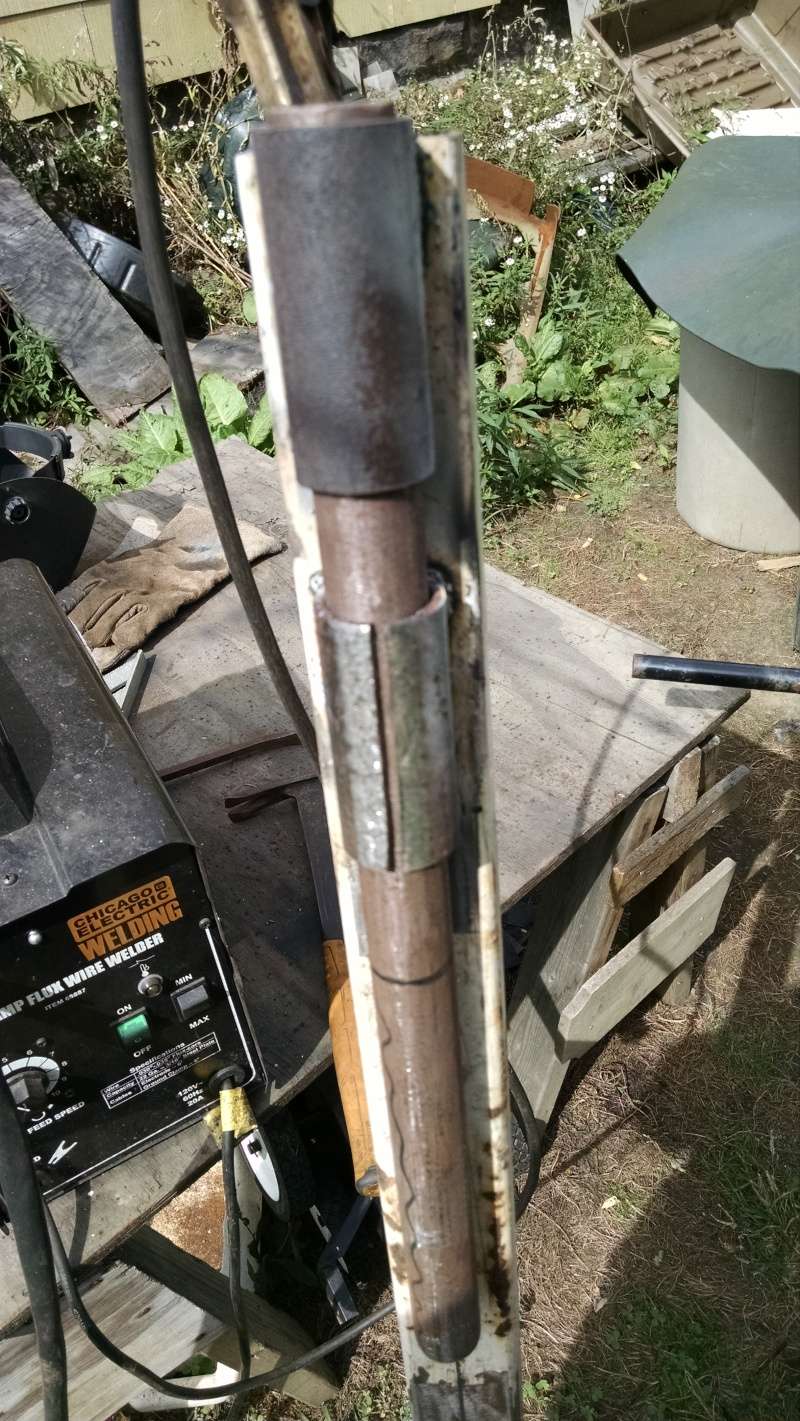
Like I said, been there,done that, on other projects of mine. You can't beat it into place, it will just distort it more. The fix is simple, slice it down the center as shown in pic and use a big screwdriver or pry bar to open up the tubing so the rod can slide through a bigger opening. Take note when doing this where the tube is bending. Twisting the pry bar in the cutted slot will bend the opposite side to open up the tube, while prying on the cut will bend the cutted area. I twisted the pry bar till the rod fell through.
After I got the rod to slide through with the tubing bent where I wanted it, I welded the part back together. I placed a 1/4 inch steel rod over the cut and welded both sides. It's that easy. Pic shows the finished piece. I ended up doing this to both sides.
Next is mounting axles on the tensioning rods. I first weld 1/2 inch rods to angle iron for support to the axles and a place to mount to the tensioning rods. Strait forward on this. I also added gussets to the angle iron. Drilled holes for cotter pins too to hold on wheels. The wheels on the tensioning rods will keep the tracks under constant pressure so they stay in the guides just like a belt with an idler pulley to keep the belt tight.
Here are the parts in place. On the left is all the way out, 9 inches of travel. On the right is all the way in. Probably won't need the whole 9 inches of travel but you never know.
Next 2 pics, well just fuel for the fire, LOL.
Next post will be mounting the draggers. Probably going to need a part 5 and 6 also. Taking pictures like crazy. Enjoy, I know I am, LOL.
mr.modified Veteran Member
2015 Build-Off Top 3 Winner
2015 Build-Off Top 3 Winner
2016 Build-Off Top 3 Winner
2016 Build-Off Top 3 Winner
2018 Build-Off Finalist
2018 Build-Off Finalist
2022 Build-Off Entrant
2022 Build-Off Entrant
2500+ Posts
2500+ Posts!
1st Place Build-Off 2014
1st Place Build-Off Winner 2014
2023 Build-Off Entrant
2023 Build-Off Entrant
Age : 34 Join date : 2013-11-02 Points : 6955 Posts : 2906 Location : New Jersey USA
Almost ready for testing! I hate when the stuff moves when your welding it. Small stuff you can feel it pull to the side when you hold it. Helps some if you tack it in a couple places but even then it's a pain sometimes.
Yah, I did that when I welded the framing together. Tacked the shock tubing in all 4 corners of the square tubing to the suspension bar and worked great. I must have had a brain fart because I forgot to do that with the tubing for the tensioners, that bit me in the you know what, LOL. Awesome pic of the tank, thanks
Ok, time to knock this part out of the park. I got 12 pics left, so 2 more posts. Think I'll finish this off tonight, I'm sure I'll be up late again, LOL. Got the next part to work on this weekend. By the way, all these pics are from the last 2 weekends (one day per weekend), and 2 hours during this week for 2 days.
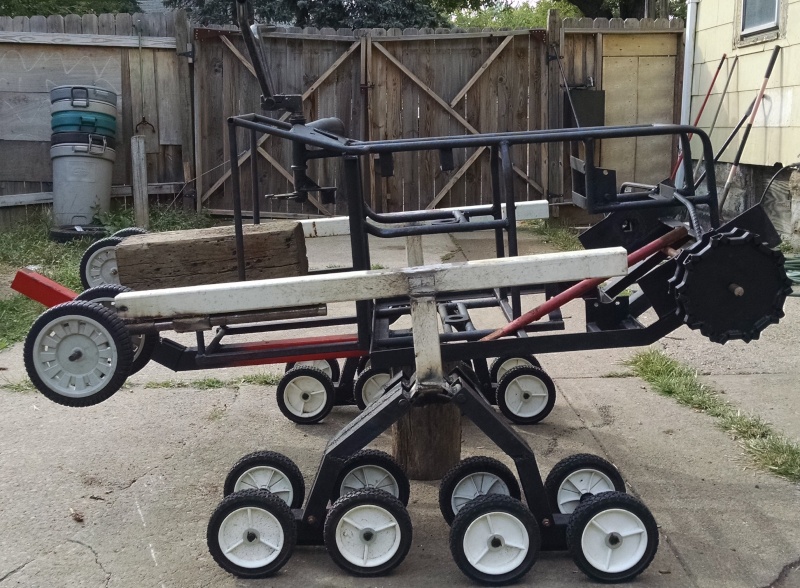
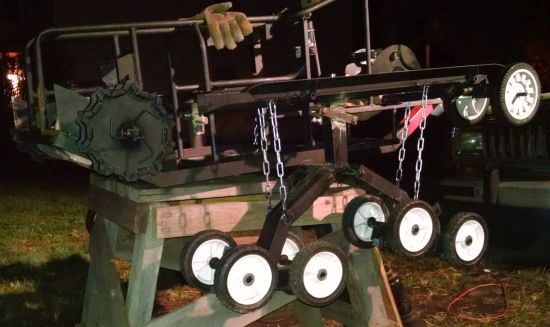
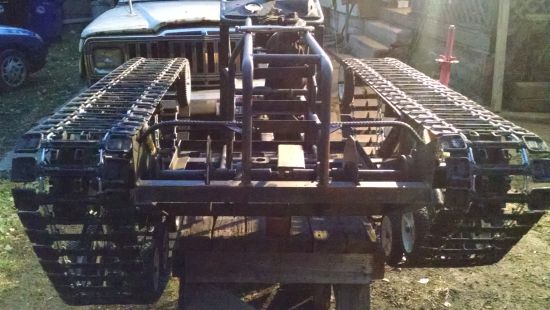
So I got the main framing done, the front wheels mounted on the tensioners. Next are the draggers. As mentioned before, the draggers replace the wheels that hold up the track in the middle, between the front wheels and the back sprockets. I wanted to do something different here because doing research on the tracks I notices that when the track leaves the sprocket, my sprockets being in the back and pulling the tracks from underneath, the top part will not be under tension which means when coming off the sprockets will sag and if I had wheels will want to go under the wheels from the weight if there is to much slack. Of course the wheel tensioners should remedy this but I don't want too much pressure from them to solve this because to much pressure would cause alot of friction or drag and would bend the sprocket axles hitting large bumps or obstacles. So to help this, I came up with the draggers that span most of this length. So.....
I cut the draggers off the framing of the 2nd attempt, One of the good parts of that failure, and reused them. Then mounted them on the guide channels with tubing. Came out pretty strong, I tested how strong by just standing on them over the shock tubing. Bracing will be made for the front part of this structure later along with the front end after I make the parts and mounts for the springs pushing on the tensioner rods.
Her's how I got the draggers mounted. Straight forward, layed wood across the guide channels with flat steel stock to raise the wood up for shimming, secured one dragger at a time, measured for squareness, cut the tubing (1/2 black pipe), and burned it in.
Pic of all the draggers mounted. I think if the tracks are dragging across these, it would make alot of noise and wear parts, not good! So on one of the earlier posts of the failed part, There was a plastic post cover, that will be cut up and put on top and sides to make it easier for the tracks to, well drag across the tops of these draggers. See where I got the name for them, LOL.
Pic of the framing for the draggers underneath.
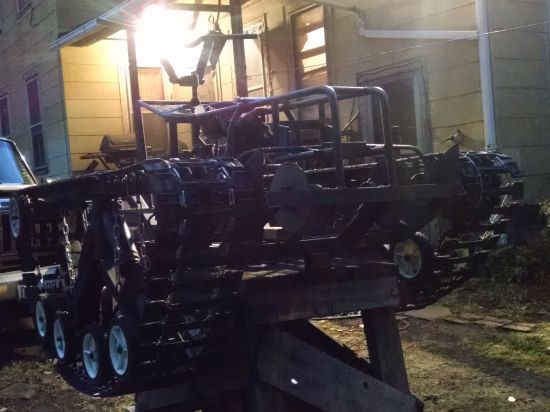
Next 2 pics are a walk around of the setup.
Pic of the belly of this beast while I was painting.
The last 3 pics on the idlers and tensioners subject and 1 pic on just bracing the drive section.
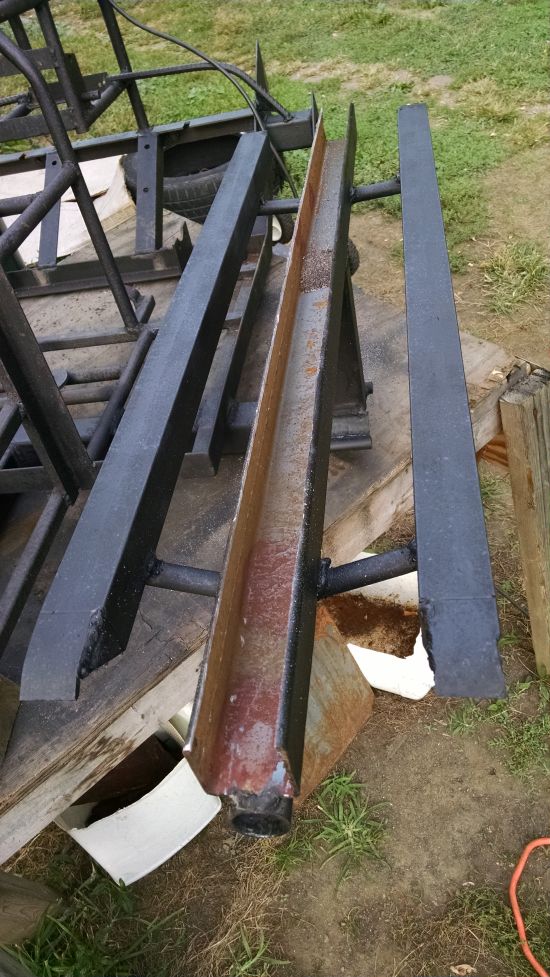
First 2 pics, during the week I had a couple of hours for 2 days to work on this part. So one of things I did was I cut the guide channels out with a sawsall.
Pic of a track plate sitting on the assemble. If needed I will choke up the guide channel after I get it running but first see how it works.
I turned my attention to the drive section for a minute and make 2 reinforcing plates for the back end. Plates are 1/8 inch thick steel plate. Needed to make these because 1 set of brakes will be mounted to them on the inside. The center section will probably remain open. Good place to mount a fairlead for a winch tucked in the frame, in front of or underneath the battery, You know, the one you win for first place in the build off, LOL!! Plus I have a bumper sticker to put on one of the steel plates.
Plans for the next post are going to be awesome. Don't want to miss it.....
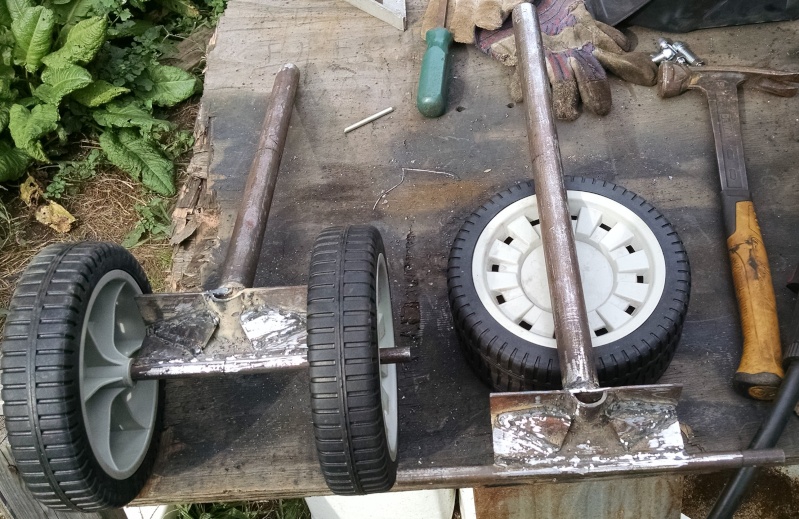
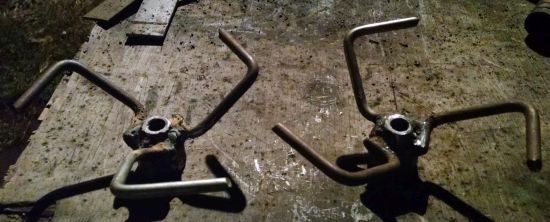
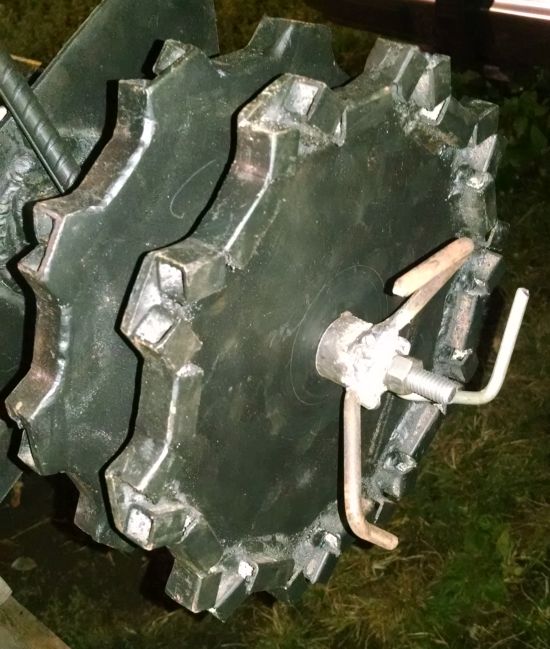
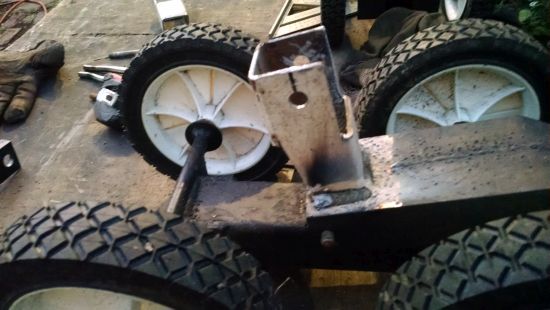
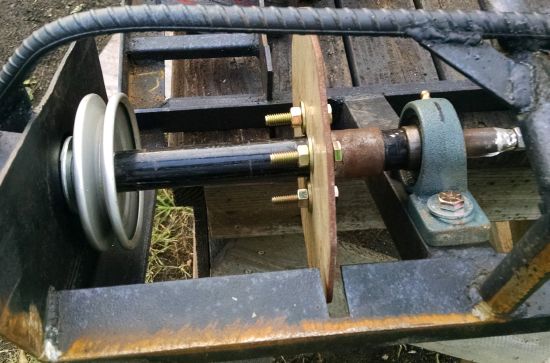
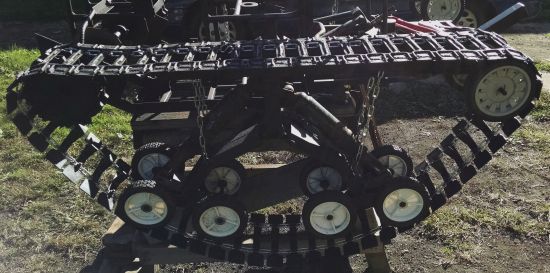
Hay People, Been slaving away on this thing. Here's a little something I did while working on the next set of pics. Took about an hour to do. While I was putting the sprocket axles in for mock up, I needed to put something on the end of the axles to hold the axles in place so I made spinners.
How I made them was pretty simple. I made a spacer to go on the end of the axle and welded a washer to the spacer to center it. I then welded a bolt to the end of axle to hold the spacer on. Seemed pretty plain so I figure I'd do something a little extra to give it that extra touch. So I welded a nut to the washer on the spacer to start out, so now the spacer will screw onto the axle shaft. I had some extra cleats left from making the tracks. I made a quick jig to hold the spacer straight up. With the nut welded on, a nut has 6 sides, so that's how I evenly spaced the prongs. Every other side of the hex on the nut got a prong. Welded the prongs onto the nut on every other piece of flat side of the nut. The prongs point forward on both sides of the sprocket axles. They're not the best looking parts but they do look cool. They screw on and put another nut on to lock them in place.
They don't hang out past the tracks but you can still see them with the tracks on I think at this point.
mr.modified Veteran Member
2015 Build-Off Top 3 Winner
2015 Build-Off Top 3 Winner
2016 Build-Off Top 3 Winner
2016 Build-Off Top 3 Winner
2018 Build-Off Finalist
2018 Build-Off Finalist
2022 Build-Off Entrant
2022 Build-Off Entrant
2500+ Posts
2500+ Posts!
1st Place Build-Off 2014
1st Place Build-Off Winner 2014
2023 Build-Off Entrant
2023 Build-Off Entrant
Age : 34 Join date : 2013-11-02 Points : 6955 Posts : 2906 Location : New Jersey USA
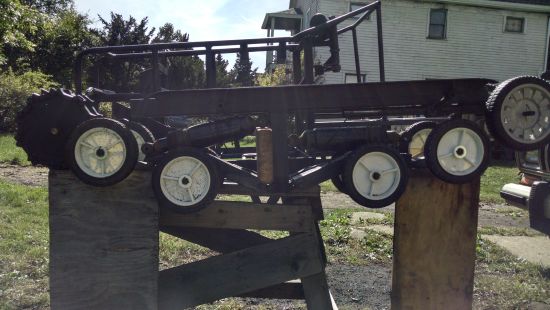
Hay People, OK, time to work towards something that will make or break this build!!! Getting the tracks on this thing!!! I got a lot of pics too, so numerous posts. Up late again, LOL.
I start with getting the shocks on the A-frames. Got to figure travel, minimum and maximum. I figured about 7 inches in front and 6 inches in back. I'm sure these numbers will change but it's a place to start.
Here I got the shocks sitting in place set for around minimum travel. Figuring out the mounting on the frame
Made the brackets for the shocks. front shocks will be lower on the frame to make room for the tensioning rod linkage
Next 2 pics. Me just seeing what the limits are and what will hit.
Burned in the brackets on the frame.
Made the back shock mounts on A-frames. Just the square tubing that I been using, notched out for the shocks and bogie clearance.
All 4 bogies are like this with full movement. I figured why not, LOL.
Threw the shock on. This is the front shock as far as it can go, trust me that the shock has more but will probable tear apart if it ever does go this far. Limit straps are going to be a must!! Plus only the front tires of the bogie will be on the tracks and the back 2 raised off the tracks, not good.
Front suspension compressed almost at its limit. If it goes too far it will hit the tensioning rod for the front wheels.
The back suspension compressed at its limit. Too far here and will hit the sprocket with the guide channel. Trying not to bend the guide channel out of the way to clear if it ever comes this close. The openings to the guide channels work great as is and I don't want to change them.
Shocks are on and this is the minimum travel limits for the front and back.
This is the front and back suspension at max travel. Just looks mean to me.
Here's the vid of the work so far.
mr.modified Veteran Member
2015 Build-Off Top 3 Winner
2015 Build-Off Top 3 Winner
2016 Build-Off Top 3 Winner
2016 Build-Off Top 3 Winner
2018 Build-Off Finalist
2018 Build-Off Finalist
2022 Build-Off Entrant
2022 Build-Off Entrant
2500+ Posts
2500+ Posts!
1st Place Build-Off 2014
1st Place Build-Off Winner 2014
2023 Build-Off Entrant
2023 Build-Off Entrant
Age : 34 Join date : 2013-11-02 Points : 6955 Posts : 2906 Location : New Jersey USA
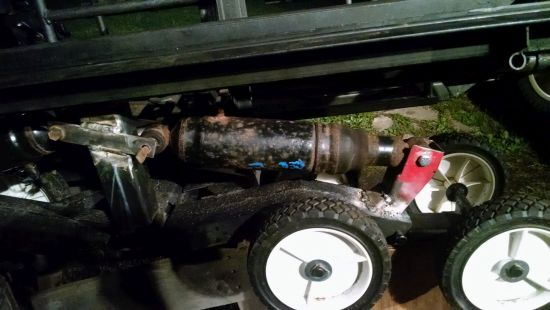
Air shocks, I pulled them off a 2002 Pontiac mini van. Only the top of the line ones have the air shocks with automatic leveling system on them. So if I wanted too, I can get the air compressor for the shocks also and hook it up for my own ride control system down the line. Right now the shocks will be individually filled up.
Hay People, That time again, lets move forward.....
Got the back end put back in so I'll do a little more work on it.
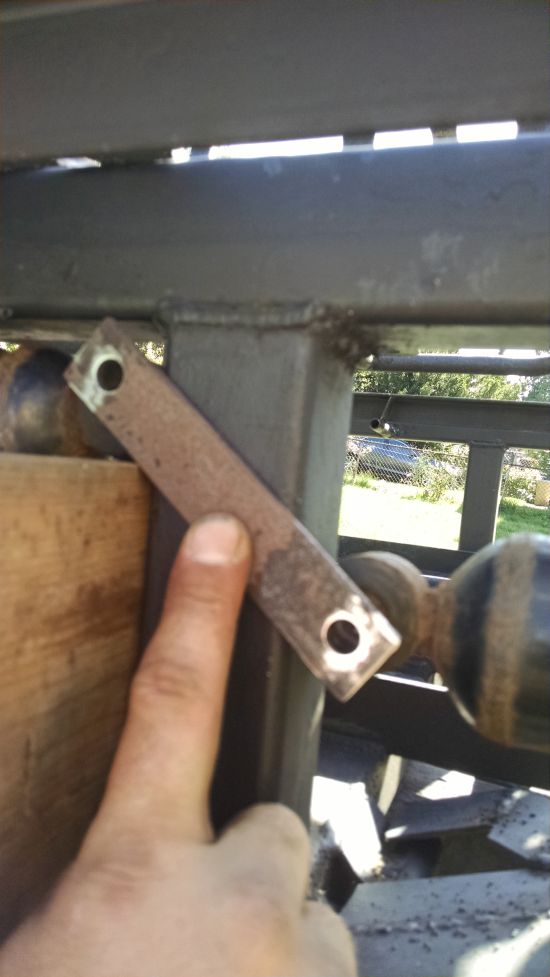
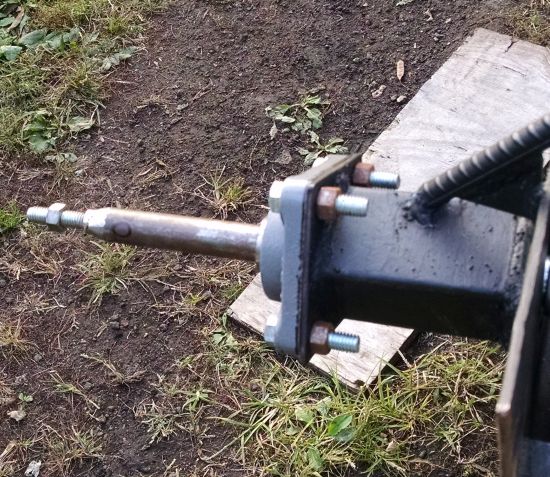
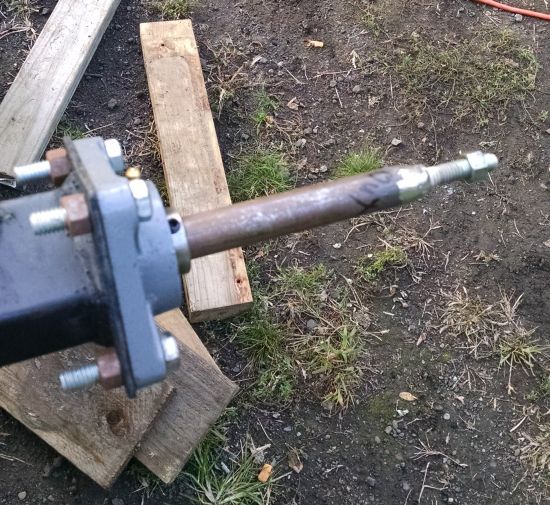
So, I take it back apart, LOL, to weld bolts on the axle ends. Don't want to use lock collars for anything because they leave marks on the axle shaft. A mark on part of the shaft will make it week, that's right, if there's even a scratch on them, that's a potential spot for a stress fracture. Any smooth surface is a stronger surface then a surface with a rough skin. The plan is to make spacers from 3/4 black pipe to fill in all the gaps from end to end. I need to keep the axles as strong as possible since they're only 3/4 inch. And that's why I got the axles sticking past the sprockets and inside bearing so when I welded the bolts on, if the welding weakened the ends of the shafts, the ends are not near anything really.
To fill the shafts with spacers I'm going to need end caps basically put on the ends of the axle shafts.The outer ones got the spinners and inside ones got end caps
The middle spacers made. No pics of the inside end caps but just the pipe with a washer welded to the ends of the pipe with a double nut to lock them. The spinners were made with nuts to screw onto the outer ends with another nut to lock them.
Next step are the limit straps so the shocks don't overextend, if they do, something will break. I use left over chain from the tracks, well, thought they would look cool. I weld the chain directly to the A-frames on both sides of the A-frame, then on the top guide channels I welded on bolts. The chain goes on the bolts and held on with a nut. The last link in chain on top is the max ride height and to lower it all I have to do is dump air in air shocks then remove the nut and pick a link in the chain to lower the ride height and air up the shocks.
I figured I would start with this. Turning an air shock into an airbag with shock. It's a small airbag but I find out it does work for sure, I have to put about 100 psi in each of them but they do take the weight amazingly well with adjustability to spare. My ride takes 4 of them. I figured the airbag would be easier to adjust and help control ride height but the limit straps take care of ride height. An unforeseen outcome.
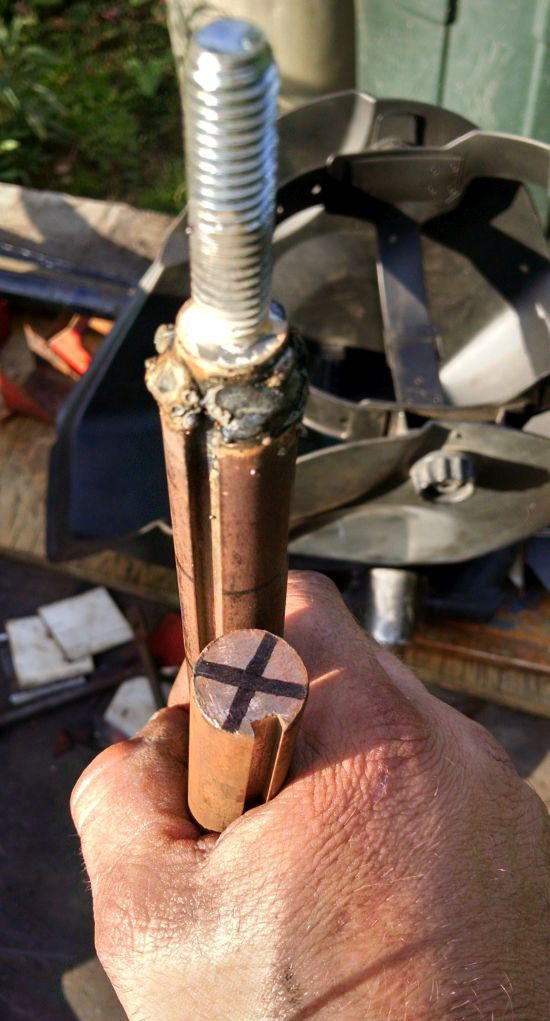
Anyways, each air shock will have it's own valve. I get the valves from old rims by cutting the valve stem out of them by the rubber part. I clean the rubber off the valve stem and the valve itself is made of brass. The plan is to solder the valve into the air shock air inlet.
I first remove the little valve part from the brass housing because there is a rubber seal on it. This leaves the valve housing to be able to solder without damaging it. I then prep the shock by drilling the air inlet bigger so the valve housing fits inside and drilling it also cleans the steel for soldering. Coat the 2 parts with flux and is ready to be soldered in place.
Pic of the valve housing soldered in place. I reinstall the valve and is ready to go.
Next few posts will be of the tracks being put on and testing them. It's late and I have to work tomorrow so tomorrow I'll post maybe , LOL.
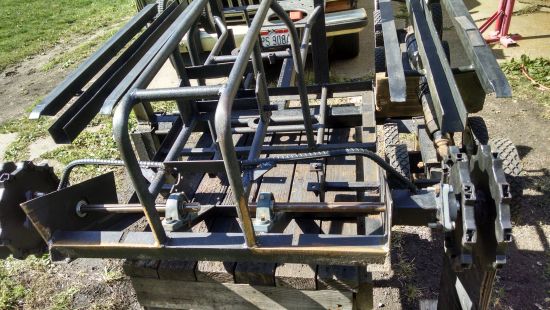
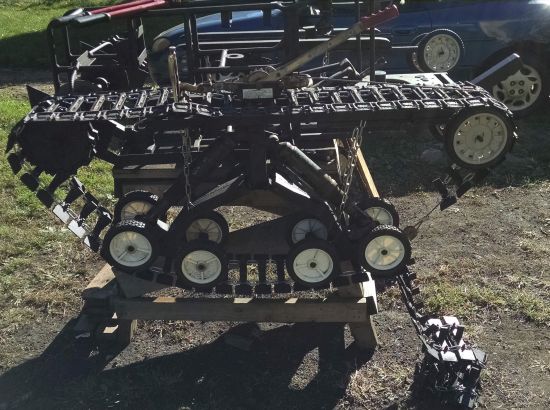
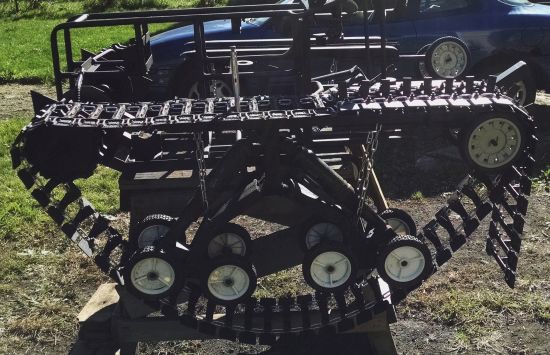
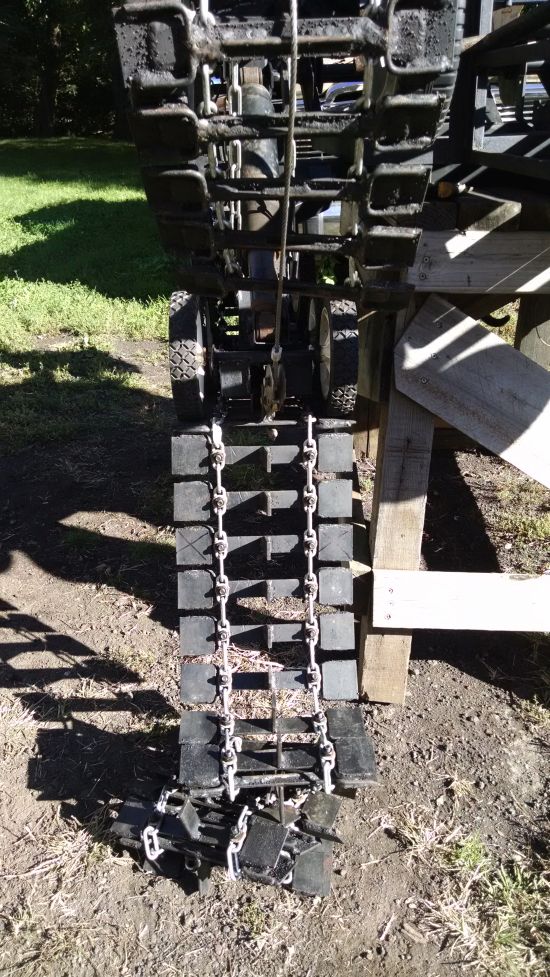
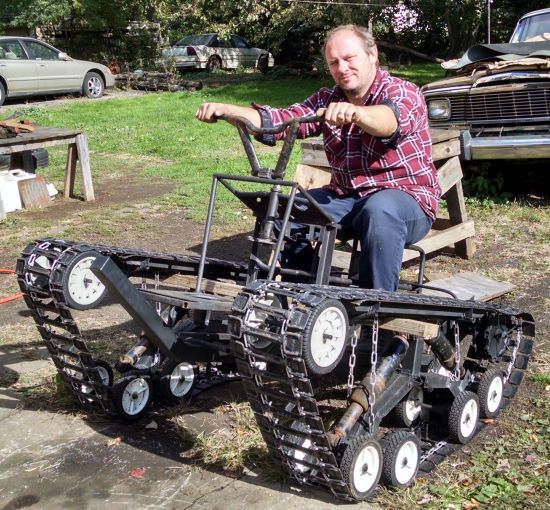
Hay People, Time to get the tracks on!! I do one track in this post. I need to figure out how long it needs to be and if the sprockets are going to work with them.
After wrestling with the track I grab a cumalong to help hold it on. Tighten it up till it starts loading the shocks and wrap it in the front eventually.
I mark an X on the track at where I think I need to cut it but turns out it was one track plate after that on. There's a total of 55 track plates on.
I cut the chain and put on the master links to make the complete track.
Here are the left overs. 19 extra track plates.
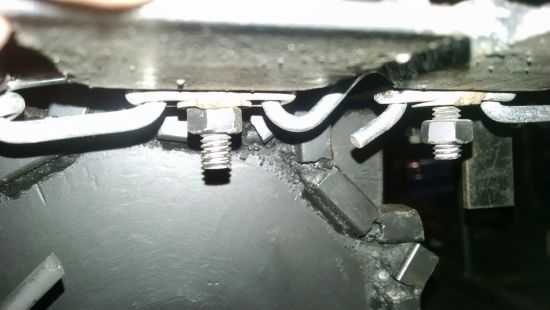
After trying it out, the track was drooping on the bottom so I made a make shift tensioner for the front wheels to extend them, to tighten up the tracks. I have a successful test at the end. Here's a close up of the master link. After doing the test I find out that I forgot to tighten up all the bolts for every track plate, ops.
I go back and tighten all the bolts and give another try with spinning the tracks and they work even smoother.
mr.modified Veteran Member
2015 Build-Off Top 3 Winner
2015 Build-Off Top 3 Winner
2016 Build-Off Top 3 Winner
2016 Build-Off Top 3 Winner
2018 Build-Off Finalist
2018 Build-Off Finalist
2022 Build-Off Entrant
2022 Build-Off Entrant
2500+ Posts
2500+ Posts!
1st Place Build-Off 2014
1st Place Build-Off Winner 2014
2023 Build-Off Entrant
2023 Build-Off Entrant
Age : 34 Join date : 2013-11-02 Points : 6955 Posts : 2906 Location : New Jersey USA
Yes!!!! Now you have some extra track sections you can bolt on the front like they do with tanks. Just in case you run over a mine and a long section is damaged. Looks good.
Yes!!!! Now you have some extra track sections you can bolt on the front like they do with tanks. Just in case you run over a mine and a long section is damaged. Looks good.
Thanks. I was just thinking about that the other day. Maybe if the theme fits. Don't quite know what I'll be doing yet with the hood and body panels. I'm just buying steel and putting it up till its time right now.
mr.modified Veteran Member
2015 Build-Off Top 3 Winner
2015 Build-Off Top 3 Winner
2016 Build-Off Top 3 Winner
2016 Build-Off Top 3 Winner
2018 Build-Off Finalist
2018 Build-Off Finalist
2022 Build-Off Entrant
2022 Build-Off Entrant
2500+ Posts
2500+ Posts!
1st Place Build-Off 2014
1st Place Build-Off Winner 2014
2023 Build-Off Entrant
2023 Build-Off Entrant
Age : 34 Join date : 2013-11-02 Points : 6955 Posts : 2906 Location : New Jersey USA
Should be interesting to see this thing in operation. The track setup for the most part seems pretty bullet proof, I don't think there will be any issues. I might finally have to try making something with tracks. Maybe on a smaller scale than this though.
Should be interesting to see this thing in operation. The track setup for the most part seems pretty bullet proof, I don't think there will be any issues. I might finally have to try making something with tracks. Maybe on a smaller scale than this though.
Yah, I can't wait to get it going. Busting tail just to make the deadline. The tracks I wanted to overbuild because later on I will be putting bigger engines and trans in this thing so I wanted a good test bed. The only thing I'll have to worry about is the sprocket axles later on since they are 3/4 inch axles, but for the build off I should be fine. There are a bunch of track designs out there, some more simpler then mine and easier to build with different materials. Cost for mine is about $40 to $45 for a foot of track of being all steel. Definitely need determination on a project like this and is a long term one too. Hope you try it, you won't regret it.
Hay People, A quick video just for the forum on how I modified the air shocks for this project. 4 shocks and individually controlled for tuning the suspension.