Looks absolutely fantastic man! Good work. Is there going to be big guards by the track for your legs?
Yes, guards for legs and will probably cover some of the tracks on top too. Safety rules probably going to require guards anyways so I got them in the plans anyways. Plus skid plates in certain spots also.
Got 24 pics, so 2 posts this time. try to get them done tonight, with video of work at the end. I got alot done last week and the weekend. Saturday was out till midnight working on this till it started raining. I even got shocked by my welder Wednesday. NEVER WELD IN THE RAIN!!!!!! That rang my bell, LOL!!!
OK........
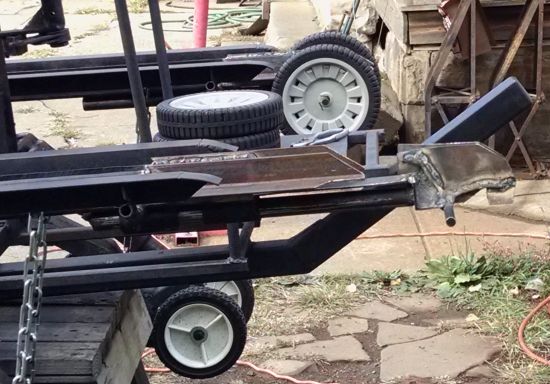
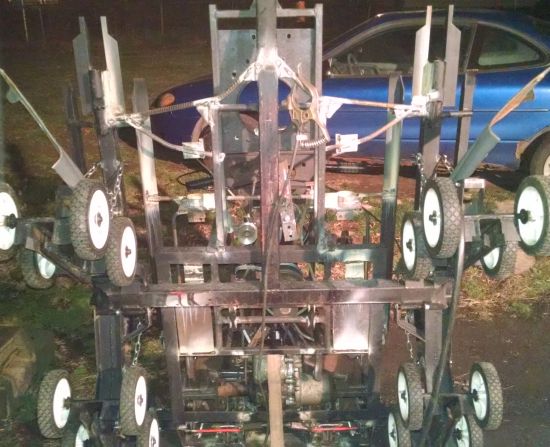
I need guides on the front wheels to hold the tracks in the center, to keep the wheels from wanting to roll over. So I start with the extensions on the guides on the frame using angle iron. They extend to the almost past the front wheels. These also hold the wheel axles from wanting to roll over.
I use the 2x4 to evenly space the extensions. worked out great. Then I burn them in.
A sacrifice for the cause. I use a riding mower body for the steel plate. It's the riding mower I got the gearbox out of, come to think about it.
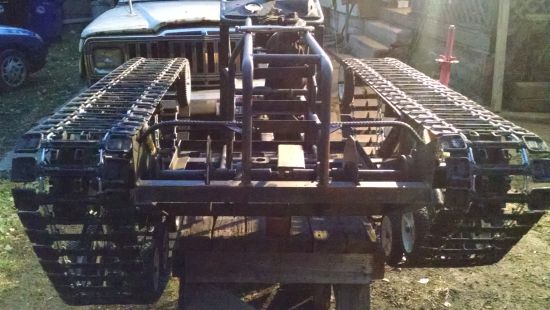
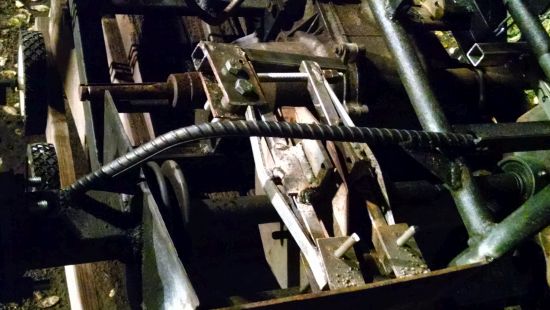
These are the front guides that go in between the extension.
I burn in the guides and reinforce them with 1/4 inch round stock. I need something to hold the wheels strait when they past the extensions. If you look close there is a flat piece of steel that slides in and out of the guide channel and is welded to the back side of the axle assembly. This allows the wheels to extend the whole 8 1/2 to 9 inches. The wheels will only need to extend that much when the suspension is fully compressed. The guide extensions I welded to the guide channel are for when the suspension is fully extended to climb over obstacles, and when the suspension is fully compressed would be for riding on flat ground only.
Side view of the assembly.
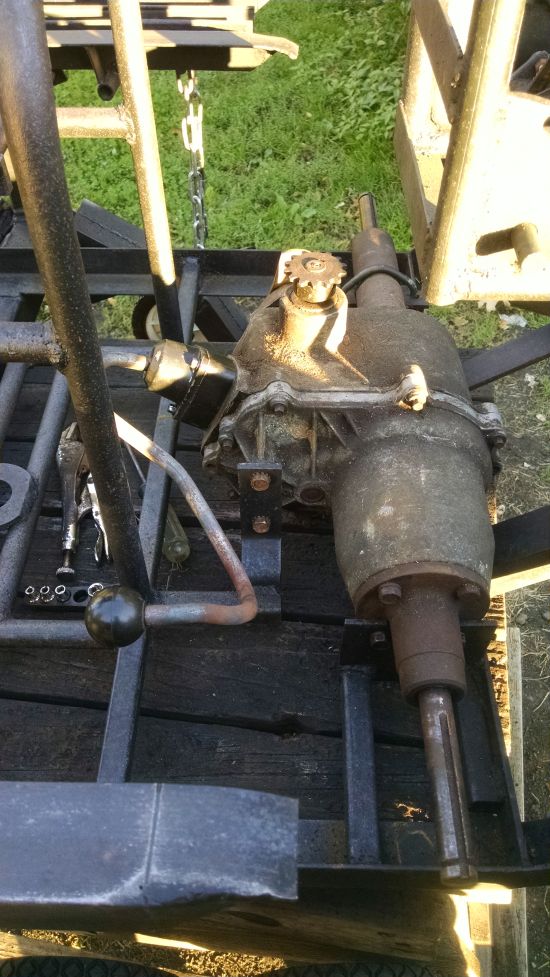
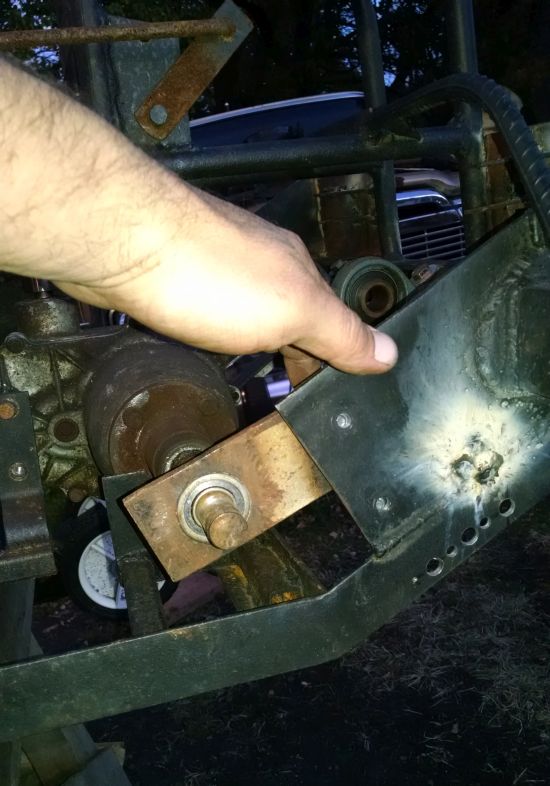
I mount the gearbox and try to do something with the shifter. I bend it to the left side and place it by my foot. I will probably move it alittle more far back because it's hitting my foot in certain gears.
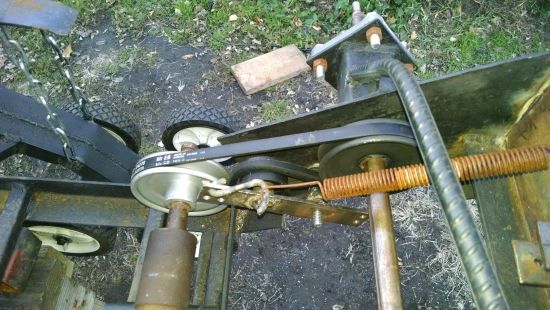
I searched high and low for the right automotive belts for half a day Saturday but everybody was out so I went to Home Depot for a couple of utility belts for the gearbox to drive sprocket pulleys. I'm probably going to snap these but worth a shot. I can always switch them out later.
I make the belt tensioners and work out everything. If needed I can put 2 springs on the belt tensioners. I get belts that are a little big to get better coverage on the pulleys.
I made these gearbox axle supports 4 years ago and finally get to use them.
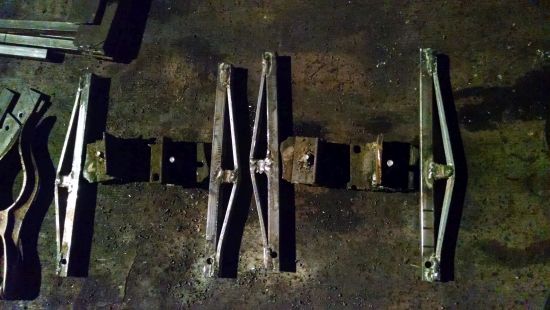
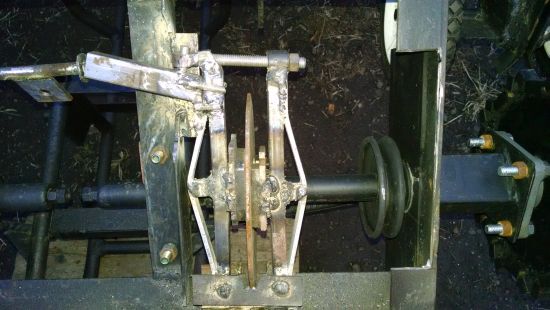
Time to make the brake calipers. I need 4 of them and buying them is out of the question so I need to make them. I looked on You Tube for an idea and came across this guy's setup for his racing mowers. Real simple to make and real cheap in cost. Can even make them stronger or weaker by playing with the levers and pivot points to tune them in, in 3 key spots.
I need brake pads so I go to the auto junk yard an rip off a set off a Ford Escort because they are pretty much flat. I need to cut them in half to fit on the rotors. Then weld a flat piece of steel to them to help keep the heat off them from welding. In this pic, the bolt welded to the steel is not necessary for this, I was trying to do something but didn't work.
Here are the caliper arms. Made from 1/2 inch square tubing with a reinforcing strap on them. I do this to all of the arms. One side needs to be mounted to the frame and be able to move because this is the pivot point. Moving this pivot point closer to the brake pad increases leverage. I keep this to 1 to 1 on my setup. I use pins to hold them in place for easy maintenance but bolts can be used on other setups. I will be putting a cover over this and will hold the pins in place. To weld the brackets to the frame, the brake pads need to be flat on the rotor.
Here's the rest of the setup. The all thread is used to adjust the arms when the pads wear down by the side with the nuts. The other side has a washer welded to it to make another pivot point for the brake lever. The brake lever length is the 2nd leverage point, simply make it longer for more leverage or shorter for less leverage. The brake lever has flat stock welded to it (top and bottom) at 90 degrees to work the arms through by using the all thread. A bolt goes through the flat stock and the washer on the all thread, and the second bolt which is the furthest away from the brake lever, has a roller on it for another pivot point, the 3rd leverage point, simply move the roller further away from the washer on the all thread for less leverage and closer for more leverage.
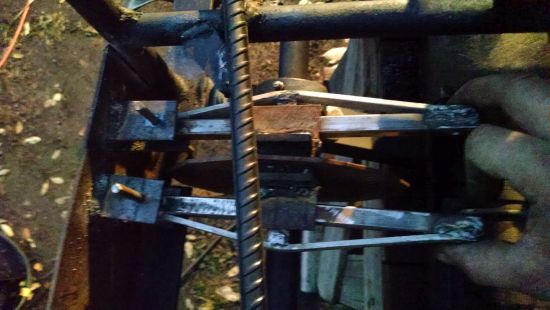
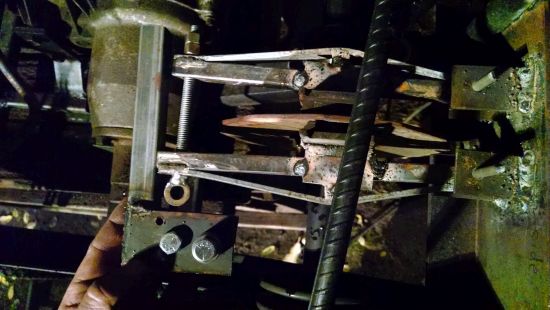
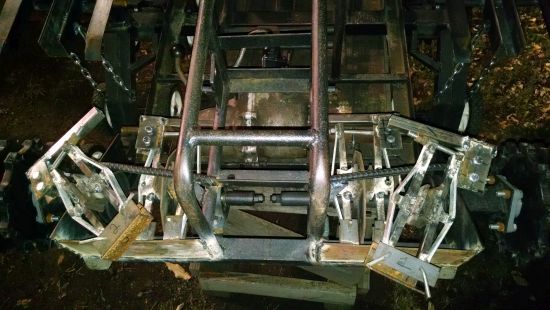
The caliper assembled and mounted in the frame. These brakes are for steering.
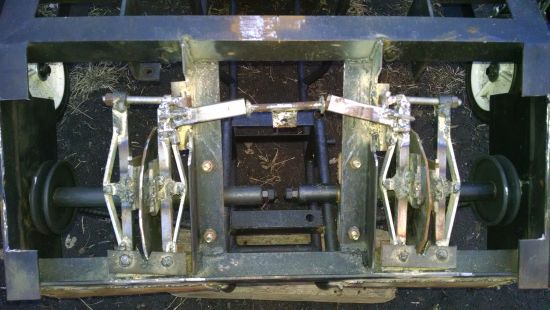
These brakes will be for stopping. Here's the arms with the pads and frame bracket. 1 Completed assembly Both completed assemblies. All 4 of the calipers. I had a little problem fitting the calipers under the frame so I had to remake the brake levers and slice and dice the frame but it was worth it. They fit in there real nice.
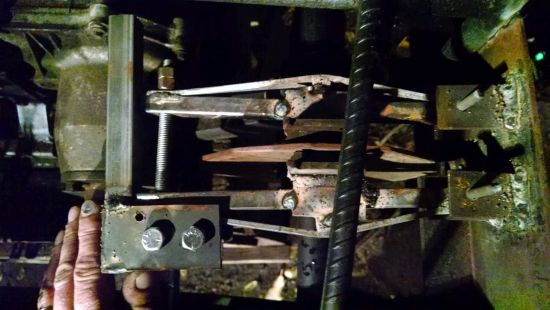
Pic of the belly with the calipers in place. To work the brakes at the same time there is a bar that goes from one brake lever to the other and in the center will be where the cable goes. I got this idea from a circle track racer.
Here's the video of the work and a better example of how the brake calipers work.
Hay People, Here's the weeks pics. Just a couple for now.
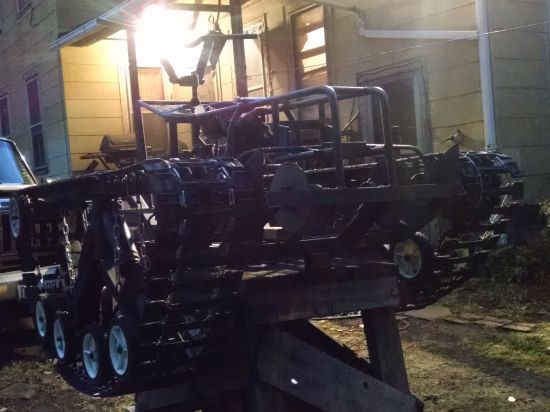
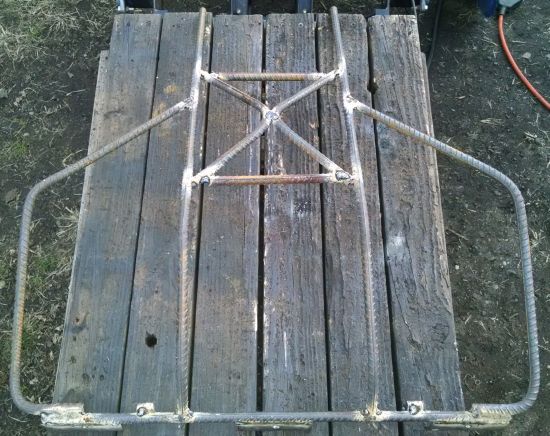
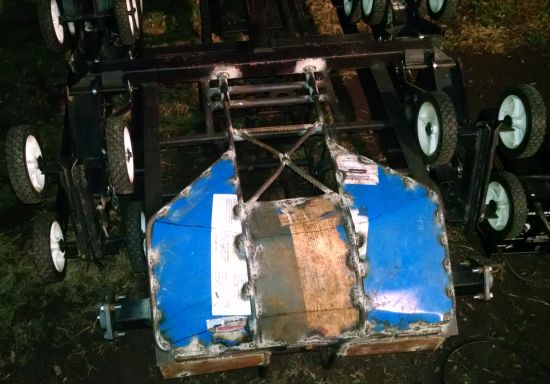
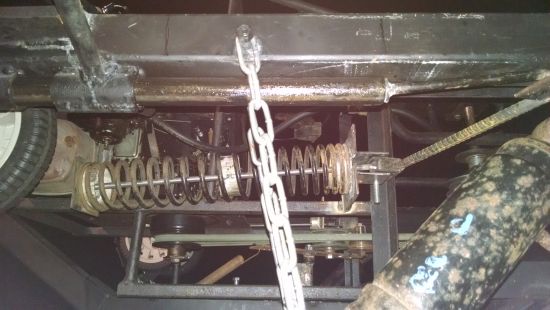
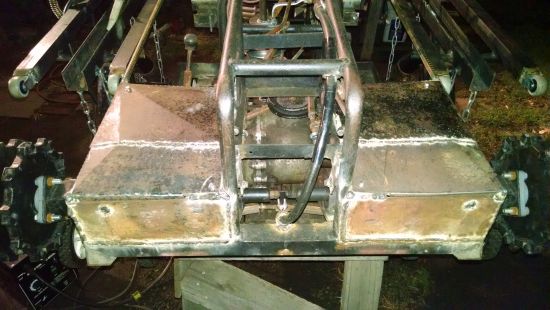
Made the back bottom skid plate. I used rebar and the lids of 55 gallon steel drums. Steel is getting harder to get. Seems it takes a lot of steel to build a tank, LOL. The skid plate holds the brakes in the frame, covers the clutches, and protects the gearbox.
Pic of the centrifugal clutch. It's a Hilliard heavy duty one for a V belt and it's the one with a bearing for the pulley. I used anti seize to put it on the engine in case I have to take it off again.
I did the mid shaft with 2 pulleys for the engine. No pulley swap here, there already on the mid shaft. Engine to mid shaft can be either 1.5 to 1 or 1 to 1. And from the mid shaft to gearbox is over driven with a 5 inch on mid shaft and 4 1/2 inch on gearbox.
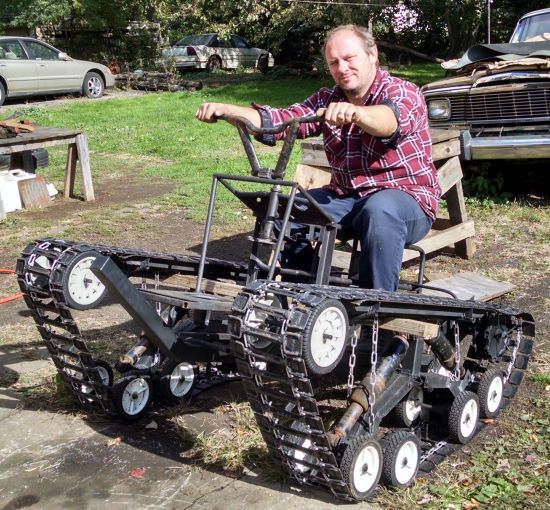
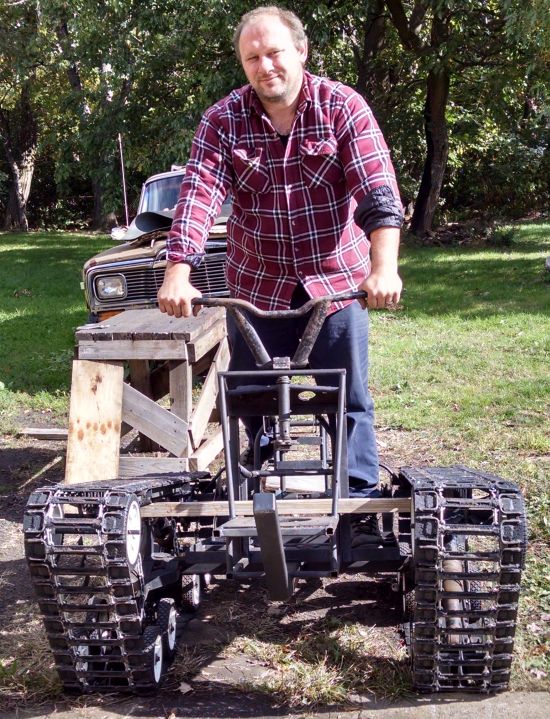
Guess what I'm working towards/
mr.modified Veteran Member
2015 Build-Off Top 3 Winner
2015 Build-Off Top 3 Winner
2016 Build-Off Top 3 Winner
2016 Build-Off Top 3 Winner
2018 Build-Off Finalist
2018 Build-Off Finalist
2022 Build-Off Entrant
2022 Build-Off Entrant
2500+ Posts
2500+ Posts!
1st Place Build-Off 2014
1st Place Build-Off Winner 2014
2023 Build-Off Entrant
2023 Build-Off Entrant
Age : 34 Join date : 2013-11-02 Points : 6956 Posts : 2906 Location : New Jersey USA
Thanks, it was made at a whim with scrap metal from work and left over rebar from something. I asked my boss for the barrel tops and told him what I was using them for, now he wants updates and he keeps making tank jokes, LOL. I'm like "Tanks alot". The calipers, I never used this design until now. Original plans was with drum brakes but after building my mini bike with a drum brake on it, I had my doughts. Haven't done the math on the leverage part yet on these calipers but after playing with them, they seem to work pretty good.
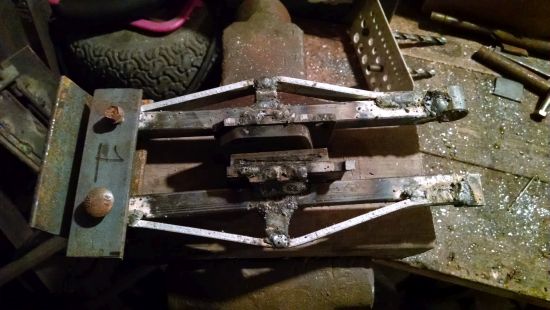
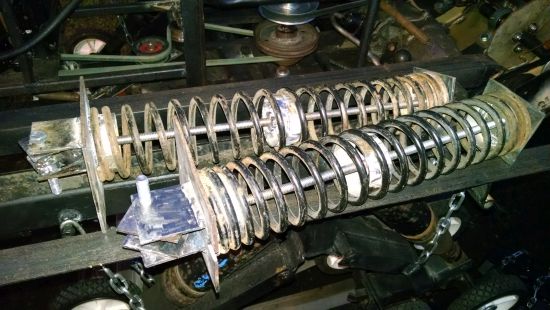
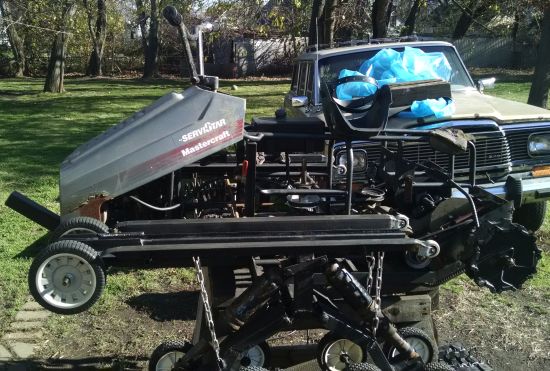
Got a couple pics this time before they add up to make it easy and quick. I start the track tensioners that are going to keep the tracks tight when the suspension cycles. So far all the testing was done with the front wheels fixed with something just holding them. I should be able to reach my goal on the front wheels being able to move under tension the whole 9 inches. For parts, I got 2 springs from a kit that you bolt to shocks to help with loads in back of a car of truck. The rest of the parts are, 1/8 plate steel for the main structure, rebar for the arms, all thread for holding and adjusting springs and load tension. exhaust pipe for spring holders.
The plan for this weekend are the tensioners built and mounted. bracing of the chassis and suspension since all major parts are mounted, and start on the controls
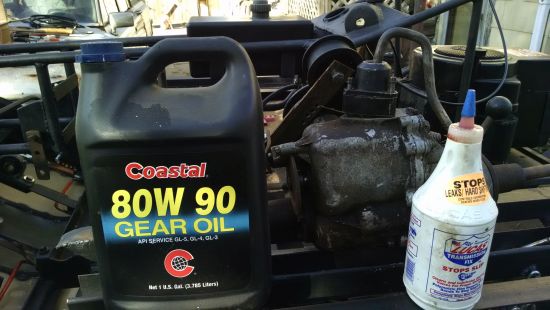
I forgot this one in my last post. Just what I filled the gearbox with.
MatthewD Veteran Member
1000+ Posts
1000+ Posts!
2015 Build-Off Entrant
2015 Build-Off Entrant
2016 Build-Off Entrant
2016 Build-Off Entrant
Age : 22 Join date : 2014-11-16 Points : 5546 Posts : 1993 Location : Northern Ireland
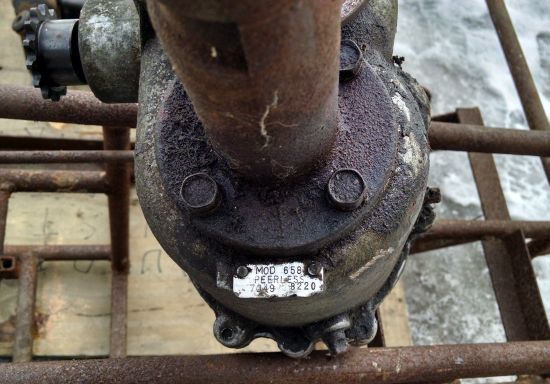
Just wondering, what Gearbox is this? Looks unusual
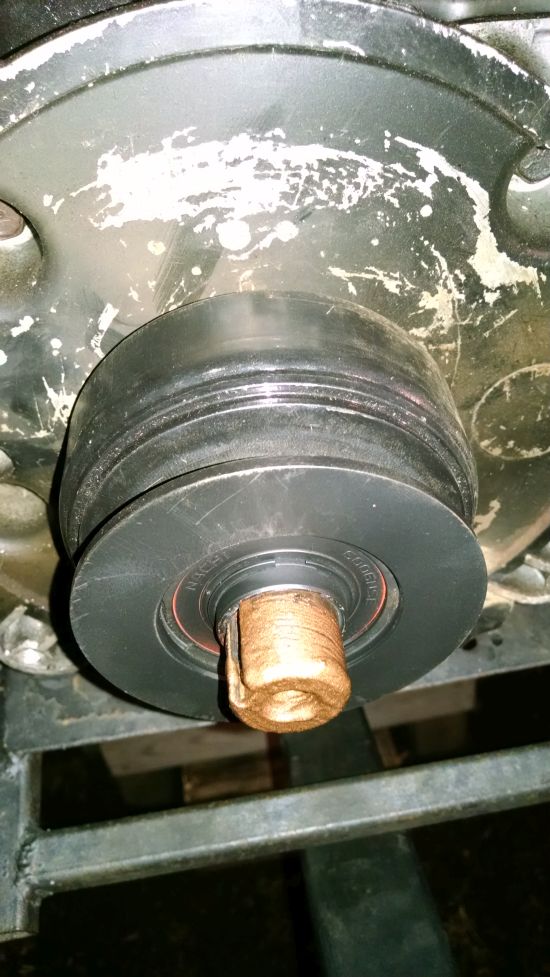
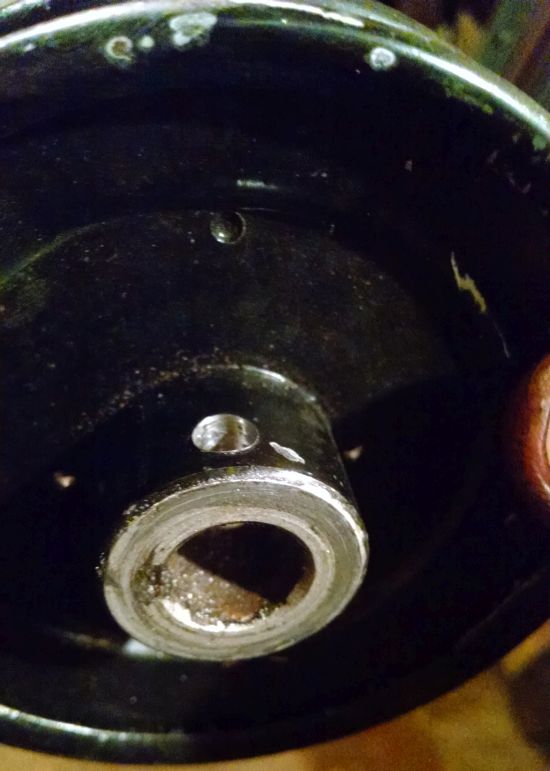
It's a Peerless. Pic with the tag on it. Numbers are-7049, 8220, and 658.
Came out of a Craftsman 10hp Lt riding mower. Not the strongest gearbox but I do have 3 of them collected through the years. Only thing I did to it was clean it out and locked the output axle.
MatthewD Veteran Member
1000+ Posts
1000+ Posts!
2015 Build-Off Entrant
2015 Build-Off Entrant
2016 Build-Off Entrant
2016 Build-Off Entrant
Age : 22 Join date : 2014-11-16 Points : 5546 Posts : 1993 Location : Northern Ireland
Hay people, I got pics on the track tensioners, possible hood, and the start of the control linkage. And away we go......
So all track testing was done with the front wheels locked. I plan on not even thinking about track slop or sag or whatever you want to call it, in any ride height I plan on driving at. Pretty much, I only want to drop it, pick the links on the straps and fill the shocks back up. To do this I need the front wheels to move on there own.
How I designed the tensioners... I, in a perfect world, would have a full machine shop in my basement (yah right!!) but this is the real world so.... I designed the tensioners from parts I have collected over the years and aquired recently. A set of spring helpers from a striped car from somewhere I can't even remember. Plate steel I got from my job from a boss who demands updates now, LOL, and won't stop making tank jokes at my account everyday now, Oh Boy!!! All thread and bolts from Home Depot, the workers who help you find that part still look at me funny when they ask me what are you using that for, LOL. I bet Home Depot would band me for life if they found out what I was building with their merchandise. Trust me, that day is coming, LOL,,,,,, I'll just go to Lowe's then, LOL.
Those are the parts I got. To make it more difficult there's limited space in the chassis for these to fit and the size of the springs made me rethink how to mount the tensioners in the chassis. I originally planned to have them under the dash but no go, the linkage made it impossible to do.
Back to the design of the part at hand. The arms need a steady pressure forward, so the springs need to move as little as possible, about an inch of movement on the springs. The arms pushing the front wheels need to move about 8 inches, and finally need to be able to adjust the pressure on the arms which is where the all thread comes in. At this point I start getting a mental picture in my head. On to the pics......
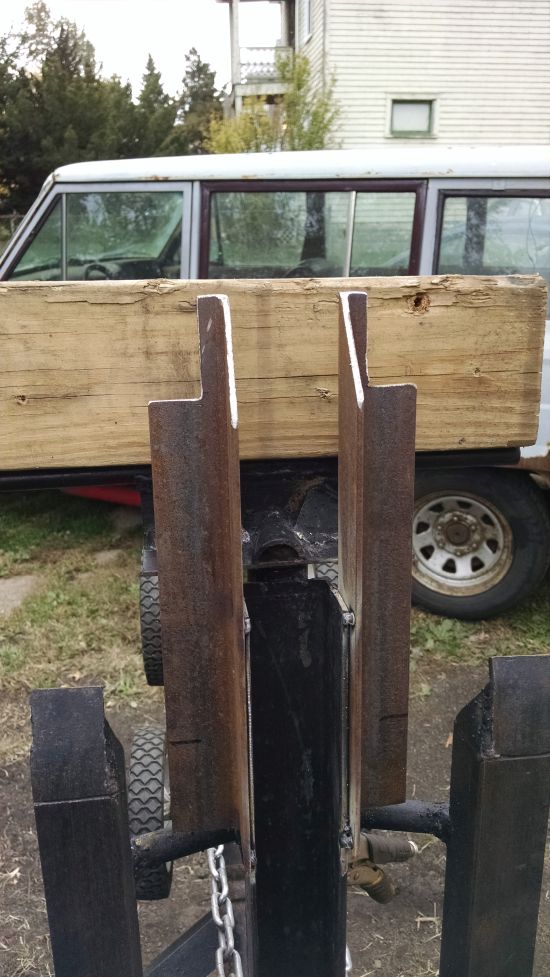
Here are the 3 main parts. Spring, main plate and arm. The spring has a backplate and a piece in the center of the spring to keep the spring straight, plus can use this center piece to hold another spring if this spring is not strong enough, and the backplate is where the adjusting comes into play by the all thread and a nut. The main plate holds everything together and gets permanently burned into the chassis. The arm will have, well the arm to push the front wheels forward (not mounted yet) and an arm that gets pulled by the spring and is the adjusting part and is what the all thread is used for.
Here they are together. The part in the center of the spring moves with the spring and holds the spring straight because a long spring wants to curl when compressed.
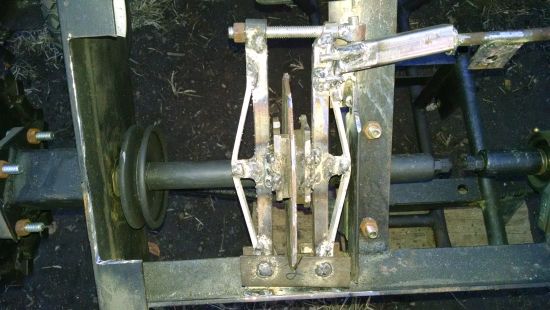
The main plate mounted in the chassis. More bracing will be necessary because there will be alot of pressure on the main plate. Bracing will be done when I brace up the whole front part of the chassis.
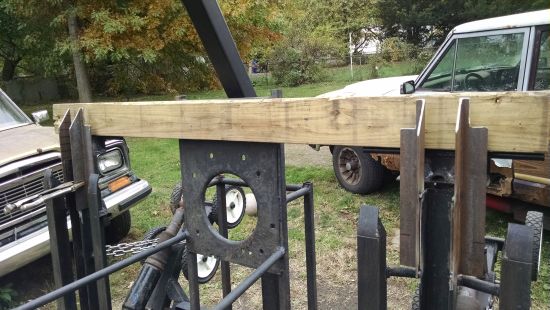
Pic of the linkage and a better vision on how it will all work. The all thread gets pushed forward by the spring which pulls the arm forward that is connected to the front wheels tensioning bar by linkage.
Completed tensioning system with all parts together.
Here's a top view. The spring is just held in place by the all thread and will be supported by the underside later.
The time I was working on the tensioners, I dug out a couple hoods. This one I kinda like because of the louvers on it. The other hood is not even worth mentioning. I left it on while working on this for a while and started seeing potential after slicing and dicing on it maybe. I got a couple more hoods but still on there mowers. Time will tell.
I start work on the controls for the tracks. I originally had the main rods coming from the handlebars going straight back and after thinking about it, "OOPS", how it would work like that, if I turned left, the vehicle would turn right. So I crisscross the main control bars. Now when I turn left, the right bar pulls forward the left controls, not the right. I want to pull on the bars, not push, so I don't have to worry about anything bending.
Alright, last pic... I start hooking up the steering brakes. Rods coming off the main controls and going to there calipers which are the calipers on top of the rotors. These brakes will be timed which means that these brakes only engage after the sprocket belt tensioners are pulled and the track is at free spin. The order will be drive/neutral/brake. The braking of these calipers is last and to adjust the timing will be done on the brake caliper arms with all thread and a nut to adjust this so the all thread slides through a piece of tubing until the nut is reached then pulls the brake.
I finished the stopping brakes but have no pics. Was too tired and was 11 o'clock and I had to work the next day. I use a hand brake on the handle bars and a cable all the way to the equalizing bar. The stopping brakes are the calipers under the rotors that are held in place by the skid plate. Pics will be later. Sorry no video yet either. Takes alot of time to do both and I need the time for building. Maybe next time just a video, we shall see. The clock is ticking, 12 days left at this point......
RevDogg Member
Age : 44 Join date : 2015-03-24 Points : 3363 Posts : 34 Location : Cabot, Vermont USA
I have to say, since joining the site and reading just about every thread/topic we have, I'm REALLY enjoying this build (also, your YT channel.. sub'd BTW). I'm having a hard time working out how the self-tensioning system you've got going here is working. Perhaps from the pics alone I'm just not able to get a good view of how you're overcoming the physics involved. I'm trying to work out the leverage. There must be something I'm clearly not seeing here as you've done a tremendous amount of work thus far and it's working out quite nice. I guess I'm going to have to wait for the next video. Sorry, just thinking(typing out loud) lol. Keep up the good work!
mr.modified Veteran Member
2015 Build-Off Top 3 Winner
2015 Build-Off Top 3 Winner
2016 Build-Off Top 3 Winner
2016 Build-Off Top 3 Winner
2018 Build-Off Finalist
2018 Build-Off Finalist
2022 Build-Off Entrant
2022 Build-Off Entrant
2500+ Posts
2500+ Posts!
1st Place Build-Off 2014
1st Place Build-Off Winner 2014
2023 Build-Off Entrant
2023 Build-Off Entrant
Age : 34 Join date : 2013-11-02 Points : 6956 Posts : 2906 Location : New Jersey USA
I have to say, since joining the site and reading just about every thread/topic we have, I'm REALLY enjoying this build (also, your YT channel.. sub'd BTW). I'm having a hard time working out how the self-tensioning system you've got going here is working. Perhaps from the pics alone I'm just not able to get a good view of how you're overcoming the physics involved. I'm trying to work out the leverage. There must be something I'm clearly not seeing here as you've done a tremendous amount of work thus far and it's working out quite nice. I guess I'm going to have to wait for the next video. Sorry, just thinking(typing out loud) lol. Keep up the good work!
Hi Revdogg, thanks for the comment and subscribing to my channel. The track tensioners are pretty straight forward. The bolt on the main plate is the pivot point and the arm has two joints after the bolt which means I am loosing leverage on the arm. The springs are pretty big and strong, get alot of movement from them and pressure, so about 200lbs of pressure on the spring means about 17 lbs on the end of the arm pushing the front wheels. There are other forces pushing the front wheels too, the tracks. The tracks are pushing the front wheels forward also. The pulling back force starts at the sprocket and ends at the forward most ground wheels, not the front idler wheels. Hope it helps, I'll make sure I explain it in the next video too. Thanks again for the comment.
Hay People, The plan starting Saturday is as follows, finish off the controls- all is figured out and all that is left is make 2 rods to hook up sprocket clutches. A couple of supports for the steering brakes. Brace up the front end. Mount hood, don't know which one yet, LOL. Then the rest of the covers. And all the fab work is done!!!! Tear it all apart and finish welding the frame, put back together. Then a test drive Wednesday. Paint and I'm done........ We shall see!!! LOL!
Hay people Did alittle work today before it started raining and then snowing and had to quit early. That just sucked!!! So, I worked on the controls for the sprocket clutches. Going forward was OK but reverse was a different story. Since from the gearbox output shafts to the sprocket axles are belts with spring loaded tensioners, going in reverse would just pull down the tensioners until the belts slipped and the pulley didn't have to move much for this to happen. I should have seen it coming. That's ok, NOT!! After kicking myself in the rear a couple dozen times, live and learn people. I'm pretty good at these kinds of problems and on the last kick I figured it out. I can solve this in the linkage. If the pulley doesn't move, it won't make the belt slip. Pretty simple, NOT!! But an idea is all I need.
OK there it is, the problem and an idea on how to solve it. I'm not going to completely solve this issue but I would be very happy to just be able to just backup off a trailer to unload this thing or backup from something to just turn around. I'm not looking to climb over obstacles in reverse or pull something. Just looking to get out of a quick jam or the likes of that. Even with my solution I see potential issues that can go wrong like the belts just stretching to name one main problem with how I plan to solve this problem.
On to how I plan to solve this. The belt pulls the pulley down so keep the pulley from moving by locking the linkage in place. Kinda hard to lock the linkage because it has to bend to work the pulley. But if the linkage from the rod that turns to the pulley arm is straight, then it is locked. The 2 part linkage from the turning rod to the pulley arm is straight then the pulley won't move. A stop in this setup will prevent over travel too. With this in mind, on to the pics.
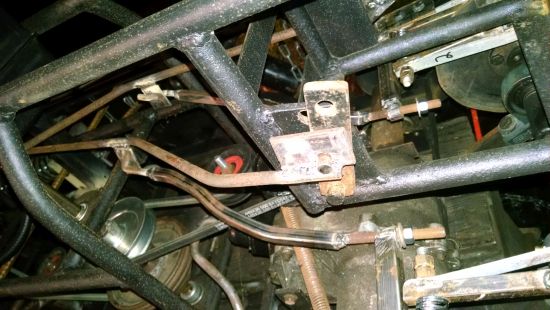
This part is adjustable to make for adjustments for when the belt stretches and is half of the link from the rod that turns to the pulley arm.
Ok, this is the setup. The rod that turns is the other half of the link. Note the 2 links are straight and that means if they are straight they have no direction to bend at the pivot point where the nut is. They are now locked. any pressure on the linkage here, will not make it move because it is straight and has no direction to bend where they connect. So the pulley won't move when I move in reverse. Plus won't move going forward either, this part might be good or bad.
The other side. If there are any bad problems with this setup, I can easily just adjust the one link to where it is bent with the other link for a regular linkage setup but with no reverse.
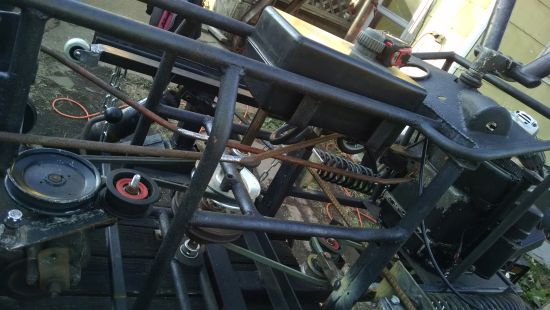
The other part of the linkage beside the area for the battery. At mid travel.
Here it is all the way back and the tubing from the chassis being the stop for the linkage. There's also a stop on the other arm to keep it from falling down.
Hopefully it will be nice enough Sunday to stay of track, LOL, for a test drive Wednesday.
Sorry People, the plan for a test drive crashed before it started, so it is post pone till Friday. After work and coming home to work on this, I just ran out of gas, plus having to get ready for the holiday my schedule freed up real late and was still too tired. So Friday is the new time, video will be later that night.
Since my last post I did get some work done though....
The weather was not being nice. First it was raining in the morning, then snowing, then cleared up, then snowed some more, cleared, then bigger snow or pea size hail. After the rain in the morning I just worked through it. What a day, I think it was Sunday. Oh, and cold the whole time. We got a saying here in Cleveland," if you don't like the weather, wait five minutes".
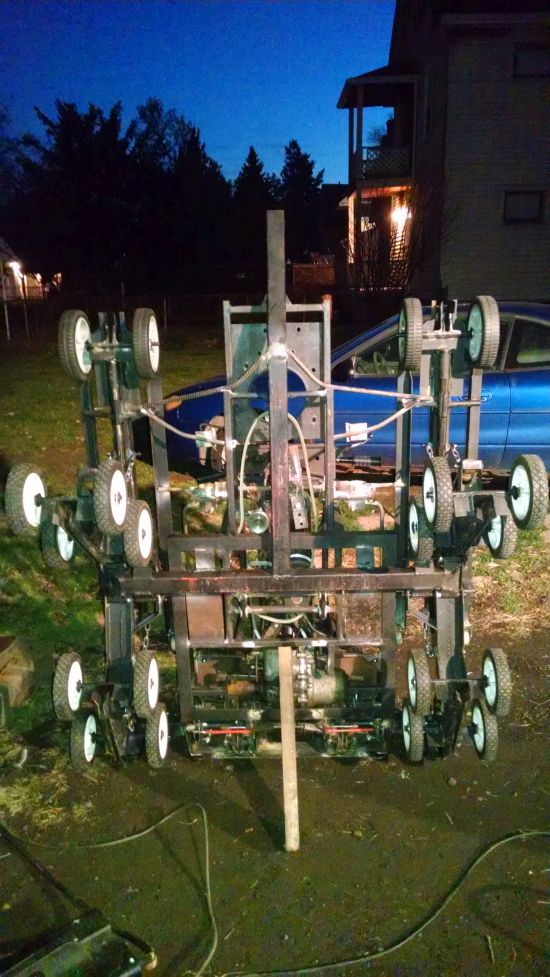
Ok, Monday night was better but still cold. I made covers for the drive system on top. I originally planed on 4 separate pieces but made more sense to connect the front with the back to make them strong enough to be able to stand on. To connect the covers I gusseted a couple corners and drilled and taped the gussets for a couple bolts to secure them. I now can stand on them.
It's a work in progress. I liked the louvers but not the rest because of the way it widened in front. So I square out the louvers and cut them out. More to come later as I do it. I finally got the image in my head to move forward. This was Monday at sun down.
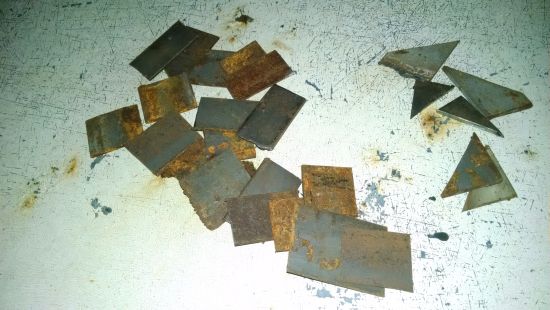
All those little pieces left over from the whole is saved for gussets. Gussets are the piece of metal that you add to reinforce the corner. Why make them when you're already making them. I got a box full of these. I think the cows will come home first before I run out.
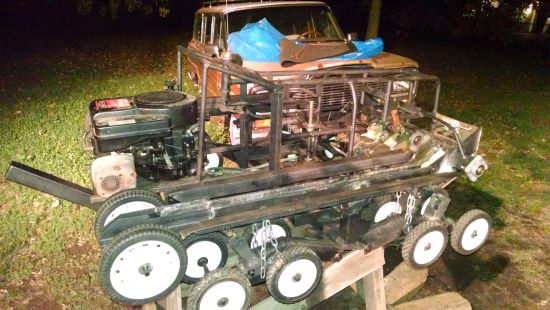
I pull the motor and a few other things to make it lighter (yah right, it's a frigen tank literally) so I can get it off the table, luckily my kid walked by and gave me a hand. We stand it up on the back end so I can weld up the bottom parts I couldn't get to earlier.
All the white spots is where I welded. The frame is now finished.
Since it's on the ground now it's staying there. I been working on the sprocket axles, adjusting the setup for the test drive, and for some reason I forgot to put keys in the brake rotor hubs, so to put keys in the rotor hubs I have to pull almost everything to get to them, Oh Boy!! Well that's where I'm at. This will be a long weekend to finish this project. TO BE CONTINUED................
1997 Murray Veteran Member
1000+ Posts
1000+ Posts!
2014 Build-Off Finalist
2014 Build-Off Finalist
2015 Build-Off Finalist
2015 Build-Off Finalist
2016 Build-Off Entrant
2016 Build-Off Entrant
Age : 25 Join date : 2013-11-13 Points : 5239 Posts : 1311 Location : NW USA
Man, your build is amazing. Definitely the most complex build of all this year.
Thank you, glad you like it. Yah, I kinda had an idea when I started but this past year or so, really got complicated definitely. The key to not getting overwhelmed with the whole project is to break down the individual systems to make it more simpler. This helps out alot.
Hay People, Sorry, no test drive today. Been raining bad all day so I been making other things today. Test drive tomorrow, most likely in the rain.
OK, I still didn't take the day off, I did get some things done.
I fixed the pulley from coming off on the gearbox input shaft with a set screw. I drilled and taped a whole, now it's good to not come off.
I also fixed the midshaft top bearing from spinning by center punching the inside of the bearing holder. This creates a little ant hill effect to bring up the metal from the surface to hold the race of the bearing.
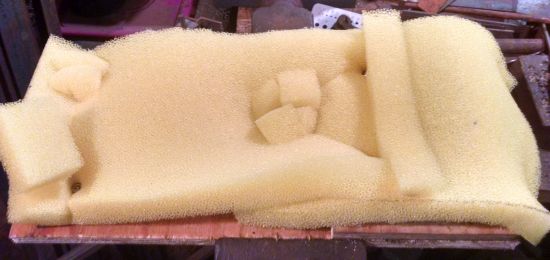
This is when it starts raining so I start making the seat. I make the base out of wood.
Add some cushion to it.
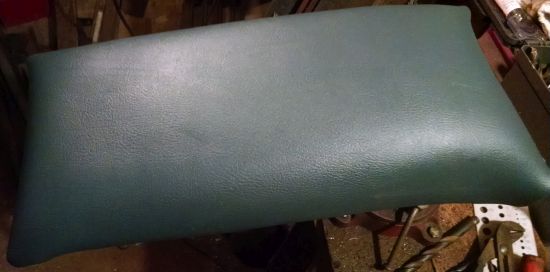
Then cover it in vinyl. Mount it with wing nuts so I can take it off easy to get to the battery.
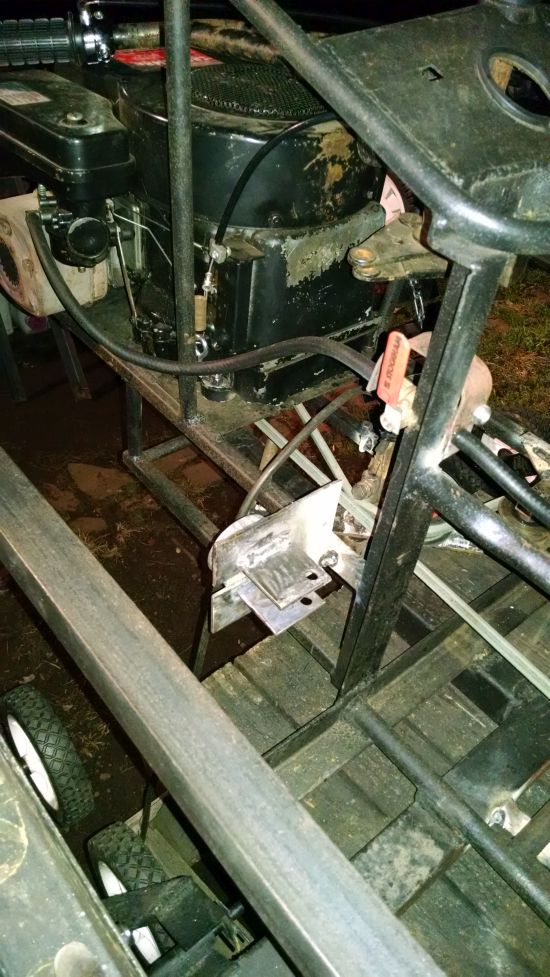
First thing in the morning, before fixing the pulley and bearing,I finish off hooking up the control arms after putting in the keys to the brake rotors and adjust all the controls to where I think they will work and tighten all the adjustment nuts. So after I finish the seat, I wait till about 8 o'clock, when the rain kinda stops, light drizzle now, and put the motor back in with all the bolts, hook up throttle and gas line. Put the midshaft back together. Put the belt back on from motor to midshaft. The driveline is now all together.
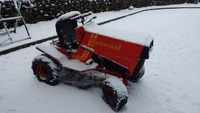
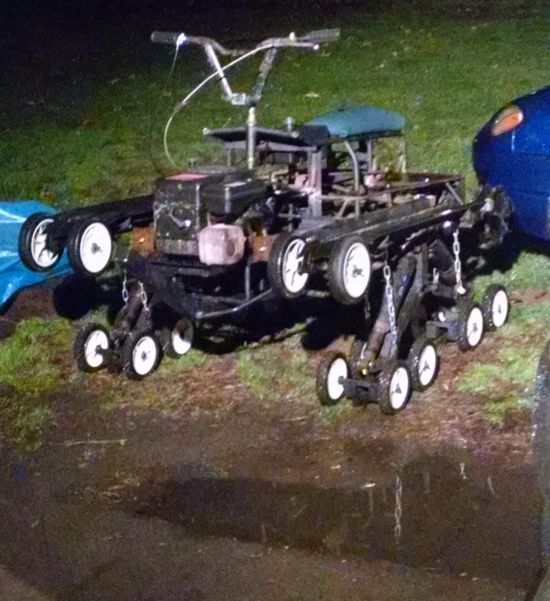
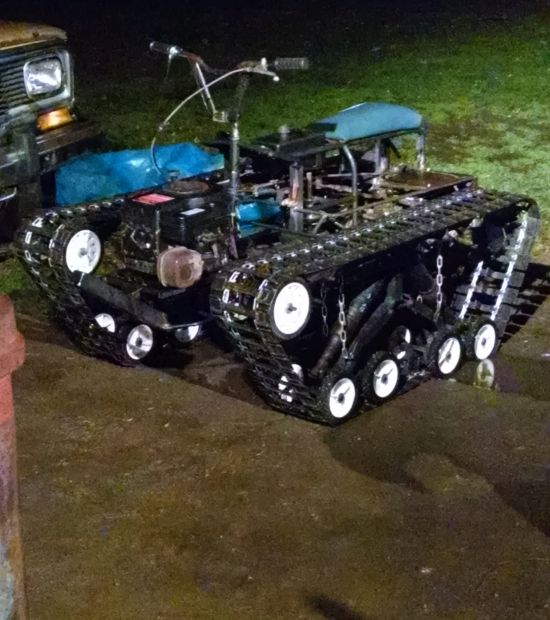
Time to put the tracks on.
So, I got both tracks on now. I charge up the shocks all the way. Then tighten the track tensioners all the way. I am ready for the first drive. All that is left is to put some gas in it and see if it moves.
I would have tried it out but was 11 o'clock, raining, and hard to see, and not able video record it, so looks like first thing in the morning is the test drive. Can't wait..........
MasonMcK Member
2015 Build-Off Top 3 Winner
2015 Build-Off Top 3 Winner
2016 Build-Off Entrant
2016 Build-Off Entrant
Age : 24 Join date : 2015-01-26 Points : 3478 Posts : 96 Location : Carroll County, Maryland