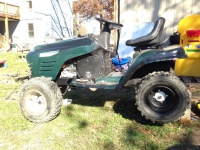
| | And so it begins! Craftsman LT1000 ---> ATV (we are hoping!) |  |
|
+11murrayracer redlinemotorsportts Doc Sprocket muddstir TheRainbowBoxer jsisti845 cumminsbayou GenevaCustoms LAWN MOWER MUDDER richie thomas Renzo24441 15 posters |
|
| Author | Message |
|---|
Doc Sprocket
Site VIP

2018 Build-Off Entrant
2018 Build-Off Entrant
2021 Winner of Winners
2021 Winner of Winners
1st Place Build-Off 2016
1st Place Build-Off Winner 2016
Join date : 2013-04-21
Posts : 2914
| |
| | |
Renzo24441
Member

Age : 48
Join date : 2013-10-19
Points : 3985
Posts : 47
Location : Shen Valley, VA
|  Subject: Re: And so it begins! Craftsman LT1000 ---> ATV (we are hoping!) Subject: Re: And so it begins! Craftsman LT1000 ---> ATV (we are hoping!)  November 16th 2013, 9:59 am November 16th 2013, 9:59 am | |
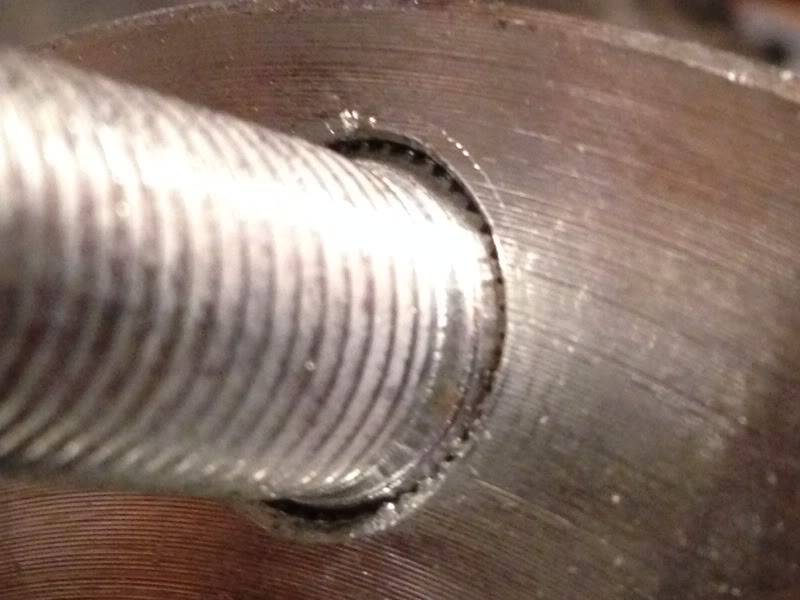
| I rather shop locally too.. nothing like the "feely/touchy" when looking for parts.. hahahaha THIS... 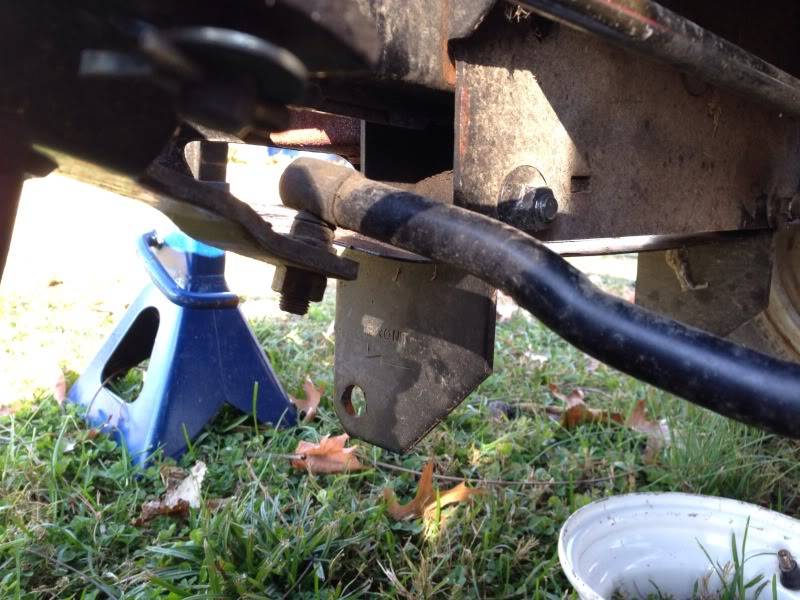 what to do with it...... removing the whole thing will not work since you need them to "keep the space" for the front "axle" and structural strength of that part, I guess... but would cutting them be an option, while keeping the integrity of the front? I would have to take measurements once the front tires are mounted, and see what would happen if I lower/weld the front... I would like to lower it a little, but keep the pivoting on it... any simple ways to do this, that do not require welding?? lol and also... THIS....  nothing that a crap ton of penetrating oil wouldnt take care of, right? I saw quite a variety of pulleys yesterday at TSC... I saw they had the keyways in different sizes, but they all had the "bolt" on them... thoughts on this, please? | |
|
| | |
LAWN MOWER MUDDER
Established Member


2014 Build-Off Top 3 Winner
2014 Build-Off Top 3 Winner
Age : 23
Join date : 2013-04-08
Points : 5092
Posts : 913
Location : Central Pa
| | Subject: Re: And so it begins! Craftsman LT1000 ---> ATV (we are hoping!) November 16th 2013, 10:17 am | |
| Bolt as in Allen screw? Yeah penetrating oil could help, but I cut or hole-saw them and then spray the penetrating oil then get a small puller and pull them off. WARNING! Do not hammer the end of the input shaft and pull up on the pully, you WILL end up mushrooming the input shaft and the pully will not come off. Just saying... But Anyway nice build.  | |
|
| | |
willis923
Veteran Member


Age : 27
Join date : 2013-04-10
Points : 5644
Posts : 1408
Location : Galway NY
| |
| | |
Renzo24441
Member
Age : 48
Join date : 2013-10-19
Points : 3985
Posts : 47
Location : Shen Valley, VA
| | Subject: Re: And so it begins! Craftsman LT1000 ---> ATV (we are hoping!) November 16th 2013, 10:24 am | |
| great input, as always!
I was very surprised to see this kind of rust on it, since EVERYTHING else on the mower has pretty much no rust at all... I just dont understand how this transmission pulley got so rusty.... not even the deck pulleys or anything underneath!
I am just curious about it... I will do the pulley swap back there eventually... I just want to make sure I can get the right belt for it... thinking ahead, I guess... I have this, I am also looking at exhaust... welding a pipe to the outlet of the stock muffler just to run it to the back, cutting those deck brackets on the picture above, and the gas pedal...
thanks guys! hope its a productive weekend, if youre working on something! | |
|
| | |
willis923
Veteran Member
Age : 27
Join date : 2013-04-10
Points : 5644
Posts : 1408
Location : Galway NY
| |
| | |
Renzo24441
Member
Age : 48
Join date : 2013-10-19
Points : 3985
Posts : 47
Location : Shen Valley, VA
| |
| | |
LAWN MOWER MUDDER
Established Member
2014 Build-Off Top 3 Winner
2014 Build-Off Top 3 Winner
Age : 23
Join date : 2013-04-08
Points : 5092
Posts : 913
Location : Central Pa
| | Subject: Re: And so it begins! Craftsman LT1000 ---> ATV (we are hoping!) November 16th 2013, 6:13 pm | |
| - Renzo24441 wrote:
- great input, as always!
I was very surprised to see this kind of rust on it, since EVERYTHING else on the mower has pretty much no rust at all... I just dont understand how this transmission pulley got so rusty.... not even the deck pulleys or anything underneath!
I am just curious about it... I will do the pulley swap back there eventually... I just want to make sure I can get the right belt for it... thinking ahead, I guess... I have this, I am also looking at exhaust... welding a pipe to the outlet of the stock muffler just to run it to the back, cutting those deck brackets on the picture above, and the gas pedal...
thanks guys! hope its a productive weekend, if youre working on something! Best way to prevent the rust on the pully is to take the pully off like twice a year and grease it nice and good then put it back on. | |
|
| | |
willis923
Veteran Member
Age : 27
Join date : 2013-04-10
Points : 5644
Posts : 1408
Location : Galway NY
| | Subject: Re: And so it begins! Craftsman LT1000 ---> ATV (we are hoping!) November 16th 2013, 11:10 pm | |
| - Renzo24441 wrote:
- Well *****.... Lug bolt pattern is 4.5"..... I'm ready to shoot somebody.... Wtfffff !!!!
I hope this galvanized hubs are easy to drill!!!! Sonofabbbb they shouldnt be too bad. if you weld it, dont breath the smoke, and if it smokes as you drill it, dont breathe it... i done that once, stick welding.. it screwed me up for about 3 weeks. it sucked | |
|
| | |
Renzo24441
Member
Age : 48
Join date : 2013-10-19
Points : 3985
Posts : 47
Location : Shen Valley, VA
| | Subject: Re: And so it begins! Craftsman LT1000 ---> ATV (we are hoping!) November 16th 2013, 11:35 pm | |
| Thanks, Willis!
Yeah I've seen all the warnings for galvanized welding... I'm not doing that... Hopefully they won't smoke while being drilled, but just in case I'm doing it in the backyard, totally in the open..
Thanks man! | |
|
| | |
Renzo24441
Member
Age : 48
Join date : 2013-10-19
Points : 3985
Posts : 47
Location : Shen Valley, VA
| |
| | |
Doc Sprocket
Site VIP
2018 Build-Off Entrant
2018 Build-Off Entrant
2021 Winner of Winners
2021 Winner of Winners
1st Place Build-Off 2016
1st Place Build-Off Winner 2016
Age : 51
Join date : 2013-04-21
Points : 7201
Posts : 2914
Location : Ontario Canada
| |
| | |
redlinemotorsportts
Moderator


2014 Build-Off Entrant
2014 Build-Off Entrant
Age : 27
Join date : 2013-03-18
Points : 7366
Posts : 3131
Location : raleigh nc
| |
| | |
willis923
Veteran Member
Age : 27
Join date : 2013-04-10
Points : 5644
Posts : 1408
Location : Galway NY
| |
| | |
Renzo24441
Member
Age : 48
Join date : 2013-10-19
Points : 3985
Posts : 47
Location : Shen Valley, VA
| | Subject: Re: And so it begins! Craftsman LT1000 ---> ATV (we are hoping!) November 18th 2013, 8:55 pm | |
| Thank you Doc, Red, Willis.... the BFH worked beautifully!  All of them out... i think I made them as centered as I possibly could...  and now all drilled out... just need to widen the holes, and off to Ace to get the bolts and nuts! 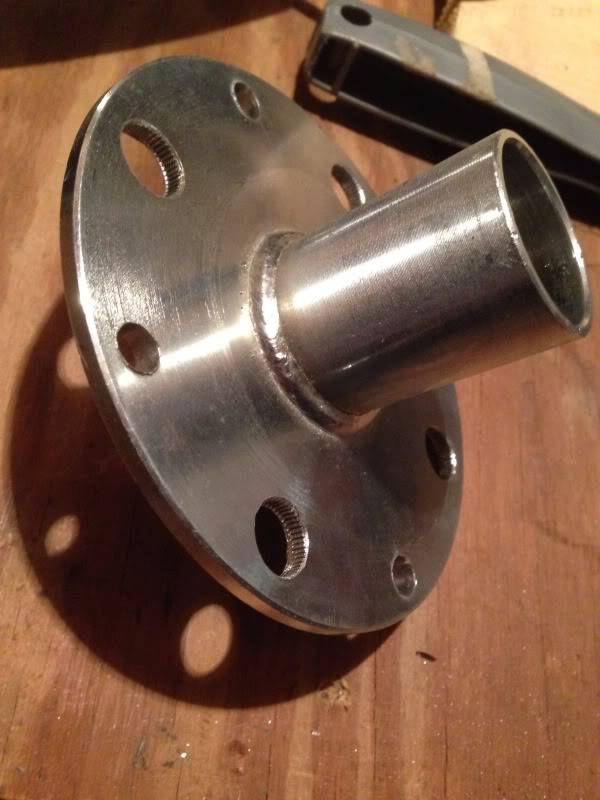 I will just need to grind down possibly an 1/8" of the back of the hubs, so the clip covers the washers and holds the whole assembly in place! Thank you all for brainstorming with me on this so far!  | |
|
| | |
willis923
Veteran Member
Age : 27
Join date : 2013-04-10
Points : 5644
Posts : 1408
Location : Galway NY
| |
| | |
Renzo24441
Member
Age : 48
Join date : 2013-10-19
Points : 3985
Posts : 47
Location : Shen Valley, VA
| |
| | |
TroyBilt Pony
Established Member

2014 Build-Off Entrant
2014 Build-Off Entrant
Join date : 2013-06-01
Points : 4693
Posts : 578
Location : West Virginia
| |
| | |
Renzo24441
Member
Age : 48
Join date : 2013-10-19
Points : 3985
Posts : 47
Location : Shen Valley, VA
| | Subject: Re: And so it begins! Craftsman LT1000 ---> ATV (we are hoping!) November 18th 2013, 11:21 pm | |
| that's cause they are, TBP!! lol... ordered them from BMI, but the lug configuration I have, SOMEHOW is not available anywhere I have looked...
from center to center of lug hole on the wheel, it is 4 3/8" or so... so I ordered these from them, and replacement bearings, since the bearings that came with them were too small.. it was a 5/8" bore, and I needed 3/4"....
so... now I only need to widen the holes a bit more, get the bolts and nuts, and it should be a roller...
even though I do need to grind down the back of the hubs, because there wont be enough space for the e clip to click in place to hold the front wheels.... thats gonna be a pain in the @$$.... hopefully this weekend, I will be done with it, so we can take it rolling... and see how it does...
pulleys, gas pedal, paint, all of that comes in the spring... right now I will just do wiring for lights, front and back... since we live in town... | |
|
| | |
TheRainbowBoxer
Moderator

Age : 49
Join date : 2012-04-23
Points : 5584
Posts : 1091
Location : Galion, OH
| |
| | |
Renzo24441
Member
Age : 48
Join date : 2013-10-19
Points : 3985
Posts : 47
Location : Shen Valley, VA
| | Subject: Re: And so it begins! Craftsman LT1000 ---> ATV (we are hoping!) November 24th 2013, 4:39 am | |
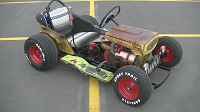
| lol well hopefully I wont have to change rims any time soon!! but... after talking with Doc and Red on options to either grind down the hub (it was too long) or removing the cup on the spindles, I went with cutting that s#!t out of it.. luckily Ace had the shaft collars I needed, so...... HERE IT IS!!  got these lights from a friend of mine.... 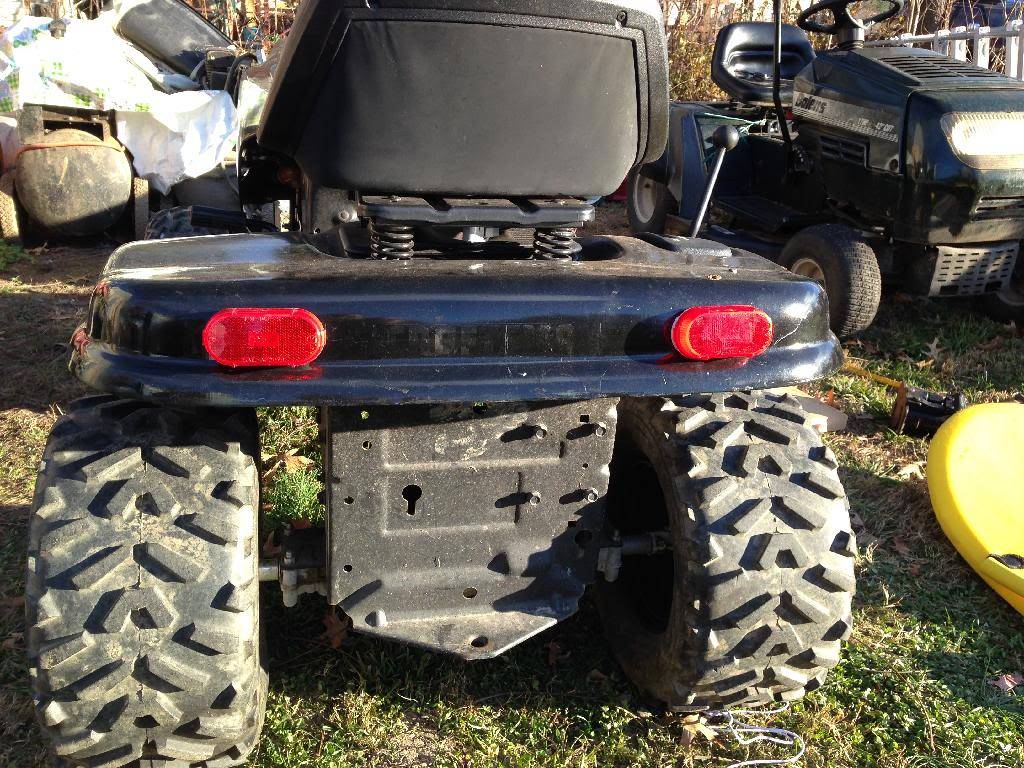 I tried using some LEDs I have for the tail lights, but to my amazement, the voltage I was getting from the headlights was 0.2v at full throttle... so they never worked... replaced them with a regular incandescent bulb, and worked fine... so for the driving lights, Im gonna have to connect them directly to the battery to get the 12v for LED driving lights... anybody has messed around with the wiring on these? any spot I could get constant 12v power after the engine is running? thanks guys! hope you like the finished FOR NOW project...  | |
|
| | |
LAWN MOWER MUDDER
Established Member
2014 Build-Off Top 3 Winner
2014 Build-Off Top 3 Winner
Age : 23
Join date : 2013-04-08
Points : 5092
Posts : 913
Location : Central Pa
| |
| | |
Renzo24441
Member
Age : 48
Join date : 2013-10-19
Points : 3985
Posts : 47
Location : Shen Valley, VA
| | Subject: Re: And so it begins! Craftsman LT1000 ---> ATV (we are hoping!) November 24th 2013, 8:48 am | |
| exactly!
luckily, somehow, there is no rust whatsoever on this tractor! the plan (forced by the weather), however, is to wait until spring is here to paint it... red, and the floorboard area sprayed with truck bedliner, as well as the underside of the rear fenders and all that. I will also cover the front bumper with the same bedliner.
I have a piece of aluminum to make something to cover the dash... I just wish there was a place where I can find some cheap gauges.. I will reuse the AMP one, but will have to do some more searching for something else, if theres anything.. | |
|
| | |
TheRainbowBoxer
Moderator
Age : 49
Join date : 2012-04-23
Points : 5584
Posts : 1091
Location : Galion, OH
| | Subject: Re: And so it begins! Craftsman LT1000 ---> ATV (we are hoping!) November 25th 2013, 8:12 am | |
| The lighting circuit on those engines is typically 12v AC... it won't read properly on a meter set for DC and simple LEDs are unable to light with it.
Thankfully LEDs don't pull much juice, so unless you go overboard on the lighting, hooking to the battery should be fine. | |
|
| | |
redlinemotorsportts
Moderator
2014 Build-Off Entrant
2014 Build-Off Entrant
Age : 27
Join date : 2013-03-18
Points : 7366
Posts : 3131
Location : raleigh nc
| |
| | |
Renzo24441
Member
Age : 48
Join date : 2013-10-19
Points : 3985
Posts : 47
Location : Shen Valley, VA
| | Subject: Re: And so it begins! Craftsman LT1000 ---> ATV (we are hoping!) November 25th 2013, 6:48 pm | |
| TRB, it is... it just surprised me that the voltage to the front lights was so low... I will take another reading and verify it, with both AC and DC... ill check voltage on the solenoid with and without the tractor running, and see if theres a difference, and may pull power for LED driving lights from there... We are supposed to bring it to my inlaws farm, and will let him drive around the fields... will get some video, hopefully! now, for the spring, plans are just to make it a little faster with pulleys, probably get a kill switch, paint, and should be good to go!  | |
|
| | |
Sponsored content
| |
| | |
| | And so it begins! Craftsman LT1000 ---> ATV (we are hoping!) | |
|