| | | W.H.A.M.S. |  |
|
+11kawasaki220 Moose redlinemotorsportts Creepycrawler willis923 Doc Sprocket 1997 Murray B440 craftsmancole LAWN MOWER MUDDER Angchor 15 posters | |
| Author | Message |
|---|
Angchor
Member


Age : 67
Join date : 2014-04-14
Points : 4302
Posts : 491
Location : Index, Washington
|  Subject: W.H.A.M.S. Subject: W.H.A.M.S.  May 3rd 2014, 4:02 pm May 3rd 2014, 4:02 pm | |
| Huge day for me yesterday. And the result was bringing a new tractor home! This one is a "White" CruiseMatic FST-15 OHV 4 wheel steering!! And an engine that is familiar to a lot of you. Here are the pics...      And the official mascot of this build.  Now, can anyone help me identify this in any way other than "White, CruiseMatic FST-15 OHV"??? Is this a re-labeled MST? Something else? Also. I have not gotten into it at all, at this point, so I am going to ask what will probably become stupid questions. LOL (IOW, once I actually start geting into it, I'll probably figure all this out on my own. But for now, I am just going to ask the stupid questions.) In the following picture, can anyone tell me what each of these things are?  It starts but will not continue to run. I'll be dealing with that, first. First thing to check is the fuel cutoff solenoid. If that checks out ok, I believe this has some kind of vacuum operated fuel pump behind the carb, no? I'll test to see if that is the problem, by using an electric fuel pump instead. That top linkage, (choke, I think), is completely disconnected. I'll be searching here for ways that people have bypassed the governor on these, connected a foot throttle, etc... I went to the bottom of the hill yesterday, with my cyrrent tractor, to tow this one up. It died at the bottom, and couldn't be started again. Looks like I am replacing it just in time. LOL So, I took two joy rides to the top of the hill, by being towed behind a huge ATV. Both of which went way too fast. But it was a good thing, in the end. Because I found out that the new tractor is MUCH more stable than the old one. Not tippy feeling. The steering is more stable. Etc. In short, I think this one is going to be much more safe. Some of what I will do to this: Remove anything mower related. The deck, the safeties, etc. Rewire with the minimum of system components. Beef up anything that needs it. Including probably the steering and the clutch. Separate clutch and brake. Possibly put on a new brake of some sort. Secure, (bolt, and/or lock anything that needs it), the battery and gas tank/lines. Build racks and bumpers. Put a hand winch on it. Tow points, front and back. Maybe add weight to the front. Although this one doesn't feel like it needs it as much as the other one did. I wish we had a 'build' section here called "Mule" or "Utility". LOL Because this is strictly utilitarian. Not a rat rod. Not an off-roader. Not a puller. Etc. Just something to get me from point A to point B, safely. Provide various kinds of assistance to others. And to carry a bunch of stuff as well. Maybe even pull a trailer. If someone makes such a section, would you kindly move this thread to that section?  EDIT: EDIT:In light of my recent debilitation, I have decided that the new tractor will be named differently. I am calling it WHAMS. Short for: White, Hillbilly All-terrain Mobility Scooter 
Last edited by Angchor on May 23rd 2014, 8:46 pm; edited 4 times in total | |
| | | | LAWN MOWER MUDDER
Established Member


2014 Build-Off Top 3 Winner
2014 Build-Off Top 3 Winner
Age : 23
Join date : 2013-04-08
Points : 5092
Posts : 913
Location : Central Pa
| | Subject: Re: W.H.A.M.S. May 3rd 2014, 4:17 pm | |
| A Fine tune deck adjustment
B-E Indicator lights
F PTO (deck engage)
G Speed selector gauge thing (shows what gear you're in)
hope it helps! | |
| | | | Angchor
Member
Age : 67
Join date : 2014-04-14
Points : 4302
Posts : 491
Location : Index, Washington
| | Subject: Re: W.H.A.M.S. May 3rd 2014, 4:41 pm | |
| - LAWN MOWER MUDDER wrote:
- A Fine tune deck adjustment
B-E Indicator lights
F PTO (deck engage)
G Speed selector gauge thing (shows what gear you're in)
hope it helps! Absolutely helps! Thank you. Does anyone know what the indicator lamps are for? The 'speed indicator' does absolutely nothing when I shift it. Must be broken or something. | |
| | | | LAWN MOWER MUDDER
Established Member
2014 Build-Off Top 3 Winner
2014 Build-Off Top 3 Winner
Age : 23
Join date : 2013-04-08
Points : 5092
Posts : 913
Location : Central Pa
| | Subject: Re: W.H.A.M.S. May 3rd 2014, 5:25 pm | |
| - Angchor wrote:
- LAWN MOWER MUDDER wrote:
- A Fine tune deck adjustment
B-E Indicator lights
F PTO (deck engage)
G Speed selector gauge thing (shows what gear you're in)
hope it helps! Absolutely helps! Thank you.
Does anyone know what the indicator lamps are for?
The 'speed indicator' does absolutely nothing when I shift it. Must be broken or something. Indicator lights- probably like PTO, brake lock, battery, and something else. Speed thing- Yeah they were like a piece of tape or something that revolved around the piece that divides the hole, when you shifted the tape moved, thus showing different nubers (Gear placement) | |
| | | | Angchor
Member
Age : 67
Join date : 2014-04-14
Points : 4302
Posts : 491
Location : Index, Washington
| | Subject: Re: W.H.A.M.S. May 4th 2014, 10:18 pm | |
| Got into it today, to try to figure out why it will not continue running. Pulled the carb solenoid. Along with the bowl. Wow! I have never seen so much crap in a carb!  Carb itself was pretty dirty.  Once I cleaned out the bowl and had a look at it... The bowl was rusted right through!!!  I think the crap that was in the bowl is all that was holding gas in there! And that, for not very long. LOL I'll have to get another bowl. For now, I used some washers and some epoxy putty to seal it up. Tomorrow I'll test it out to see if it actually sealed or not. I found a bolt to replace the solenoid. More, when I make more progress. It was cold, wet and miserable here today. I didn't get much done. | |
| | | | craftsmancole
Established Member

2015 Build-Off Entrant
2015 Build-Off Entrant
Age : 25
Join date : 2013-04-05
Points : 4845
Posts : 661
Location : New Smyrna Beach,Fl
| | Subject: Re: W.H.A.M.S. May 5th 2014, 10:44 am | |
| Nice a Vanguard! How many gears do ya have? And to id it further look under the seat there should be a model number. | |
| | | | Angchor
Member
Age : 67
Join date : 2014-04-14
Points : 4302
Posts : 491
Location : Index, Washington
| | Subject: Re: W.H.A.M.S. May 5th 2014, 11:13 am | |
| - craftsmancole wrote:
- Nice a Vanguard! How many gears do ya have? And to id it further look under the seat there should be a model number.
7. Well, there's 7 notches. With the varidrive, the reality is that there is infinite speeds bewteen the highest and the lowest. So I could make up a plate that had 30 notches in it, to replace the 7 notch plate. Then I could brag that I have 30 speeds forward and 30 speeds backward! Under the seat is the first place I looked. Nothing there but rust.   And this is the back of the seat. I can't tell if that "semi-trangle" shaped sticker was only a reflective sticker, or if it had the ID info on it. In either case it's pretty sun-bleached now. And if there was info on it before, it is completely gone, now.  One thing that I am pretty excited about is the rear axles. Although I do not know enough about them to kow whether I should actually be excited or not. But they look pretty stout!!!  | |
| | | | B440
Member
Join date : 2014-01-22
Points : 4087
Posts : 226
Location : Thompson, CT
| | Subject: Re: W.H.A.M.S. May 5th 2014, 12:53 pm | |
| Great score on the AWS! Those are even more rare than the Noma versions. If you do a google search, there's a guy in another country (UK maybe?) and he took that rear axle and put it on the front of his Wheelhorse to make it a selectable 4WD.
Can you take a pic of the rear wheels and how they are attached to the axle? I'd like to see how they did it. Mine use special offset wheels and three lugs. | |
| | | | 1997 Murray
Veteran Member


2014 Build-Off Finalist
2014 Build-Off Finalist
2015 Build-Off Finalist
2015 Build-Off Finalist
2016 Build-Off Entrant
2016 Build-Off Entrant
Age : 25
Join date : 2013-11-13
Points : 5329
Posts : 1311
Location : NW USA
| | Subject: Re: W.H.A.M.S. May 5th 2014, 1:01 pm | |
| sort of like my old white, but it had a regular mtd axle. that on you have there looks very strong indeed. the "speed indecator" is not a speed indicator at all, but it used to have a tape that told you how high the deck is. "b" is the brake light, and "c" is on if the engine is cranking, then one of them is low oil, and the other one is if the deck is engaged. | |
| | | | Angchor
Member
Age : 67
Join date : 2014-04-14
Points : 4302
Posts : 491
Location : Index, Washington
| | Subject: Re: W.H.A.M.S. May 5th 2014, 2:27 pm | |
| - B440 wrote:
- Can you take a pic of the rear wheels and how they are attached to the axle? I'd like to see how they did it. Mine use special offset wheels and three lugs.
This is the best that you'll get for now. I am still in the 'looking at it' stages right now. While I work on the earlier tractor, to get it running again. I need a running machine, while I work on this one.   And since I am still in the just looking phase, I have not yet picked up on the front, to figure this one out. Can anyone tell me why, when backing up, the right front wheel oversteered by so much? The left front was normal, it was just the right front that oversteered. The guy I got it from said it has done that, many times. He just kicks it back around, and it stays where it is supposed to be. Well, until the next time it does it. LOL Here is a crude drawing to show what I mean.  - 1997 Murray wrote:
- sort of like my old white, but it had a regular mtd axle. that on you have there looks very strong indeed. the "speed indecator" is not a speed indicator at all, but it used to have a tape that told you how high the deck is. "b" is the brake light, and "c" is on if the engine is cranking, then one of them is low oil, and the other one is if the deck is engaged.
Thank you. All, very good info! | |
| | | | 1997 Murray
Veteran Member
2014 Build-Off Finalist
2014 Build-Off Finalist
2015 Build-Off Finalist
2015 Build-Off Finalist
2016 Build-Off Entrant
2016 Build-Off Entrant
Age : 25
Join date : 2013-11-13
Points : 5329
Posts : 1311
Location : NW USA
| | Subject: Re: W.H.A.M.S. May 5th 2014, 2:50 pm | |
| check the rod that conects the spinles together and see if the hiem joints or bolts atre loose. my mtd does that if you are backing up and you turn the steering wheel is turned sharply. | |
| | | | Angchor
Member
Age : 67
Join date : 2014-04-14
Points : 4302
Posts : 491
Location : Index, Washington
| | Subject: Re: W.H.A.M.S. May 5th 2014, 3:23 pm | |
| - 1997 Murray wrote:
- check the rod that conects the spinles together and see if the hiem joints or bolts atre loose. my mtd does that if you are backing up and you turn the steering wheel is turned sharply.
That's exactly when this does it. Backing up, and turning sharply. When I get to that, I'll check the components as you suggest. Beef up anything I think should be. And maybe weld in some steering stops, to keep it from happening again. So that's for a later day. | |
| | | | Angchor
Member
Age : 67
Join date : 2014-04-14
Points : 4302
Posts : 491
Location : Index, Washington
| | Subject: Re: W.H.A.M.S. May 24th 2014, 12:49 am | |
| I have it mostly torn down now.  Looks like the brakes are worthless. Can anyone tell me anything about these brakes? I haven't removed the trans yet. Probably won't, if I don't have to. Is there a link here at ATLTF, (or several links) to this kind of trans and brake?  If I can fix this brake, then I may fab up a separate brake pedal for that. I have a pile of hardware that I have taken off the tractor. Mostly related to the mower deck. Figured I might actually find some useful pieces there for a brake pedal. Maybe even a throttle pedal that isn't just a bicycle handbrake lever... LOL  The steering was really loose in this thing. In the following picture there are three red circled bolts, and one orange circled bolt. The top two red circled ones had bolts through those holes when the dashboard was in place. But they were loose. The bottom one had no bolt at all. I'm thinking that someone has had this apart to this extent, before. The orange circled bolt is the bolt for an idler pulley, underneath. With that pulley in place, you cannot get to the other side of the bolt for the steering. It is completely covered. To put the bolt for the steering bracket in place, you have to have the pulley off. They must have forgotten about the steering bracket bolt until after the pulley was on, then decided, "aw, screw it". The bolts.  The pulley.  | |
| | | | Doc Sprocket
Site VIP

2018 Build-Off Entrant
2018 Build-Off Entrant
2021 Winner of Winners
2021 Winner of Winners
1st Place Build-Off 2016
1st Place Build-Off Winner 2016
Age : 51
Join date : 2013-04-21
Points : 7201
Posts : 2914
Location : Ontario Canada
| | Subject: Re: W.H.A.M.S. May 24th 2014, 9:00 am | |
| Now that certainly is an interesting machine! Have you got a specific model number for the transaxle? - Angchor wrote:
I wish we had a 'build' section here called "Mule" or "Utility". LOL Because this is strictly utilitarian. Not a rat rod. Not an off-roader. Not a puller. Etc. Just something to get me from point A to point B, safely. Provide various kinds of assistance to others. And to carry a bunch of stuff as well. Maybe even pull a trailer. If someone makes such a section, would you kindly move this thread to that section?
Don't you LOVE it when you defy classification? I actually wouldn't mind setting up a utility subsection, just not looking forward to trying to figure out what's what, and moving it all there! | |
| | | | Angchor
Member
Age : 67
Join date : 2014-04-14
Points : 4302
Posts : 491
Location : Index, Washington
| | Subject: Re: W.H.A.M.S. May 24th 2014, 11:26 am | |
| - Doc Sprocket wrote:
- Now that certainly is an interesting machine! Have you got a specific model number for the transaxle?
I'd rather not remove that, if I don't have to. Do you have any idea what kind it is, and where I would find that number? - Doc Sprocket wrote:
- Don't you LOVE it when you defy classification?
I actually wouldn't mind setting up a utility subsection, just not looking forward to trying to figure out what's what, and moving it all there! Were it me, I'd set up the section, and then move only what immediately stood out as belonging there. Then let it grow, or not, on it's own, from that point. I'm one for having rules and order. But only enough to keep things flowing. When the rules and order, stifle creativity, then they begin to stifle the forum/community... I guess if you wanted some sort of catch phrase about it... "Build it and they will come." But... Build it and then try to corral them into it, and they will run. | |
| | | | Angchor
Member
Age : 67
Join date : 2014-04-14
Points : 4302
Posts : 491
Location : Index, Washington
| | Subject: Re: W.H.A.M.S. May 25th 2014, 3:26 pm | |
| Well I found the model and serial number for the transaxle. Looks like it's an MTD Transaxle (618-0034)   I still have no idea who manufactured the part. Does anyone know? Edit: Looks like peerless.Looks like if I want to have working brakes on this, I am going to have to remove the entire transaxle from the tractor. Because the brake is internal. Probably do an R&R while I am at it... Also probably not going to be real soon. Lots of back pain again today.
Last edited by Angchor on June 2nd 2014, 1:01 pm; edited 1 time in total | |
| | | | willis923
Veteran Member

Age : 27
Join date : 2013-04-10
Points : 5644
Posts : 1408
Location : Galway NY
| | Subject: Re: W.H.A.M.S. May 25th 2014, 10:38 pm | |
| That thing looks tank! you made out with that thing. that tranny looks almost as beefy as my bolens' tranny is.
as far as a utility category, im all for it. like angchor said, i would move only the obvious posts, then only worry about the NEW builds. if i get bored some time, i could sort through the previous builds too | |
| | | | Creepycrawler
Established Member

2024 Build-Off Entrant
2024 Build-Off Entrant
Age : 37
Join date : 2013-07-02
Points : 4902
Posts : 731
Location : Logan Ohio
| | Subject: Re: W.H.A.M.S. May 26th 2014, 12:37 pm | |
| Hey bud nice score on the tractor. here is a little info for ya, that tractor is built by mtd for white. and that transaxle shares its internals with your run of the mill mtd varidrive transaxles, so you should be able to snag brakes off any old varidrive laying around. also diff gears and other internals should swap over | |
| | | | Angchor
Member
Age : 67
Join date : 2014-04-14
Points : 4302
Posts : 491
Location : Index, Washington
| | Subject: Re: W.H.A.M.S. May 29th 2014, 6:51 pm | |
| - B440 wrote:
- Can you take a pic of the rear wheels and how they are attached to the axle? I'd like to see how they did it. Mine use special offset wheels and three lugs.
4 lug wheels. Here is a shot of the axle, with the wheel removed.  | |
| | | | Angchor
Member
Age : 67
Join date : 2014-04-14
Points : 4302
Posts : 491
Location : Index, Washington
| | Subject: Re: W.H.A.M.S. May 30th 2014, 9:59 pm | |
| I would like to know what engineer, thinking himself a genius, decided to put the brakes INSIDE A GREASE PACKED HOUSING!!!
Anyone who has done brakes on automobiles of any kind, knows the dire warnings about not getting grease anywhere near your brake pads or shoes! Don't even THINK about it, else the 9 hells be let loose and all life as we know it, will come to an end!!!
And these geniuses, decide that the best place to put a rotor and brake pads, is inside the housing, and pack grease completely around, on and through them!
Oh well. One pad is kind of chipped and worn, and the other seems like new. Since the outer, (worn), one is the one that moves in it's channel, I am going to swap them as I put it back together. Also going to cut a metal shim to go under the worn one. I figure that since the inner pad just sits there, it's going to be ok to have it sitting on top of a shim, to make up for the wear. I'll just put the best side up, and hope for the best.
If I do not have brakes on this, when finished, or the brakes are just plain crap, because of the grease they are packed in... I guess that eventually I'll have to figure something else out.
Looks like a trade-off. The rear axle on this thing is monster! Because of the way it is all supported by the cast iron, I think I can expect a good long life out of the transfer case, axle, etc...
But it has the brakes packed in grease!
The cheaper transfer cases and axle setups, have the better brakes.
Why couldn't they do both, on this? Better brakes and better housing, axle support, etc...
The iron housings, while protecting the axles admirably, leave no means of installing a brake rotor along the shaft.
So it looks like, if I want to put on some other kind of brakes later, I'll have to do extensions for the wheels, and then mount a rotor on that, with a caliper on the end of the iron housing. No idea if that is even feasible. | |
| | | | Angchor
Member
Age : 67
Join date : 2014-04-14
Points : 4302
Posts : 491
Location : Index, Washington
| | Subject: Re: W.H.A.M.S. June 2nd 2014, 2:37 pm | |
| Remember that I am working in a sloped gravel driveway, with a tarp strung up to keep off the rain. I don't have a shop to work in. Or any fancy machinery. Nor at this time, any fancy way to lift the tractor. I am just using a farm jack, and bracing it as I lift it. All while being barely able to move because of back re-injury. (I have metal plates in my back. They were put in there, years ago, when I broke my back doing construction work.) So everything I do is taking ten to 50 times longer than it normally would. LOL I removed the FNR transaxle, and opened it up. Here is what I found. The "brakes", in their natural habitat.  If you look close you'll see the outer brake pad stuck to the rotor, by the grease. With the metal shim that pushes on it, stuck to the pad. Here are the brake components after being removed and cleaned up a bit.  Note how the outer pad is rounded and worn, and a chunk is missing. I couldn't be bothered to order new pads, and sit here and wait for them, so I decided to reuse what I had, including the worn pads. So... Here is what I have to work with: 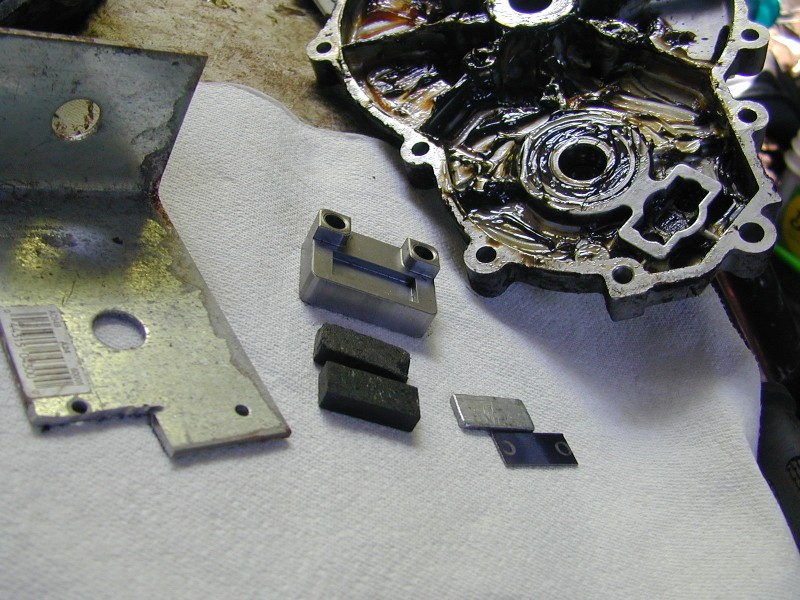 I cut a shim out of a construction brace. That is the piece that you see cut out of the angled piece of metal. That shim is three times as thick as the metal piece that was originally in the brakes. 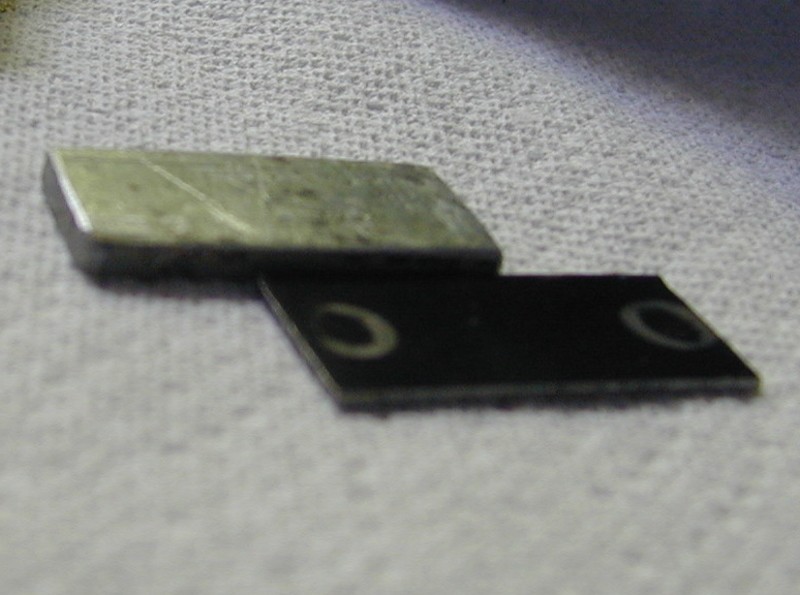 The original is about a 16th of an inch, or smaller. The one I fabbed is about 3/16ths of an inch. Not a whole lot, on the grander scale of things, but apparently it makes a big difference when it comes to these brakes. You'll see that, later. Putting things back together: I decided that since the inner pad just sits in it's channel, I should put the worn one in there. Swapping them, would more or less "even out" the wear on them. I would have liked to have put the less worn and rounded edge on the outside, to contact the rotor. But that channel is not all that deep. I put the thinner factory shim, in behind that pad, because it is so worn. Just to get a little more life out of the pad. Once the shim was in, the channel was even more shallow, and I didn't want to take the chance of the pad just being pulled right out of there... So I put the pad in with the more square, less worn side, inside the channel. Here is the inner piece with the pad. And then with the shim under the pad. You can see that it doesn't seem like much. I don't think I would have chanced the thicker shim on this side.  As it is, I am still concerned that it might slip out of it's channel. As for the outer pad... The channel that it rides in is much deeper. This is the pad, sitting in place without a shim.  This is the pad sitting in place, with that thick shim that I made, sitting behind it.  The one concern I had, was whether this would be too much. Not having new pads in front of me, I had no idea just how much these pads had worn. What if they hadn't worn that much? So I was concerned that I'd get the case all back together, and I wouldn't be able to spin the axles because the brakes would be locked up. Well, I needn't have worried. The axles spin freely. I can even spin both axles by spinning the input shaft, (no pulley)... By hand! So there is no lockup on the brakes. I suppose if I ever decide to take this thing apart again, I'll buy new pucks/pads before I start. Now here is a before and after of the brake lever on the outside of the case. I am sorry about the bad quality of the before pic. But I didn't realize I would want that pic, so I didn't take a pic especially for that reason. I cropped a pic I had taken for overall reassembly purposes.  You'll have to look hard to see the difference. But before the work, that lever was loose and dangly. It didn't come anywhere near the spring plate which is off to the right. After, it is good and solid. And it comes right up against the spring plate. That plate was designed to hold the return spring, (There was no spring. I'll have to rig something up with whatever spring I can find.), but it also is designed to 'stop' the lever. The lever now naturally stops right at the plate. Also, the nut that holds the lever in place is a castellated nut. Then there are two holes drilled in the shaft. Line the notches in the castellated nut, up with a hole, and put a cotter pin through, to lock the nut in place. There are two holes in the shaft. To allow for plenty of adjustment as the brake pads wear. When I began, the inner hole was being used. And as I explained, the lever was STILL very loose. Now I am using the outer hole, and the lever is stiing tightly exactly where it should be. The brakes work by that lever being pulled forward, away from the spring plate. It only takes about a 16th to a 1/4 inch of travel for the brakes to be actuated. In the before pic, you can see the lever is about 1/2 to 3/4 of an inch away from the spring plate. Pretty worthless as brakes, at that point. They should work, now. One of the things I will do as I put this back together, is to separate the brake function out, to a pedal of it's own. Not forgetting, of course, a way to lock it in place, while the tractor is parked. That said... It doesn't look like much, but now I am in the process of putting the tractor back together again. 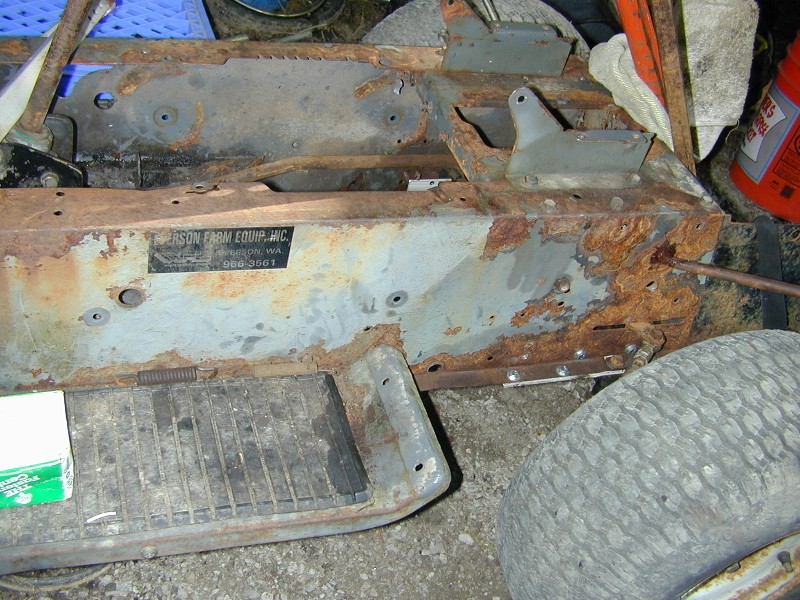 Which reminds me. The frame of the tractor is very rusty. Rusted through in places. Also easily broken in places because of the rust. The point where the trans bolts to the bottom rail of the frame was broken, just ahead of the mounts. On both sides. I cut pieces of bedrail, and bolted them in, in those areas. I decided to bolt, instead of weld, because the metal is so badly rusted and weak. The bolts have a better chance of holding things in place without creating new breaks. Welding would have weakened the already weak metal, and it would have been guaranteed to break right beside the weld. 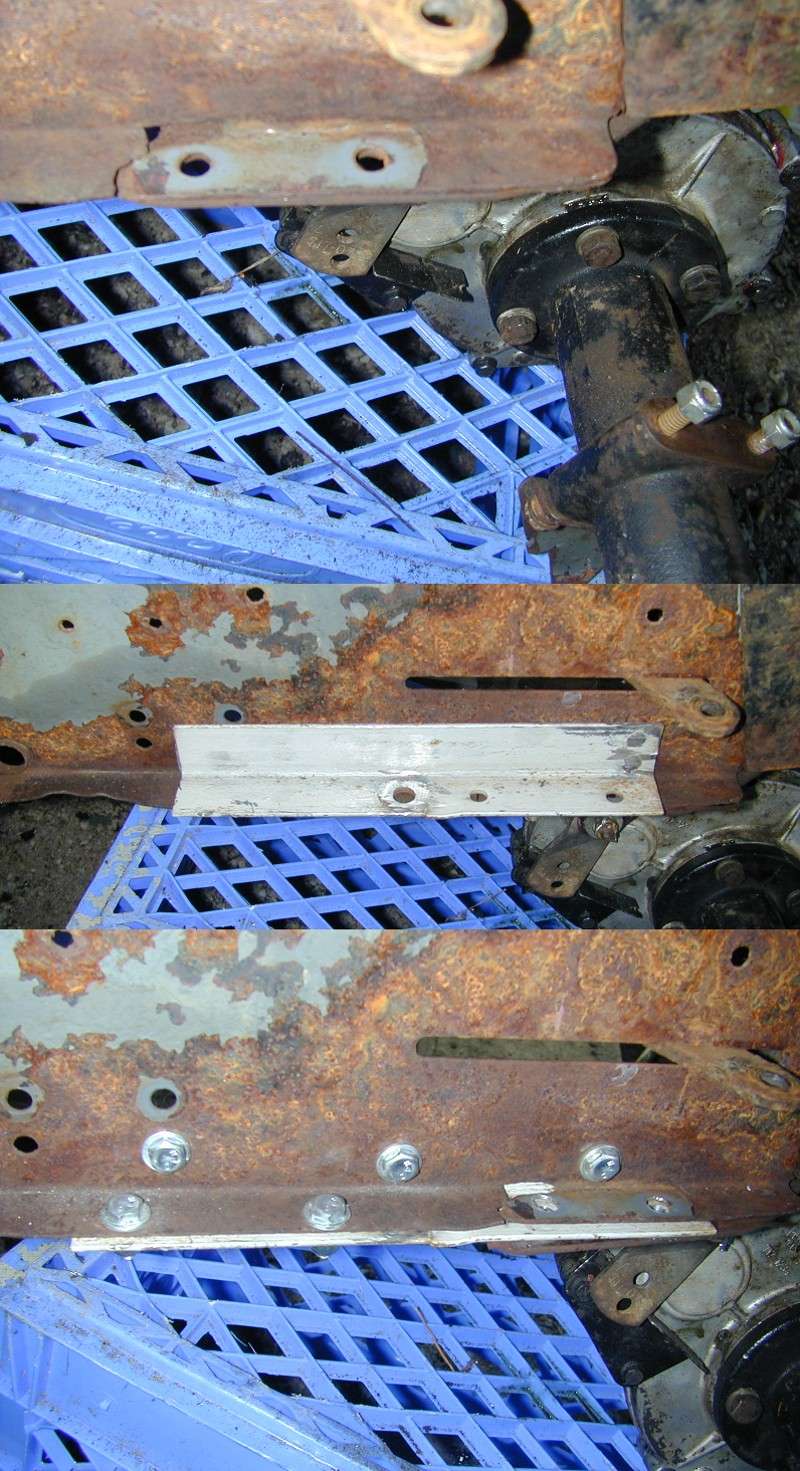 | |
| | | | redlinemotorsportts
Moderator


2014 Build-Off Entrant
2014 Build-Off Entrant
Age : 27
Join date : 2013-03-18
Points : 7366
Posts : 3131
Location : raleigh nc
| | Subject: Re: W.H.A.M.S. June 2nd 2014, 3:04 pm | |
| Good frame recknstruction, mine was cracked so I weld a washer over it and welded the crack. Hadn't have me problems. Frames are so freakin thin, just sheet metal...  | |
| | | | Angchor
Member
Age : 67
Join date : 2014-04-14
Points : 4302
Posts : 491
Location : Index, Washington
| | Subject: Re: W.H.A.M.S. June 2nd 2014, 3:26 pm | |
| - redlinemotorsportts wrote:
- Good frame recknstruction, mine was cracked so I weld a washer over it and welded the crack. Hadn't have me problems. Frames are so freakin thin, just sheet metal...
Here's a place where I will probably do the same. On the top of the frame. 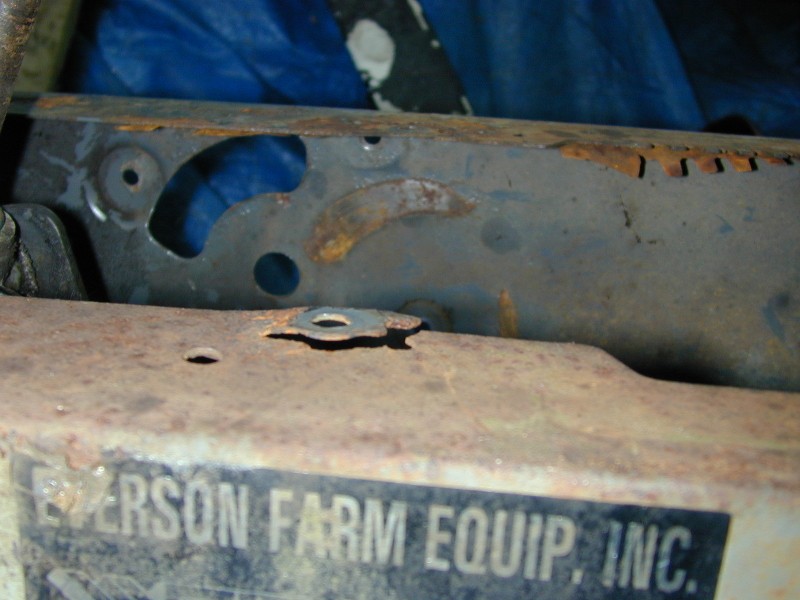 I'll probably bend the frame back into shape there, put a washer underneath, and then weld it all together. | |
| | | | Angchor
Member
Age : 67
Join date : 2014-04-14
Points : 4302
Posts : 491
Location : Index, Washington
| | Subject: Re: W.H.A.M.S. June 22nd 2014, 11:35 pm | |
| Today, I have removed the engine, to seal the oil leak. This engine has been apart before, but this is the first time I have cracked it open. I was pretty sure of where the leak was. When I had it apart I took pictures of both sides. Manipluated one of the two pics, so that they both ended up with the same 'profile'. Then compared gaps in the gasket on one side, with the same place on the other side. 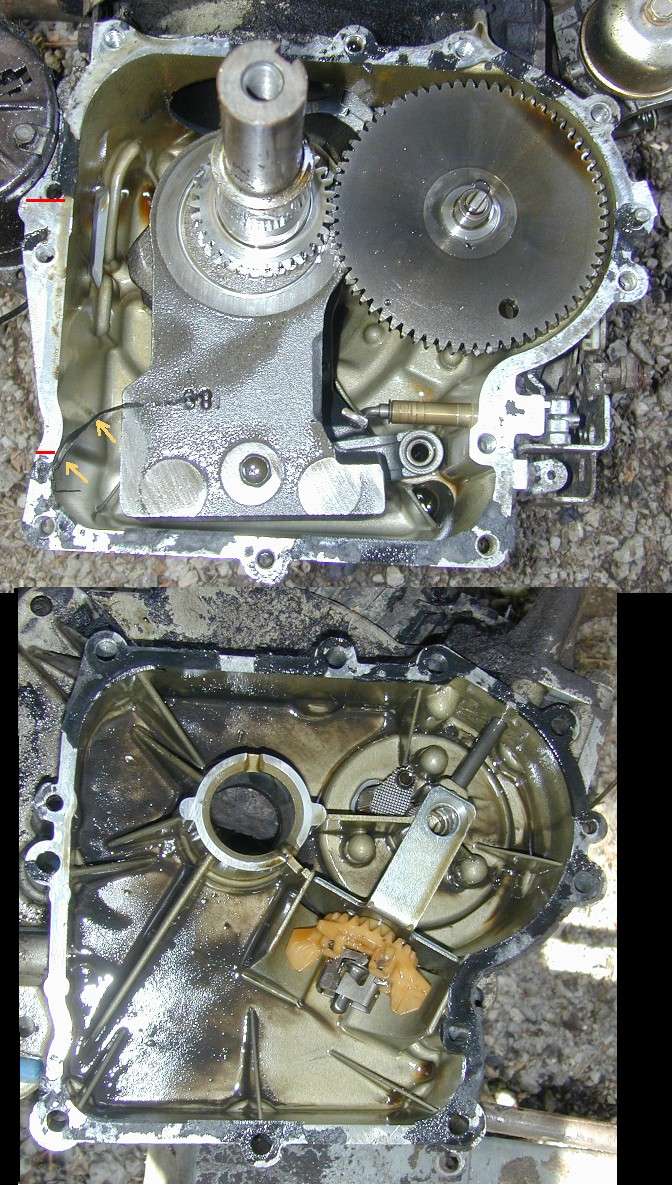 The leak was exactly where I thought it was. I then cleaned everything up really well, and checked for cracks or any other obvious problems inside and out. Now it's time to put it all back together. You know those gaskets you can buy with the silicone sealant already applied? It's a thin line that runs neatly around the area where needed. They have machinery, of course, to apply that silicone just so fine and neat... Well, I obtain the same sort of results as those gaskets, but I don't use a gasket, and my silicone isn't as fine and neat.  I clean off the remaining gasket. Clean both surfaces with brake cleaner. (Not carb cleaner or any other cleaner. Brake cleaner leaves no residue, so the silicone gets a good bond with the metal.) Put a very thin layer on one side. Keeping it as even as possible, but making sure to get the entire surface 'painted' with the silicone. (Did this on the block side, because it has stuff protruding, and it's more difficult to get the silicone even, unless you make this side the very thin side.) A slightly thicker layer on the other surface. Again, keeping it as even as possible. Even this layer should not be very thick. Then I let the silicone cure. Best if you leave it overnight for a complete cure. But in cases like this, I just let it sit for an hour or two. (It's the perfect chance to come inside to eat, and take my insulin shot.) It's thin enough that a couple hours sitting in the open, will have it mostly cured. I'll be putting this one back together after I have had a couple hour break. ~~~~~~~ Got the engine back together, and set it aside. Got to looking at the front end. Curious why it was so loose. I'll spare you all the pics and talk about how the metal frame was bent and bowed. The piece that holds the axle in, was all bent. And the axle itself was no prize. But what ground me to a halt was this... 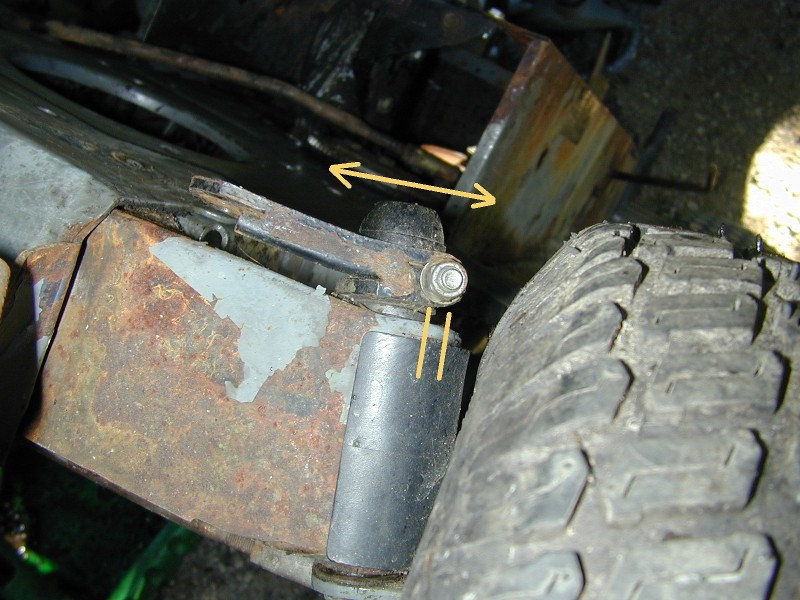 The upright part of the axle there, wobbles by well over 3/8 of an inch. I started taking things apart, and discovered why. Everything in the end of that axle is plastic! Once I had all the plastic out of there, I was left with this. 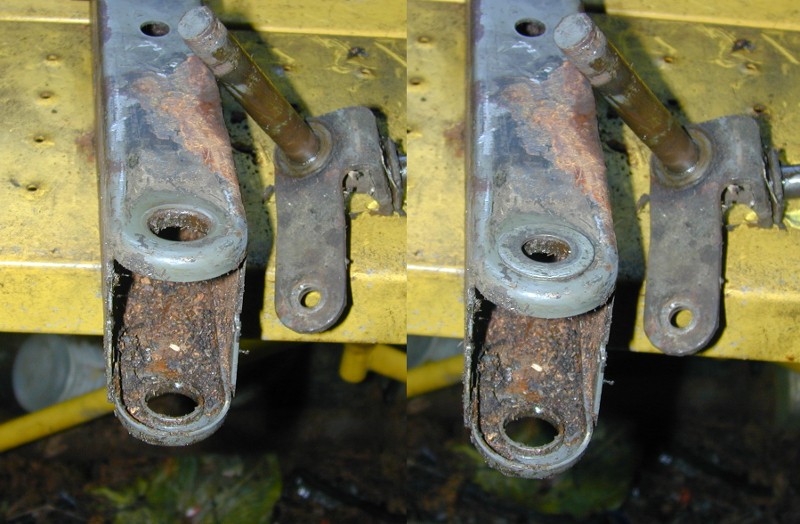 How do you guys normally deal with this? Going to be spending some time searching here, tonight. LOL But if anyone can save me some time and point me to some of the solutions you guys have come up with, I'd appreciate it. The only thing I can think of right now, is to weld some washers on the top and bottom of the axle. (As in the right side of the picture.) But that wouldn't last very long. Ideas? Suggestions? | |
| | | | willis923
Veteran Member
Age : 27
Join date : 2013-04-10
Points : 5644
Posts : 1408
Location : Galway NY
| | Subject: Re: W.H.A.M.S. June 22nd 2014, 11:42 pm | |
| common MTD problem. they really f'ed up when they designed that. Those spindles are 5\8, correct? rither way, go to your local hardware store and get a length of steel pipe, or a steel spacer, with an inner diameter which matches the diameter of the spindle. then just weld that into to axle. then, get a nylon bushing for the top. maybe even a brass bushing. then slap everything back together. i would weld an inch on one side, than an inch on the other, and keep flopping like that, as to try to control the heat so it dosent take out ALL the temper and weaken it. | |
| | | | Sponsored content
| | | | | | | W.H.A.M.S. | |
|
| | Permissions in this forum: | You cannot reply to topics in this forum
| |
| |
| | Who is online? | In total there are 58 users online :: 1 Registered, 0 Hidden and 57 Guests Rustbucket GarageMost users ever online was 412 on January 7th 2023, 7:59 am |
|