| | Utility MX |  |
|
+9redzz02 Deluxe66 Thunderdivine redlinemotorsportts jamcco jonjunk willis923 Doc Sprocket MoMower 13 posters |
|
| Author | Message |
|---|
mr.modified
Veteran Member

2015 Build-Off Top 3 Winner
2015 Build-Off Top 3 Winner
2016 Build-Off Top 3 Winner
2016 Build-Off Top 3 Winner
2018 Build-Off Finalist
2018 Build-Off Finalist
2022 Build-Off Entrant
2022 Build-Off Entrant
1st Place Build-Off 2014
1st Place Build-Off Winner 2014
2023 Build-Off Entrant
2023 Build-Off Entrant
Join date : 2013-11-02
Posts : 2906
|  Subject: Re: Utility MX Subject: Re: Utility MX  March 10th 2015, 10:16 pm March 10th 2015, 10:16 pm | |
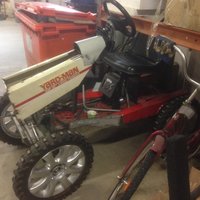
| This thing is looking pretty neat. Don't know if I missed seeing those custom rims before or what, but they really worked out good. Nice to have the tools to make straight cuts and line that stuff up so you can do things like that. | |
|
| | |
Deluxe66
Member

Age : 47
Join date : 2014-05-23
Points : 3844
Posts : 120
Location : Finland
| |
| | |
Deluxe66
Member
Age : 47
Join date : 2014-05-23
Points : 3844
Posts : 120
Location : Finland
| | Subject: Re: Utility MX March 23rd 2015, 6:01 am | |
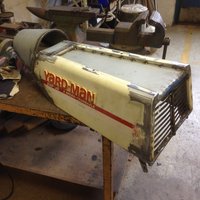
| Little progres with the hood. I have decided the place because it was easiest to make brackets to this position. Hood is now bolted at place and shabe is almost finish. I started making the led light brackets. After led light is bolted I will weld some tubes to the sharp edges. http://aijaa.com/NmL1n4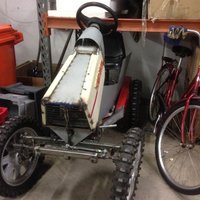 Now this hood will give protection against rain and there is also some shield over the moving parts. I will add some silicone to the seams to get little cleaner look and to get better raincover. | |
|
| | |
Deluxe66
Member
Age : 47
Join date : 2014-05-23
Points : 3844
Posts : 120
Location : Finland
| |
| | |
Deluxe66
Member
Age : 47
Join date : 2014-05-23
Points : 3844
Posts : 120
Location : Finland
| | Subject: Re: Utility MX April 15th 2015, 5:05 am | |
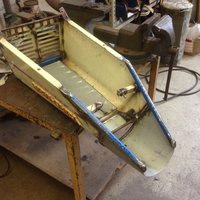
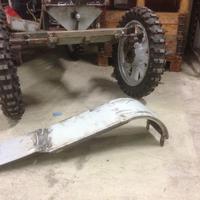
| Other side fender needs only some final weldings and it is ready. I have started to modify other side with these bended tubes. Sharp edges are not so nice looking and maybe dangerous at some point. http://aijaa.com/HdUJEI Next challenge is to get varidrive system bolted. I have looked the drawing printed from some Yardman manual and it seems that I am missing some parts. Well I have get used to make parts during this build  | |
|
| | |
Deluxe66
Member
Age : 47
Join date : 2014-05-23
Points : 3844
Posts : 120
Location : Finland
| | Subject: Re: Utility MX April 21st 2015, 6:17 am | |
| Rear fenders are now ready. I can jump at my full weight on these. http://aijaa.com/7GpEoW 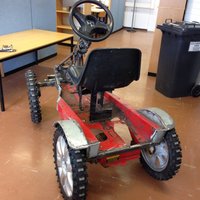 http://aijaa.com/tYPicz http://aijaa.com/tYPicz  I started to put varidrive parts to the frame. I would be clad if someone could have photo around rear axle area because I am missing pulley and brackets. The small pulley on my photo is for the rear axle belt and I am missing the engine belt tensioner pulley + all pulley brackets. Are those upper and lower tesnioner pulleys moving together at same angle? Or is there two springs so that upper and lower pulleys can move separately? Sorry about the unclear questions http://aijaa.com/y53CDJ  How many rods this kind of varidrive pulley tensioners need? Will it work with one rod only? Originally there is some lever where you can choose constant speeds but is that connected only to the pedal and from pedal there is only one rod to belt tensioner system? If there is only one rod then I will skip the constant speed system and use only pedal for different speeds. I will not make any gas pedals I will only use the original throttle so that I can leave engine running at different speeds. I have an MTD riding mover with some varidrive system. I will flip it over and look whats under it. Maybe I get the system idea from that mover. Because I need to make parts for the belt tensioners I am thinking about to make totally different system than the original has been. Of cource it means welding and grinding and then welding again. Well this Project might be on hold because I bought an small motocross bike to the kids and it needs some repairings. Anyway thanks in advance if someone will post some answers to my open issues. | |
|
| | |
Deluxe66
Member
Age : 47
Join date : 2014-05-23
Points : 3844
Posts : 120
Location : Finland
| | Subject: Re: Utility MX May 26th 2015, 5:00 am | |
| Hello from slow fabrication center in the midlle of Finland Mini Bike is running so next project please I found the missing parts to the VariDrive system. I managed to install the pulleys + engine somehow and started to make the pedal. Pedal is made from the original parts. I modified it to fit to the steering collumn and bottom plate. I made hole to the frame so that the rod which pulls the pulley is goin to down to the protection of rear skip plate. Originally pedal and all rods are uder the frame from the front to rear. With this design the front is clear about any parts under the frame. Here is photo about the pedal. http://aijaa.com/C2EDQs http://aijaa.com/DzNO7l http://aijaa.com/DzNO7l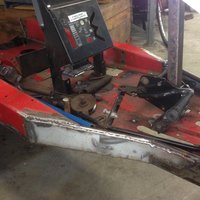 I will use only one rod system and see how is it going to work. I will drill many holes to the lever so that I can change the pulling lenght. Or I will use pull / push type of cable attached directly to the pedal. Maybe pedal needs to be lifted to get longer lever? I am open for modifications Maybe some points are not so clear but I will add photos after there is some progress. | |
|
| | |
Deluxe66
Member
Age : 47
Join date : 2014-05-23
Points : 3844
Posts : 120
Location : Finland
| | Subject: Re: Utility MX June 11th 2015, 7:11 am | |
| Slow progress but some progress anyway. I had an brain fart about the directions. According the original plan rod would have been pushing the to the rear oops. So I made quick change and of cource more complex system First linkage is ready for testing. http://aijaa.com/ka2yws 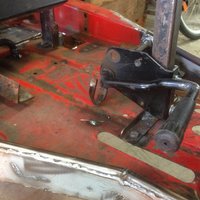 http://aijaa.com/S6Nhme http://aijaa.com/S6Nhme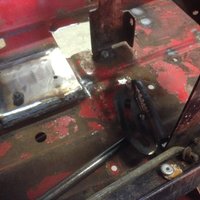 http://aijaa.com/tE3O5N http://aijaa.com/tE3O5N  http://aijaa.com/h61Ca8 http://aijaa.com/h61Ca8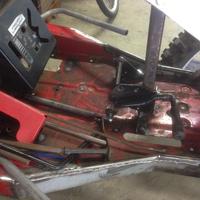 http://aijaa.com/WqFPZ3 http://aijaa.com/WqFPZ3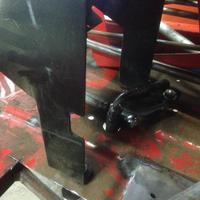 I made adjustable rod because I do not have any idea how long travel is needed. Those extended hole brackets are cut from the original pedal system. With those extended brackets I can adjust the travel lenght. Photos are not the best but hopefully you can get idea some how. Uder the frame linkage is the next Project. I need to add springs also and then and then ...... I am bit worried about the force needed to use that pedal but if I do not have enough power on my leg I will go to gym or rework the pedal system This pedal + linkage issue has been more time-consuming that I was thinking. Mosl likely atv engine mounting + drive system would have been done a lot at this time. But that is future. | |
|
| | |
Deluxe66
Member
Age : 47
Join date : 2014-05-23
Points : 3844
Posts : 120
Location : Finland
| | Subject: Re: Utility MX August 20th 2015, 5:48 am | |
| Hello all listeners or is it readers  I took little break about fabrication but now I started again. Today I managed to weld engine installation nuts to the frame + some other weldings. It is much easier to design the pull rod + spring issues when the engine is easy to remove. http://aijaa.com/up6W41  Now engine is at its own place and hopefully at final place at the same time | |
|
| | |
redlinemotorsportts
Moderator


2014 Build-Off Entrant
2014 Build-Off Entrant
Age : 27
Join date : 2013-03-18
Points : 7366
Posts : 3131
Location : raleigh nc
| | Subject: Re: Utility MX August 20th 2015, 1:09 pm | |
| Nice, get the vari drive belt system figured out? | |
|
| | |
Deluxe66
Member
Age : 47
Join date : 2014-05-23
Points : 3844
Posts : 120
Location : Finland
| | Subject: Re: Utility MX August 20th 2015, 2:04 pm | |
| Yes I at least think so. Hopefully tomorrow I will have time to continue and then be closer about the test drive. | |
|
| | |
Deluxe66
Member
Age : 47
Join date : 2014-05-23
Points : 3844
Posts : 120
Location : Finland
| | Subject: Re: Utility MX August 21st 2015, 5:40 am | |
| One spring and one rod almost ready. This is just the phase where you do something but nothing seems to get ready  Well I will make it work some day I have already bought gasoline for the test drive | |
|
| | |
MoMower
Member
Join date : 2014-06-25
Points : 3724
Posts : 37
| | Subject: Re: Utility MX August 23rd 2015, 12:36 pm | |
| love this tractor! You're doing really great work amd I camt wait to see it running and driving. | |
|
| | |
Deluxe66
Member
Age : 47
Join date : 2014-05-23
Points : 3844
Posts : 120
Location : Finland
| | Subject: Re: Utility MX August 24th 2015, 8:27 am | |
| Thanks for positive comments Now the rod + spring issues are solved and done. Varidrive pulley height needs to be adjusted now the belts are not inline. Well I just need to adjust the sleeve lengths and then bolt it back. Then I need to fabricate some air cleaner and then oil to engine and then and then .... | |
|
| | |
Deluxe66
Member
Age : 47
Join date : 2014-05-23
Points : 3844
Posts : 120
Location : Finland
| | Subject: Re: Utility MX August 26th 2015, 6:26 am | |
| I started to bolt on more original parts. This time I imagined that I can just bolt the original shifter back but it did not fit. I have made supports to the seat and offcource this shifter is just at the same line. Well I will cut the shifter rod and make it work. Collision is at the blue arrow area. I made an adjustable spring tensioner and you can see it about the red arrow area. I was thinking that because I do not have the orininal setup some adjustment would be good. http://aijaa.com/U7qCjK I started also to make the engine shut down switch. I have learned that even there is small amount of horsepower the torgue is quite big. Test drive should be more safe with this switch. Air filter will be some where behind the seat. For the test drive I will only bolt the honda original plastic bottom plate. That plate has some cover so not every stone gets inside of the engine. After test drive I will more wiser about this tractor and about the other modifications taht needs to be done. So air filter is not priority one. | |
|
| | |
Deluxe66
Member
Age : 47
Join date : 2014-05-23
Points : 3844
Posts : 120
Location : Finland
| | Subject: Re: Utility MX September 8th 2015, 6:29 am | |
| Now I have enough good working throttle. http://aijaa.com/9fvoOf Aijaa.com Aijaa.comI can change gears from the lever. http://aijaa.com/zODFJe Aijaa.com Aijaa.comEngine shut down switch is ready. Maybe I can test drive even this week? Some bolts need to be installed. I will make some cover over the carburetor and then I think this should be ready for test drive. For some reason there is bit of traction even pedal is at floor but maybe it will fix automatically during test drives. If not then I will figure out something. Most likely the belts are too short? I just picked up some belts that I have at my garage. As usual when everything is almost ready rush is on and quality migh be not so nice but is it so that these fastly made issues can be done better at some day later | |
|
| | |
Deluxe66
Member
Age : 47
Join date : 2014-05-23
Points : 3844
Posts : 120
Location : Finland
| | Subject: Re: Utility MX September 10th 2015, 7:53 am | |
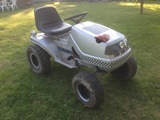
| Test drive done. Engine was running badly and some traction was on all time. I managed to drive forward and reverse left and right so good enough for now. Next I will make some improvements. It seems that nothing needs to be done again. Seat is too close to steering wheel but seat modification is not on top of to list. http://aijaa.com/pdsGsM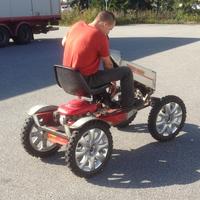 | |
|
| | |
redlinemotorsportts
Moderator
2014 Build-Off Entrant
2014 Build-Off Entrant
Age : 27
Join date : 2013-03-18
Points : 7366
Posts : 3131
Location : raleigh nc
| | Subject: Re: Utility MX September 10th 2015, 11:31 pm | |
| Nice, now its just fine tuning to change what you dont like. its always in everyones builds when were "done"  | |
|
| | |
Deluxe66
Member
Age : 47
Join date : 2014-05-23
Points : 3844
Posts : 120
Location : Finland
| | Subject: Re: Utility MX September 13th 2015, 6:53 am | |
| Thanks I was happy about the light steering and slow speed. Hopefully this tractor is never ready | |
|
| | |
MoMower
Member
Join date : 2014-06-25
Points : 3724
Posts : 37
| | Subject: Re: Utility MX September 13th 2015, 1:22 pm | |
| I hope to see a video soon. | |
|
| | |
Deluxe66
Member
Age : 47
Join date : 2014-05-23
Points : 3844
Posts : 120
Location : Finland
| | Subject: Re: Utility MX September 13th 2015, 3:07 pm | |
| - MoMower wrote:
- I hope to see a video soon.
Well I am not good at computer stuff but maybe I manage to get video some day some way | |
|
| | |
Deluxe66
Member
Age : 47
Join date : 2014-05-23
Points : 3844
Posts : 120
Location : Finland
| | Subject: Re: Utility MX September 22nd 2015, 5:20 am | |
| Intake ready for painting. I placed the filter under the seat so it has some rain cover. I will also bolt some "hood" over the filter cutted from some plastic bottle or something. I have used some car cooling system tubes and also exhaust pipes and Yardman frame and and... after some time it looks like this. http://aijaa.com/kr9TQN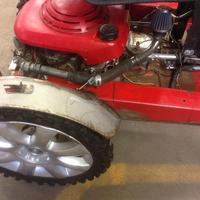 I have also cutted some space to the frame so that carburetor is able to remove easily. Next I will open the carburetor and hope to get better running engine for the next test drive. | |
|
| | |
Deluxe66
Member
Age : 47
Join date : 2014-05-23
Points : 3844
Posts : 120
Location : Finland
| | Subject: Re: Utility MX October 1st 2015, 5:06 am | |
| Test drive number 2 done. Engine was running well and ones the other wheel was even spinning not on the tarmac though. http://aijaa.com/qwXsGx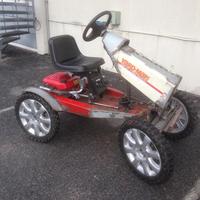 http://aijaa.com/e1rXyG http://aijaa.com/e1rXyG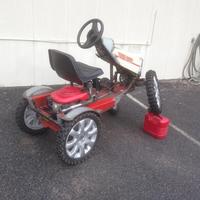 Front wheel can be lifted at least 25" before rear wheel rises. Maybe I need to limit the tilting? Temperary shifter weldings didn´t last so driving ended. Next I will start making the skid plate for the rear axle. Then some painting and real test drive at some forest. | |
|
| | |
Deluxe66
Member
Age : 47
Join date : 2014-05-23
Points : 3844
Posts : 120
Location : Finland
| | Subject: Re: Utility MX October 8th 2015, 5:22 am | |
| I took the engine out and because of the weld nuts and small engine it takes only about 5 minutes Rear skid plate was on the list next. I made the round shape from kids bicycle rim. http://aijaa.com/RvOK4p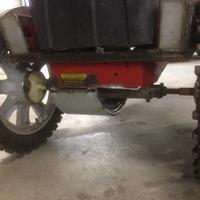 http://aijaa.com/iLrLc2 http://aijaa.com/iLrLc2 This is going to bolted for easy access to the belts and rear axle. I will add one plate so that there is not any gaps between this plate and frame. | |
|
| | |
Deluxe66
Member
Age : 47
Join date : 2014-05-23
Points : 3844
Posts : 120
Location : Finland
| |
| | |
Deluxe66
Member
Age : 47
Join date : 2014-05-23
Points : 3844
Posts : 120
Location : Finland
| | Subject: Re: Utility MX November 17th 2015, 5:23 am | |
| Plan was to use white and red but because of timetable issues I desided to use workplace paint shop. There is only one colour available and it is black. It took only half an hour to paint all parts. So one lunch break job. http://aijaa.com/T2zOaA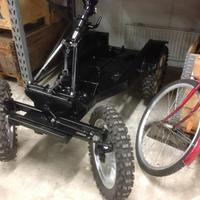 I will add Silver to the hood and that´s it. When I had rear axle at my hands I noticed that one important this has not been done = Brakes. Well I will add some rod to the varidrive rod somehow one pedal should be enough. Until next time .......... | |
|
| | |
Sponsored content
| |
| | |
| | Utility MX | |
|