Do you think the plastic wheels will hold up where they ride on the axle? I guess greased up a bit and given the number of them it won't be so bad. Weight spread out over a bunch of them. Some field testing with the X1 should provide some answers. Looking good!
Do you think the plastic wheels will hold up where they ride on the axle? I guess greased up a bit and given the number of them it won't be so bad. Weight spread out over a bunch of them. Some field testing with the X1 should provide some answers. Looking good!
Thanks! I think I'm good with the road wheels for now. These wheels are rated for 50lbs each. There'll be 16 of them total which brings the weight of the total vehicle that it can handle to 800lbs. I think I'm at around 300 to 350lbs right now plus me. Still have about 300lbs free. Plus I plan on upgrading to the metal ones eventually with the bearings inside of them. Plus I have a big box of the plastic ones I been collecting. It will give me a reason to use them up, LOL. I'm more concerned with the axles bending first though. One set will hold my weight rolling down the driveway but hitting an obsticle might bend the axle first before breaking a wheel. Can't wait to test them out though.
mr.modified Veteran Member
2015 Build-Off Top 3 Winner
2015 Build-Off Top 3 Winner
2016 Build-Off Top 3 Winner
2016 Build-Off Top 3 Winner
2018 Build-Off Finalist
2018 Build-Off Finalist
2022 Build-Off Entrant
2022 Build-Off Entrant
2500+ Posts
2500+ Posts!
1st Place Build-Off 2014
1st Place Build-Off Winner 2014
2023 Build-Off Entrant
2023 Build-Off Entrant
Age : 34 Join date : 2013-11-02 Points : 7137 Posts : 2907 Location : New Jersey USA
I remember reading about those MK IV british WWI tanks that they had trouble with the idlers crushing in when going over logs or other obstacles that would put a lot of weight on just one roller at time, like you said. They fixed the problem by making them solid instead of hollow. Maybe your setup will hold up good anyway.
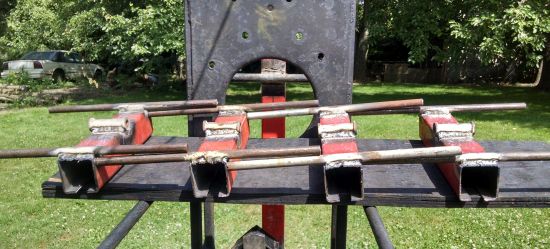
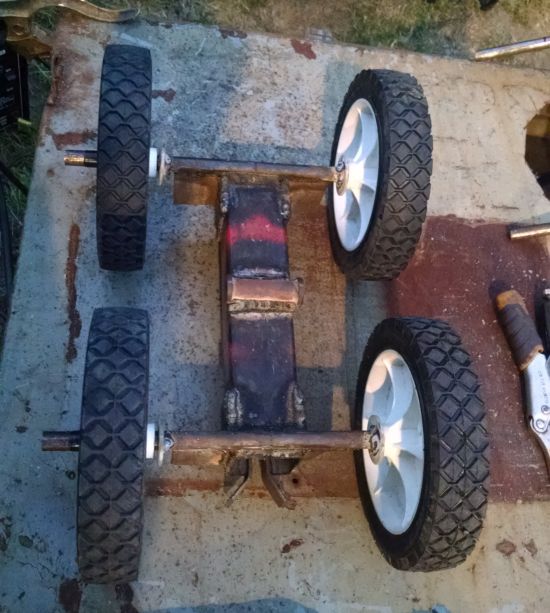
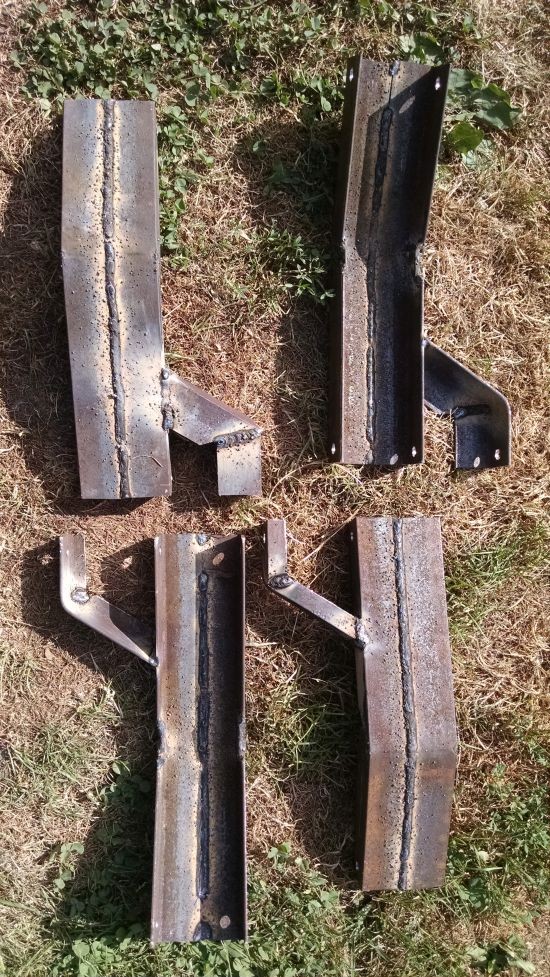
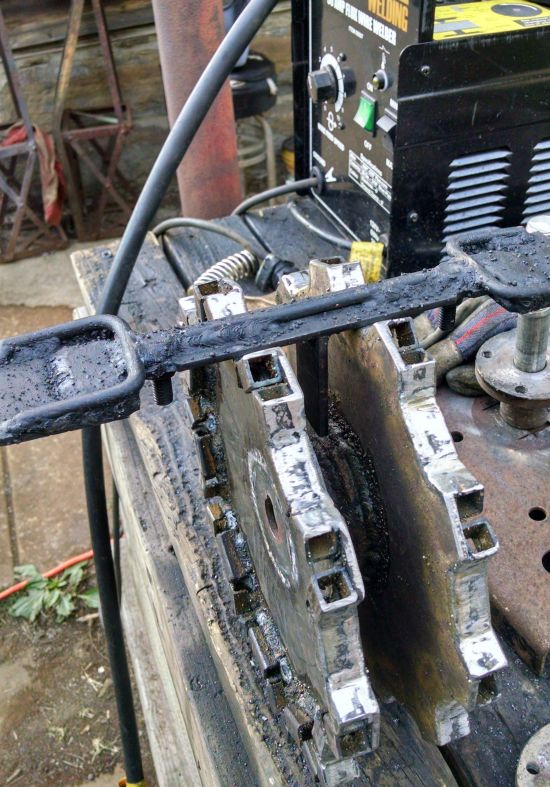
Hay people, I been busy!! The same weekend I did the suspention mounting bar I did the road wheels, the part that holds them, and finished today. This is called a double wheel bogie. I used the same square tubing for the suspention mount for its strength which is 2 inch square tubing with a 1/8 thickness, plenty strong. Then for the axles, 1/2 inch round bar. For the guides I ended up using 1 inch flat stock, 1/8 thickness. on this part I ended up using the flat stock in the end because when I tried using angle iron, I made it too close to the track, so when the bogie rolled over the track, the angle iron kept scraping the track. I could have redone this with angle iron by raising the angle iron closer to the bogie frame but the result would have been the same in the end. I added reinforcement to the axles and frame with pieces of angle iron. The video shows me building these and testing a set on the actual track with good results.
This pic shows the body of the double wheel bogie with the axles and A-arm link welded on
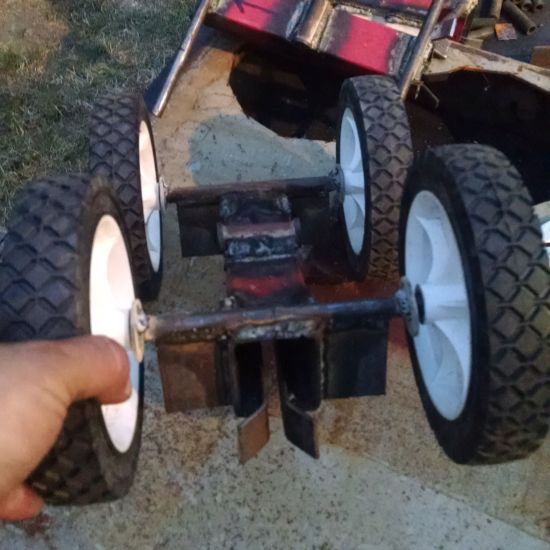
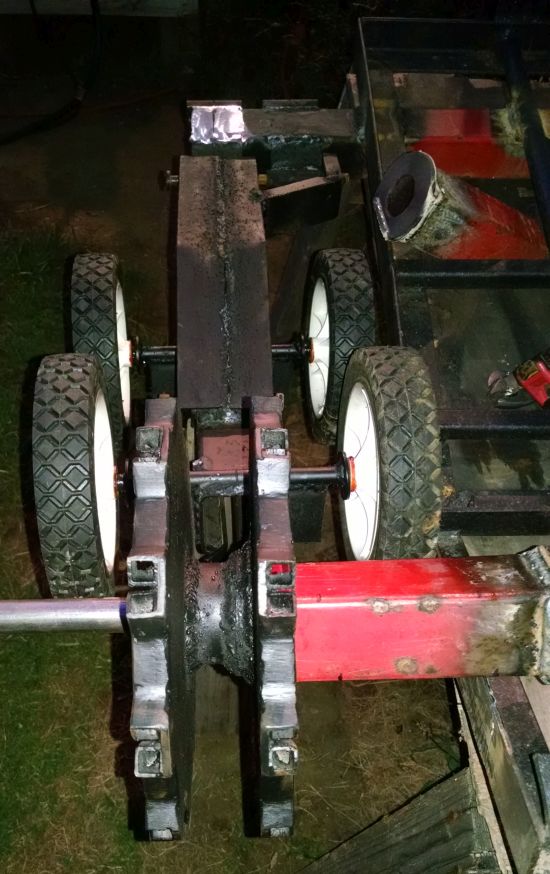
The completed bogie, note the guides open up past the body to help straiten the track when going through
This is the bottom view
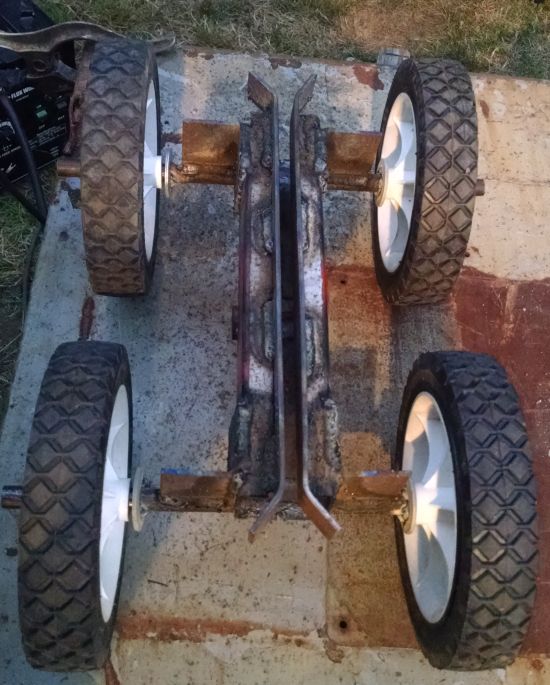
This is the top view, note the A-arm hookup is in the center to evenly push down on the bogie body
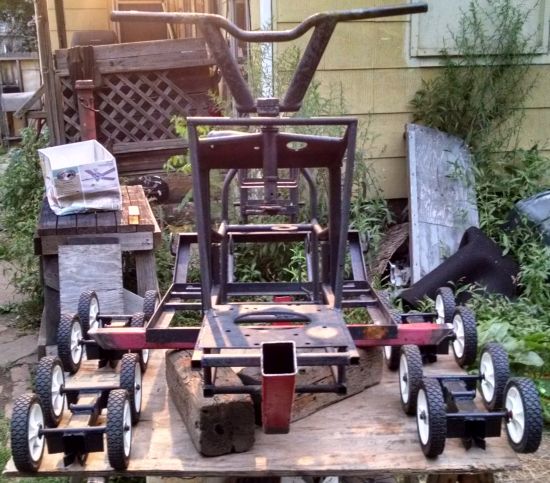
4 completed double wheel bogies without the wheels for the build, painted flat black
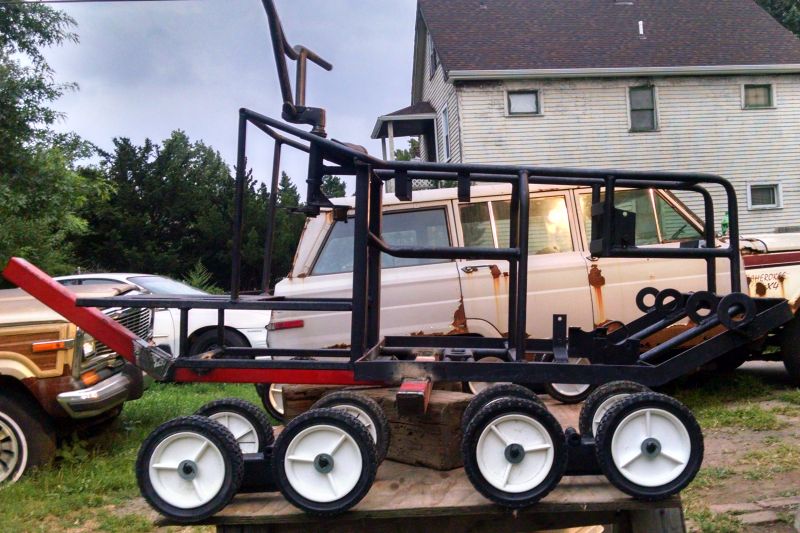
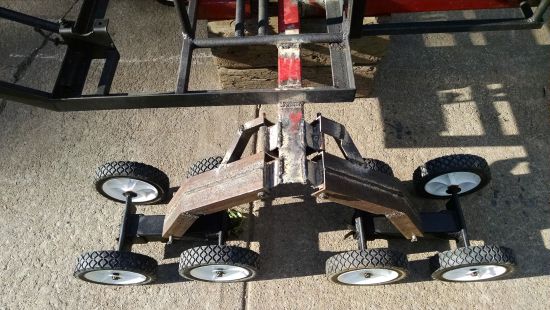
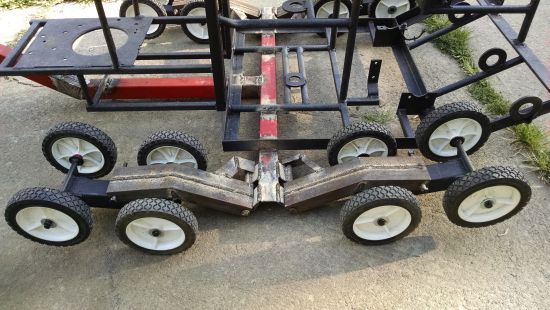
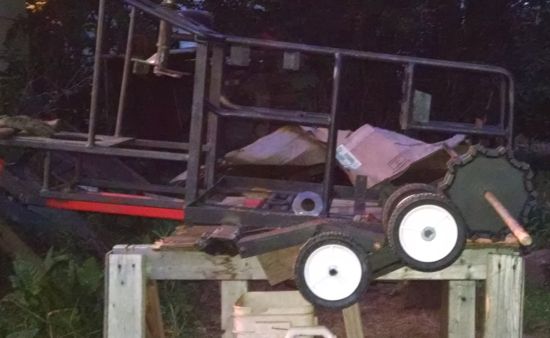
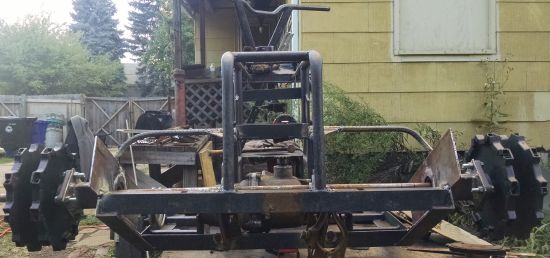
This view gives an idea on how wide this thing will be.
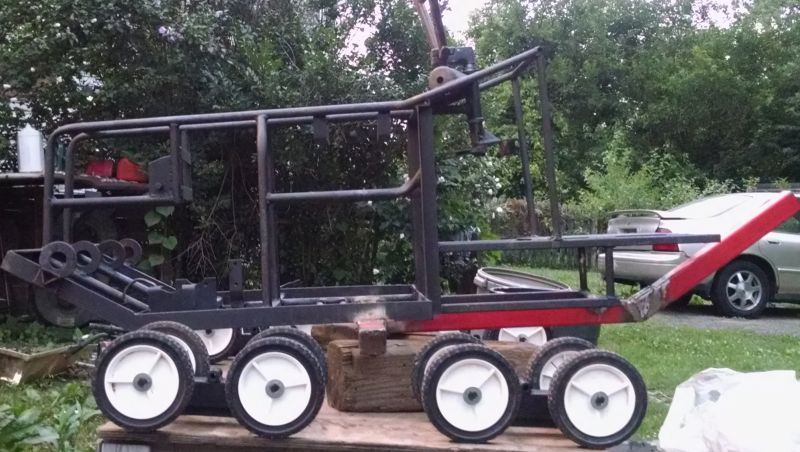
This view gives an idea on the stance, I love the look of it being higher in the front
I haven't decided on ride height yet. Since I'm using automotive air shocks for the suspention, this gives endless posibillities and with the front idler setup I'll be making, which keeps the tracks tight, will be spring loaded and not fixed to the chassis, will make choosing ride height as simple as just adding air to, or removing air to the shocks.
mr.modified Veteran Member
2015 Build-Off Top 3 Winner
2015 Build-Off Top 3 Winner
2016 Build-Off Top 3 Winner
2016 Build-Off Top 3 Winner
2018 Build-Off Finalist
2018 Build-Off Finalist
2022 Build-Off Entrant
2022 Build-Off Entrant
2500+ Posts
2500+ Posts!
1st Place Build-Off 2014
1st Place Build-Off Winner 2014
2023 Build-Off Entrant
2023 Build-Off Entrant
Age : 34 Join date : 2013-11-02 Points : 7137 Posts : 2907 Location : New Jersey USA
Neat idea with the sliders to hold things straight. Think wear will be an issue? If you have to change the setup later, you could get some snowmobile track slides to use in place of the metal ones. Bolt in place maybe or something. Almost like teflon or some kind of plastic I think. Almost ready to roll with this thing now!
Neat idea with the sliders to hold things straight. Think wear will be an issue? If you have to change the setup later, you could get some snowmobile track slides to use in place of the metal ones. Bolt in place maybe or something. Almost like teflon or some kind of plastic I think. Almost ready to roll with this thing now!
I plan on having this thing on the ground this weekend. I got the main part of the A-frames done Wednesday with the connecting links put together ready to be welded to the frame. I still have to make stops later on for A-frames, shock mounts, and the 3rd leg for the A-frame for stability connecting to the frame.
Wear on the guide channels will be the worst in the front bogie where it first enters the bogie guide channel. That's what I was told by guys building those air soft paintball tanks. I can remidy this by either just welding metal to the worn spots or cutting out the front part and putting in caster wheels for a more permanent fix. Plastic will just get eaten up too quickly up front but in the middle of the channel will work great. I'll most likely put casters up front. For the Idler wheels I plan on using pvc flatened out for the track to slide on, on the stretch from the rear sprocket to the front idler wheels for least resistance. No casters here except the front idlers, will help keep the track tight.
McKmudder Member
2015 Build-Off Entrant
2015 Build-Off Entrant
Age : 25 Join date : 2014-12-02 Points : 3658 Posts : 36 Location : South webster ohio
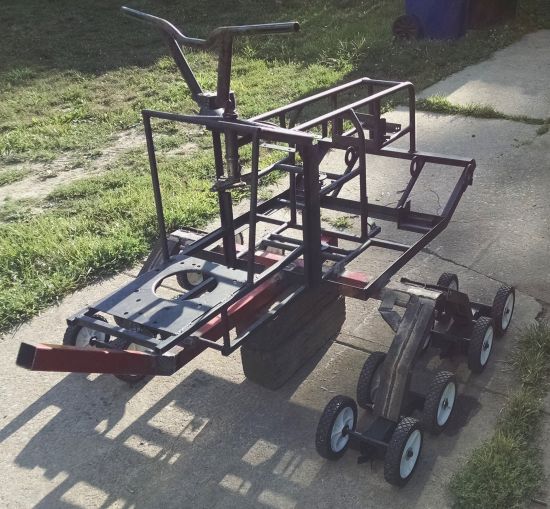
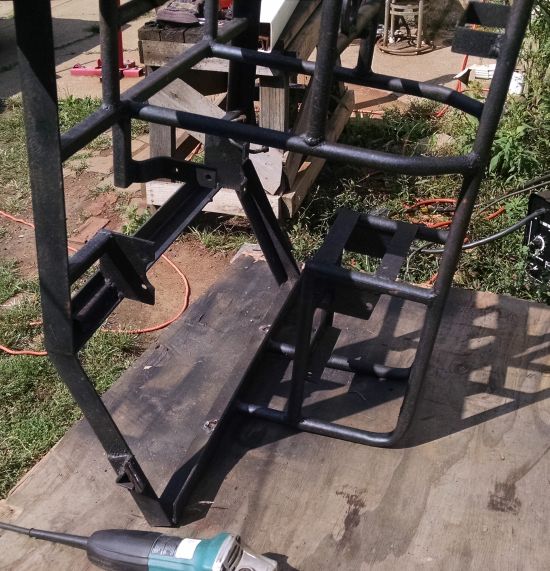
Hay People, still going crazy on this thing, still alot to do. I finished up the A-frames after I welded on the mounting spots on the chassis. The A-frames make a more stable or stiffer suspention then just a single bar. I welded 2 pieces of angle iron together for the A-frames, should be plenty strong I think. Should be able to drive over a land mine, er a, I mean a pot hole with no problems, lol. Still need to put stops on and shock mounts on, but that will come later so I know where to exactly put them.
Completed A-frames without the stops and shock mounts. Top and Bottom views.
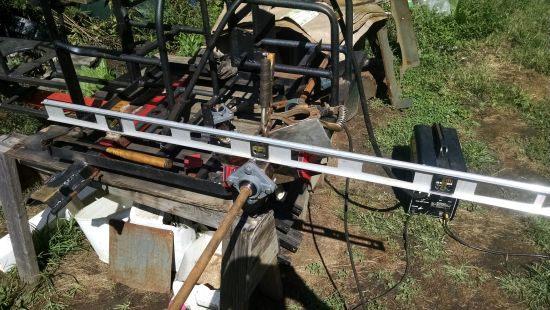
Next 2 pics are A-frames installed on the suspention bar with the mounts welded in. First pic is the suspention fully extended, and the 2nd pic is fully lowered.
The next 2 pics show the suspention fully extended. Those are 2 6x6 blocks holden the chassis up. So thats around 12 inches of ground clearance under the belly there.
The next 2 pics show the chassis all the way lowered. Around 1 to 2 inches off the ground and it still rolls. Although it will go this low, the tracks will hit the framing. So the lowest I can have the suspention go and be able to drive it would be about 4 inches from the belly to the ground. Since I'm using auto air shocks, picking the ride height will be as simple as putting air in them or letting the air out. I'm going to try to make the suspention be able to work with the Idlers so I can take full advantage of the air shocks adjustability in heights. The shocks have a compressed height of 13 inches and at full extention are 20 inches, so thats 7 inches of travel.
Here's the video of me doing the work.
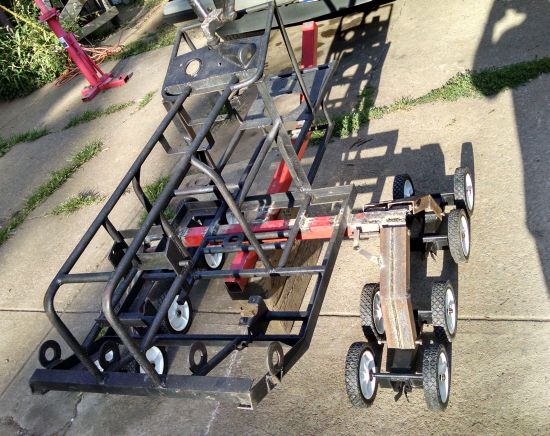
Here's a sneak peak of the drive sprocket I been working on. I been working on this part off and on for the past 3 weeks. It's the last complex part of the track system. A lot of little parts to make. Vids coming soon on this part, don't know when, but soon. I'm waiting on parts to come in the mail to finish the drive section with this part.
I planned on having the chassis on the ground, on wheels by the end of July. I'm only a day late, LOL. Planning on a test of the track system fully together in 2 weeks, lets see if it happens. Wish me luck.
mr.modified Veteran Member
2015 Build-Off Top 3 Winner
2015 Build-Off Top 3 Winner
2016 Build-Off Top 3 Winner
2016 Build-Off Top 3 Winner
2018 Build-Off Finalist
2018 Build-Off Finalist
2022 Build-Off Entrant
2022 Build-Off Entrant
2500+ Posts
2500+ Posts!
1st Place Build-Off 2014
1st Place Build-Off Winner 2014
2023 Build-Off Entrant
2023 Build-Off Entrant
Age : 34 Join date : 2013-11-02 Points : 7137 Posts : 2907 Location : New Jersey USA
Hay People, time for the thinking cap, (no, not the pointy one), LOL. Ok, I have to make the drive sprockets to, well, drive the tracks. Never made a sprocket before. OH BOY!!! So, when you think about it, you just can't use anything. Lets talk about what I have first. Homemade tracks made from scratch, from steel I got from steel cages from work, a steel supplier, and Home Depot. I just can't go through a catalog and pick a set out from something. Plus I can't use what comes to mind, like a set of rims. All this means, I HAVE to design them myself!!
So, I need to know the spacing of the track plates on the chain, thickness of chain, the diameter for the sprocket to work with tracks, spacing of chain, how the chain bends or works, to start with. Some of this stuff is important and some I won't even need to know. I need to know how the chain works for the most part- the links have an inside diameter of 1 1/4", means the links are 1 1/4" spacing and where the chain links bend is the hinge, so the spacing of the cogs will have to be 1 1/4". I found out this is the main info I need for my sprockets to work with my tracks with a slight mod because the cogs won't be grabbing the chain links but the track plates themselves so I have to compensate later for this after the main design is done. I need the main diameter to start with.
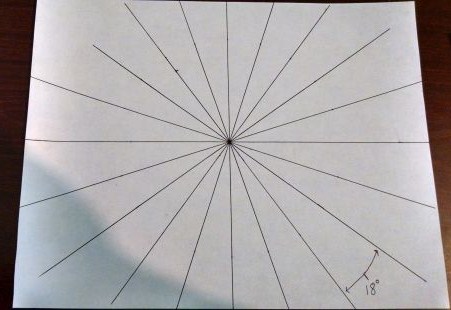
How to do it.... I divided 1/4 of a circle in degrees by 5, so 90 degrees divided by 5 = 18, so each cog will be 18 degrees apart in a 1/4 circle. Blow this up a bit. A whole circle is 360 degrees or 4, 90 degree parts, and 5, 18 degree parts in every 90 degree parts, give a total of 20 parts or cogs in a whole circle. My sprocket will have 20 sections or wedges in it. Each wedge is a cog, but how long are the wedges? This is where the measurements of the chain and how it works come in to play. The chain is spaced and the hinge is on the inside of the chain link which is 1 1/4". That's the magic number that determines the diameter of the sprocket or right now, the height of the wedge. As a wedge gets longer, it gets wider, so from the center of the circle moving outwards till the wedge gets to be 1 1/4" wide will give me my diameter. That's how you figure it out. Now I'll draw it and explain the pics using this info.
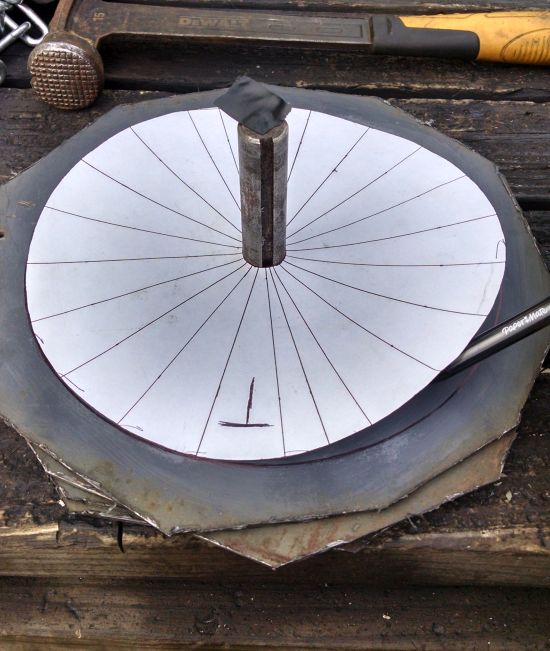
In this pic, from the info I figured out. I start with making the center of the circle,(just put a dot in center of paper). My circle will have 20 wedges in it at 18 degrees apart. Using a protractor and setting up the protractor so the center is in its spot on the center of the paper, I drew marks for the wedges placing marks every 18 degrees all the way around and connected the 18 degree marks to the center dot on the paper using a ruler. I also made the lines as long as I can make them. This will set me up for the next step.
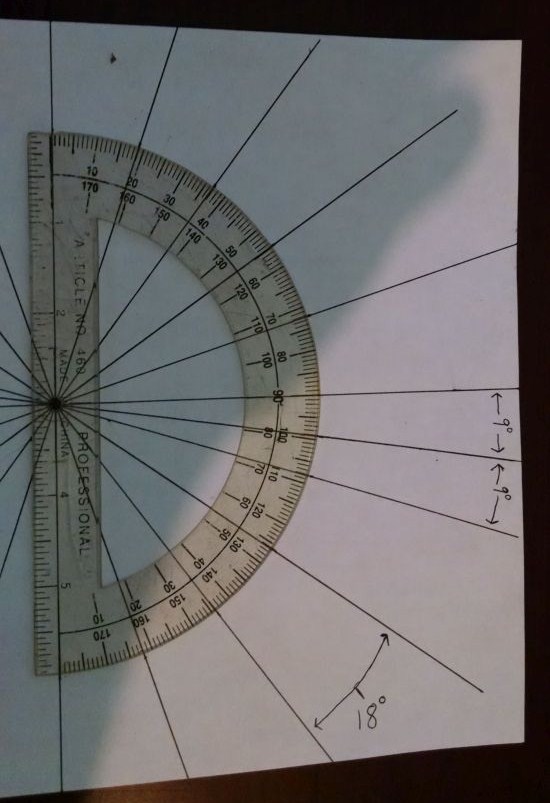
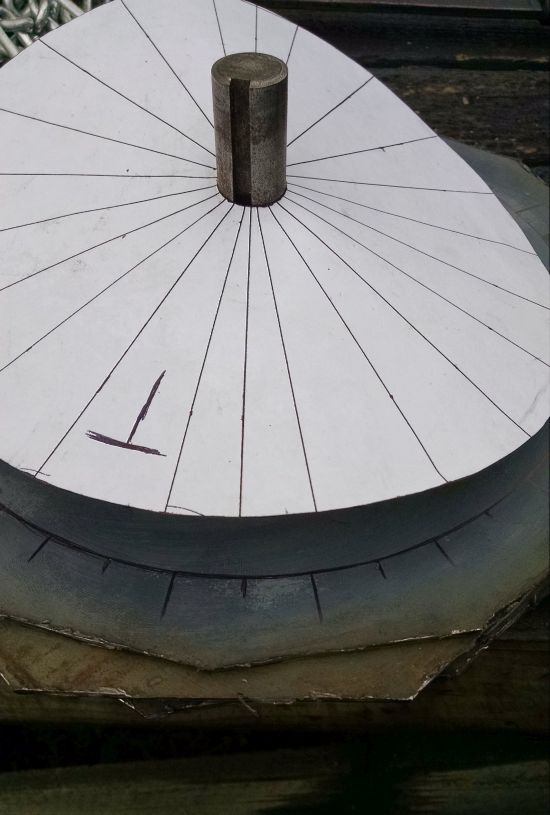
In this pic, Shows my protractor, which is clear, so I can see the lines better. Now I have to draw a line down the center of one 18 degree wedge which is 9 degrees and the line needs to be long enough to go through the other half of the circle too. This line in the middle of the wedge will ensure that the protractor stays straight for the next step.
In this pic I find the diameter. My protractor has a ruler on it also on the flat end. I need the wedge to be 1 1/4" wide on the open end. I turned the protractor around and the 90 degree mark on the protractor stays on the middle line while I move the protractor up the wedge, which ensures the ruler side is straight facing away from the center of the circle. Go up till I reach 1 1/4" on the ruler, on the middle line with half of the 1 1/4" on one side of the line with the other on the other half of the line in the middle of the wedge. That's my diameter of the sprocket.
The results so far.
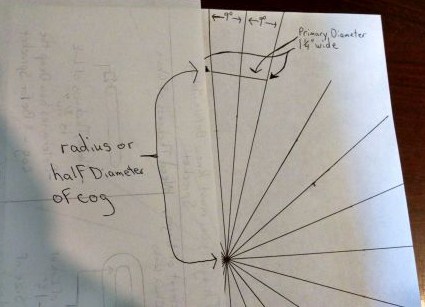
I use a circle compass and draw the diameter. I start from the wedge line, not the center of the wedge and draw a circle. This is the main part of the sprocket. If you notice how I did this, I never come up with the exact diameter of the circle because I never needed to know this measurement. That part is pretty weird if you ask me. This piece of paper I drew this on is my actual template for making the sprocket out of plate steel.
This part I draw in the axle diameter. I will be using 3/4 axles. This part will be cut out so the drawing will be slid over the axle while drawing on the plate steel.
I bet you would have paid attention in Geometry class if the teacher told you " You could build a tank with what you learn here". More to come with me making it out of steel plate, as soon as I finish this part.
Hay People, In a previous post I showed a pic of the drive sprocket I've started working on. Unfortunately that set was Doomed to fail!! Because of the materials used, not the design, the design never changed, so my previous post on designing it is still accurate, and I scraped the drive sprocket. Bad materials meaning too thin of steel. I tried using the frame rail of a craftsman mower, every time I would weld on it, it would warp. Then after fishing it off my porch roof, from an anger relapse, whipped it the scrap pile. Ok, second time around I got a thicker piece of steel plate from work, (my Boss, what a guy!!), which is 3/16 thick steel plate door off an old industrial band saw. and that's where the next set of pics start at, me transferring the design from paper to the steel plate. What was drawn earlier is my actual template.
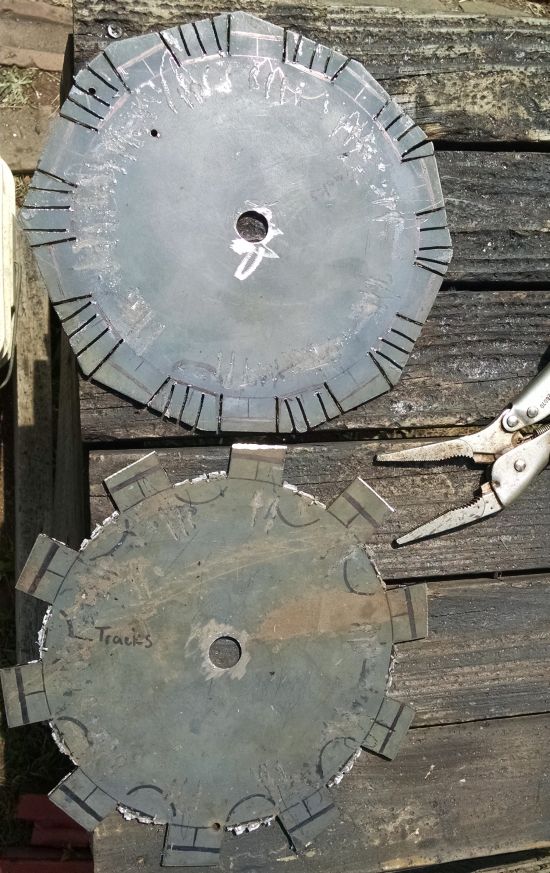
Here is the metal used, same piece I used to make my brake rotors from, 3/16 plate steel. I first center punch each of the circles drawn for a starting spot, got to know your center, and took a measurement from the template and drew the diameter with a circle compass. Then gave an extra inch boarder around that for cutting it out. the extra space will be for the cogs in future pic.
I cut the 4 pieces out, drilled the center holes using 3/4 inch drill bit which is the axle size, stacked them so I can put a piece of axle through the holes and would be straight up. As for the template, I cut out the axle diameter from the drawing to lay on the plates. Cutting this hole does not ensure it is center, knowing this from experience, I came up with a step to fix this. See the T on the template, this is for a clock position. I first pointed the T towards me and drew the circle using an ink pen which made a fine line. Then turned the template a 1/4 turn, using the T as a reference point, drew the circle again. Then turned the template another 1/4 turn, and drew the circle again. Did it one more time for a total of 4 times. I raised the template for the pic and notice that the line is around 1/16 inch thick all the way around and is a perfect circle in reference to the axle. I did the drawing using an ink pen which means the template is about 1/16 inch off center, but doing this step made it center.
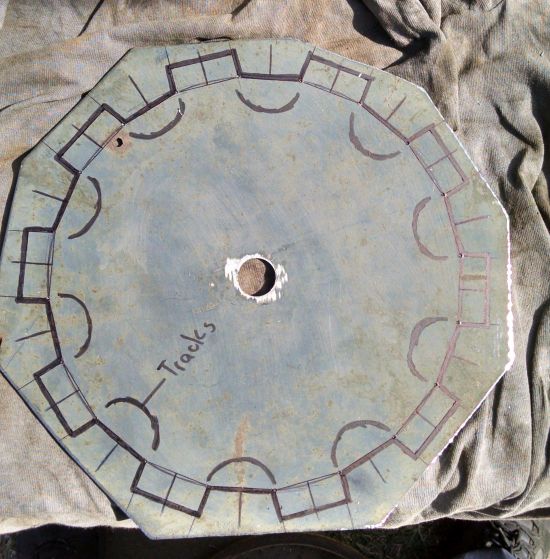
Ok, now comes the marks for the cogs. I tape the template to the plate and make my marks around the circle for this. The short lines are how long the cogs will be and the long lines are for the center of the cogs. At this point I don't know how I'm going to draw in the cogs yet, but I do need to know the spacing of every thing. To check for accuracy I just pull the tape off and turn the template to match the marks up. I should be able to line up any mark on the steel to any mark on the template and the rest of the marks should line up also.
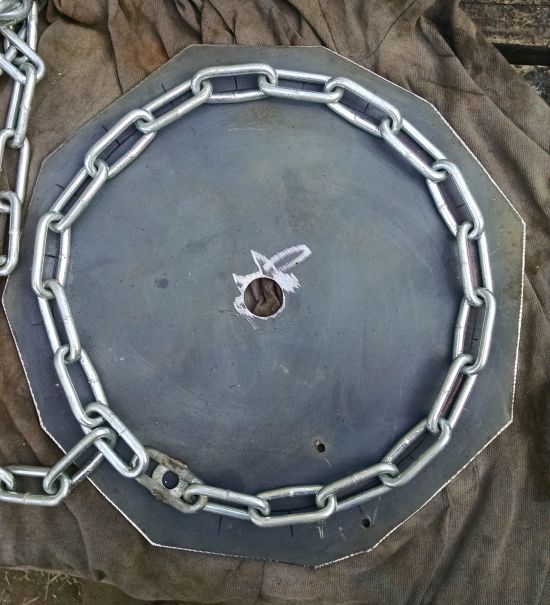
At this point I decided to take a breather and removed the template and placed a piece of chain on the marks to see, well something positive. Yes, looks good to me. The chain and the marks all line up. I lay the chain down as if it was in a continuous circle and looks good to me!!
Ok, Here's the video of me doing the actual work in time laps and the tools I used. The tools are pretty much what everybody has plus a couple more that you can buy cheap at a craft store. The idea here is to know how to get the most use out of every tool and how to achieve accuracy in every thing you do.
Final thoughts on this subject- Why so much time on this single part? Well, this is THE major part for the track system, any real tanks drive system. If this part doesn't work right, then the thing won't move, and if this thing doesn't move, well I just sunk $$ grand into lawn art, LOL!!
A lot more pics and a video to come, stay tuned..........
1997 Murray Veteran Member
1000+ Posts
1000+ Posts!
2014 Build-Off Finalist
2014 Build-Off Finalist
2015 Build-Off Finalist
2015 Build-Off Finalist
2016 Build-Off Entrant
2016 Build-Off Entrant
Age : 26 Join date : 2013-11-13 Points : 5419 Posts : 1311 Location : NW USA
Wow, this is a really cool project. I really hope you finish in time so I can vote for you, you will definitely get first place.
Thank you very much. I'm glad you like it. I'm trying my best. I keep telling everybody, the paint will probably be drying when the deadline hits. I also have other motivations for me to finish this build, like romping in the snow. I'll definitely be making vids of that. Plus my family wants to ride it, especially my sister. There tired of me talking about it. LOL.
mr.modified Veteran Member
2015 Build-Off Top 3 Winner
2015 Build-Off Top 3 Winner
2016 Build-Off Top 3 Winner
2016 Build-Off Top 3 Winner
2018 Build-Off Finalist
2018 Build-Off Finalist
2022 Build-Off Entrant
2022 Build-Off Entrant
2500+ Posts
2500+ Posts!
1st Place Build-Off 2014
1st Place Build-Off Winner 2014
2023 Build-Off Entrant
2023 Build-Off Entrant
Age : 34 Join date : 2013-11-02 Points : 7137 Posts : 2907 Location : New Jersey USA
I wish,LOL. I still have to make the drive axle framing that holds the sprockets. Axle mounts for this also. The brakes have to be made still. There will be 4 of them. 2 sets of brakes per rotor, since this is the steering and braking systems I want them to be able to take a crap load of punishment. Linkage for the brakes to work. Oh, the front idler wheels are 1/3 of the way done. This will hold up the tracks on the top part and the front idler wheels will be connected to this part too. I'm making them spring loaded instead if fixed idler wheels. Wiring, body panels, and paint.
All this stuff will be made from scratch. I think I'm about 2/3 done though.
Here I center punch the tops of the wedges on the diameter of the sprocket, as if I grind on it I don't erase the marks. I draw in the cogs that grab the tracks which are 1/2 inch high, and the cogs where the tracks sit on the sprocket, these cogs are the same as the diameter of the sprocket and are flat,because the tracks hold the chain where the chain needs to be, not the sprocket. If the sprocket was grabbing the chain then I would have to make this part inside the diameter of the sprocket. This is pretty much the basic shape of the sprocket. Note the cogs that grab the track, the sides are not beveled yet, this comes later.
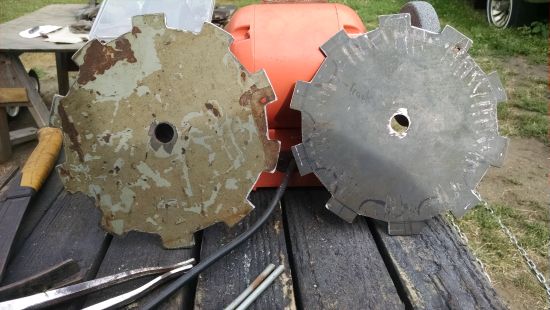
Time to start cutting out the sprocket. What a pain. I'm working with 3/16 plate steel and sure is testing the limits of my tools. To cut out the sprocket, I make a lot of individual cuts up to the lines. I then take a needle nose vise grip and break away the parts, this leaves jagged edges. I then cut the top of the remaining cogs off. I did all this with a hand grinder and 1 whole cutting disk per sprocket and there are 4 of them.
I smoothed out everything with a bench grinder and this is the outcome.
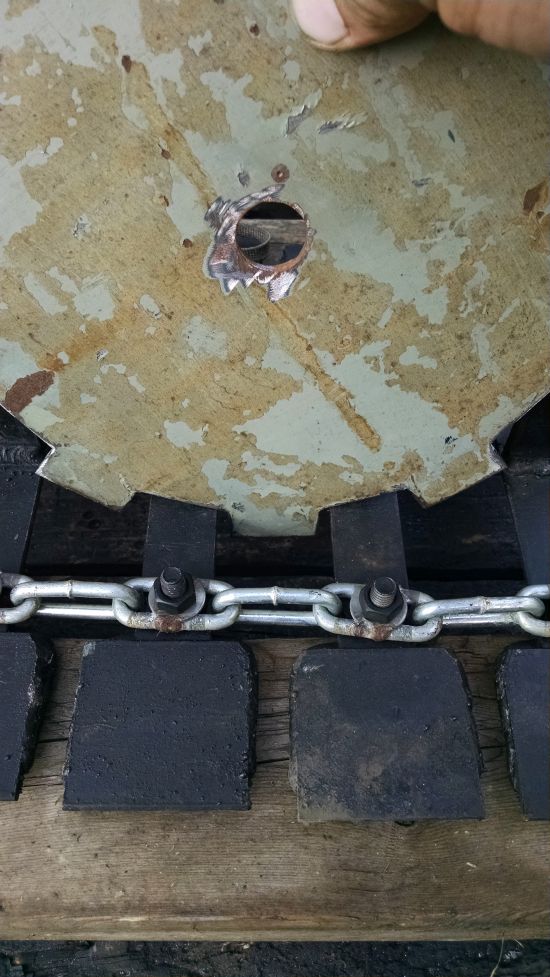
Time to test them out, looks like they work, cool!!! This gives an idea on how they work on grabbing the tracks. Note where the chain is, that it doesn't even touch the sprockets. There on the outside of the sprockets and the track hold the chain where they need to be, I just needed to know where to place the track on the sprocket to have the chain sit where it needed to be.
You can see that the track guides are in between the 2 sprockets as so they don't fly off.
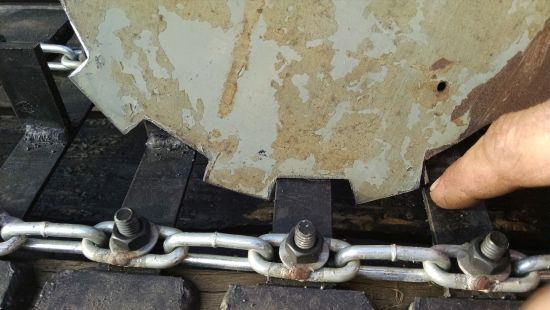
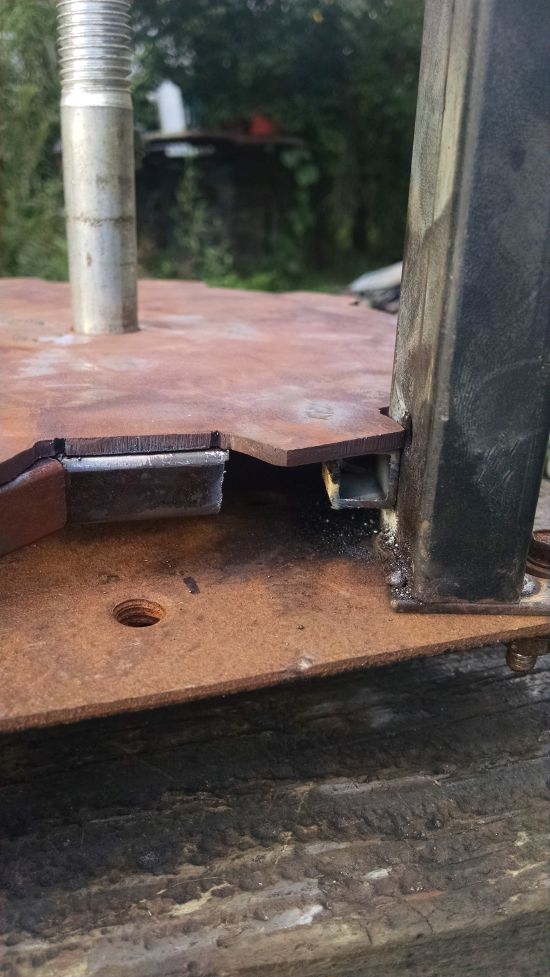
Time to put the bevels in the cogs that grab the track. This is needed because the sprocket will hit the track instead of going in between the track. To do this clearance I take one sprocket tooth and set it in between the track and slide it to one side and then roll it. You can see where it's hitting, where my finger is pointing. I take a sharpie and mark a line going straight up. I do this with every cog going both ways. This is the part that needs to be cut off so it can roll into the space in between the track to grab it.
The bevels are on one cog that is in between the tracks.
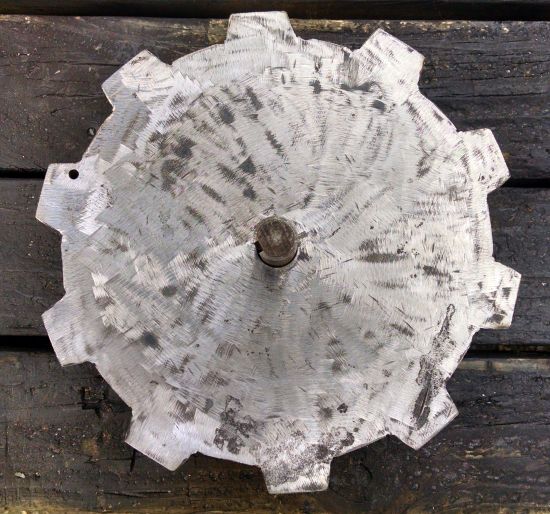
One complete sprocket disk with all the bevels on it. This is the final shape.
I have a few more pics and another video left. Hang in there, LOL.
redzz02 Site VIP
500+ Posts
500+ Posts
2014 Build-Off Entrant
2014 Build-Off Entrant
2016 Build-Off Top 3 Winner
2016 Build-Off Top 3 Winner
2021 Winner of Winners
2021 Winner of Winners
1st Place Build-Off 2015
1st Place Winner Build-Off 2015
1st Place Build-Off 2017
1st Place Build-Off Winner 2017
1st Place Build-Off 2018
1st Place Build-Off Winner 2018
Age : 29 Join date : 2010-05-12 Points : 6349 Posts : 899 Location : PA pittsburgh and pymatuning
Thank You. Hard to believe these sprockets was a metal door off of an industrial band saw. I showed a pic of these to my boss who gave me the door. He's like "I don't even want to know", LOL.
I'm figuring out the spacing of the sprocket disks. Never measured it, Did it like how my Mom used to cook, a little bit of this, a little bit that, till it looked right. The center hub is keyed for the axle. It's a coupler that I cut the 3 prongs off and made a thinner hub also with a keyed slot to get the right spacing in between the disks.
Ok, I drew everything on the steel plate perfectly. Since I cut, ground, cut some more, ground smooth, The sprocket is not perfect any more. That's where this jig comes into play. To make everything perfectly centered again. I start with welding on 1/2 inch square tubing clamped to the jig. Each part will be welded in the same exact spot as the others. This will make it true again. Also make a larger contact area on the tracks to prolong wear on parts.
This is also done on the angled side of the cogs.
A little mock up to see how the tracks fit on.
2 completed sprocket disks for welding together. One will be keyed, the outside one, for maintenance and repairs.
I start welding the 2 disks to the hub. I weld the hub to one disk first and then weld on the second disk. Making sure the key ways are all aligned and the cogs hold the track straight.
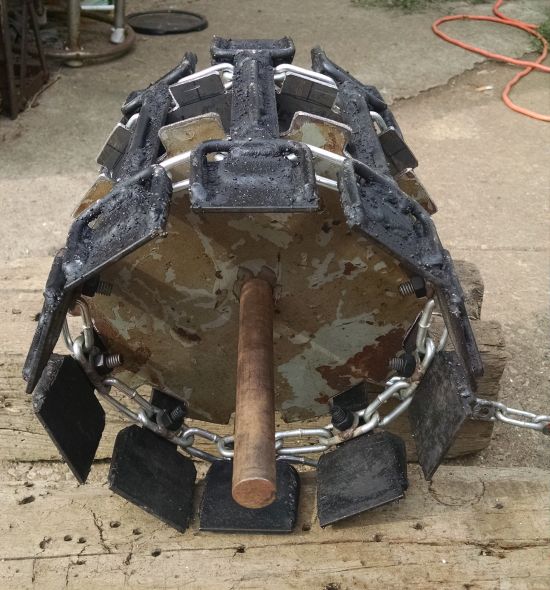
All done with the track sitting on it. Everything has it's own spot and doesn't interfere with another part. I mocked up the sprocket on the chassis, sorry no pics of this, but the bogie wheels closest to the sprocket, well the sprocket fits in between the wheels where the wheels cover the sprocket about 1/4 of the way. I never thought about this happening but just goes to saying how one system fits and works together with another system. I'll have to get a pic or video of this part, to share.
Here's the completed sprocket, painted and ready to go...
The video to go with the pics of me finishing the sprockets off and ready to go.
Next step is the drive system with the brakes.
mr.modified Veteran Member
2015 Build-Off Top 3 Winner
2015 Build-Off Top 3 Winner
2016 Build-Off Top 3 Winner
2016 Build-Off Top 3 Winner
2018 Build-Off Finalist
2018 Build-Off Finalist
2022 Build-Off Entrant
2022 Build-Off Entrant
2500+ Posts
2500+ Posts!
1st Place Build-Off 2014
1st Place Build-Off Winner 2014
2023 Build-Off Entrant
2023 Build-Off Entrant
Age : 34 Join date : 2013-11-02 Points : 7137 Posts : 2907 Location : New Jersey USA
Took a couple pics of the drive sprockets in place while I was working on the drive section. Me mentioning how the pieces fit together is what I was after in the pics. How the drive sprocket fits in between the wheels on the bogies. I was wrong on one thing, about how the wheels fit over the sprocket, The guide channel just hits the sprocket. I need to trim the guide channels down on the part that opens up out of the main framing of the bogie, the part that will straiten the track going into the guide. Just trim it about half way, or bend it out of the way and perfect, LOL.
Setting up this pic, I noticed that the suspension still had way more flex in it. Just to give an idea on how much flex this thing is going to have. The pics don't do it justice.... I don't know if I can take advantage of all this flex in the suspension, all depends on the idler wheel setup, so suspension stops looks like a must have on this thing.
Hay People, pics, pics, and more pics, with a vid at the end.
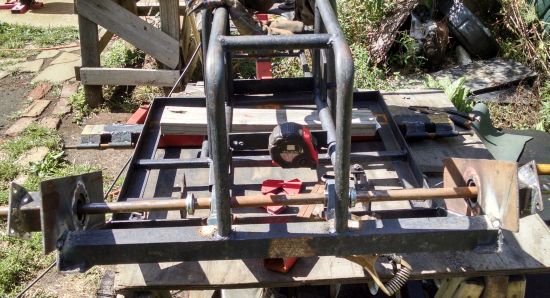
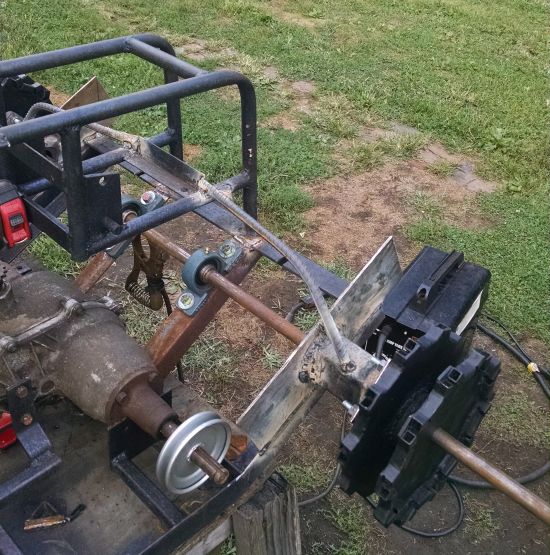
I start out by cutting out what I originally put on the frame 4 years ago, why, I got better, stronger parts for this section since I originally did it 4 years ago. I originally welded in jack shaft parts for the drive system that holds the sprocket axles, I think because of not doing the work of finding better parts. I got the jack shaft parts when I was doing something else and just got the parts on a whim. So, out they come for the more stronger parts. Now I got just the frame to start with. Been there, done that, LOL.
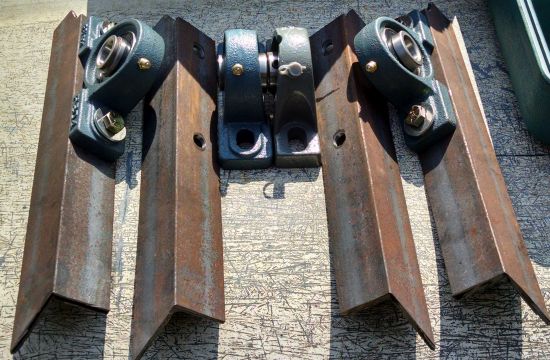
Clean frame to start. I got pillow block bearings, so I start with making the center supports. I made 4 to start with, original plan was to put a pillow block on both sides of brake rotor but after looking at it, it made the distance from the pillow block to the outside pillow block for the sprocket too long. This spot will have alot of force on it for driving so I decided to put a pillow block on the most inner side of rotor, then a pillow block (flange type not shown in pic) next to the sprocket and a jack shaft bearing next to the drive pulley on the frame rail. That should keep the axle from bending in the high stress areas. I'm using 3/4 go cart axles so the more support and keep the distance from bearing to bearing short will make these axles strong to use. So I start out by using only 2 pillow block bearings on the inside with the framing I just made.
I got the pillow block bearing frames welded in with the axle in place for measuring purposes. I decided to use only a pillow block on the inside of the rotor, then a jack shaft bearing on the frame rail and a flange pillow block bearing next to the sprocket. Each 19 inch axle will have 3 bearings on it. I keep the axle lengths 19 inches so if an axle breaks, all I need to do is buy a 19 inch jack shaft axle from BMI. I keep a bearing next to the high stress areas, the sprocket and the drive pulley for strength for the axle. Less chance of axle to bend.
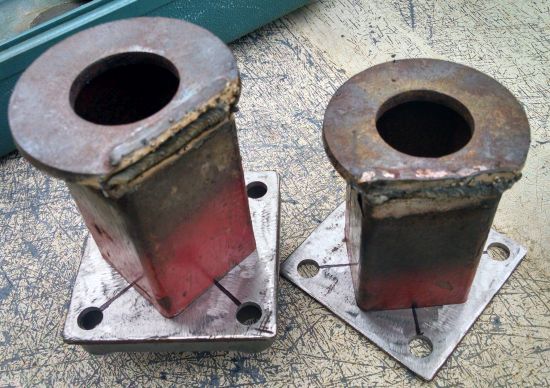
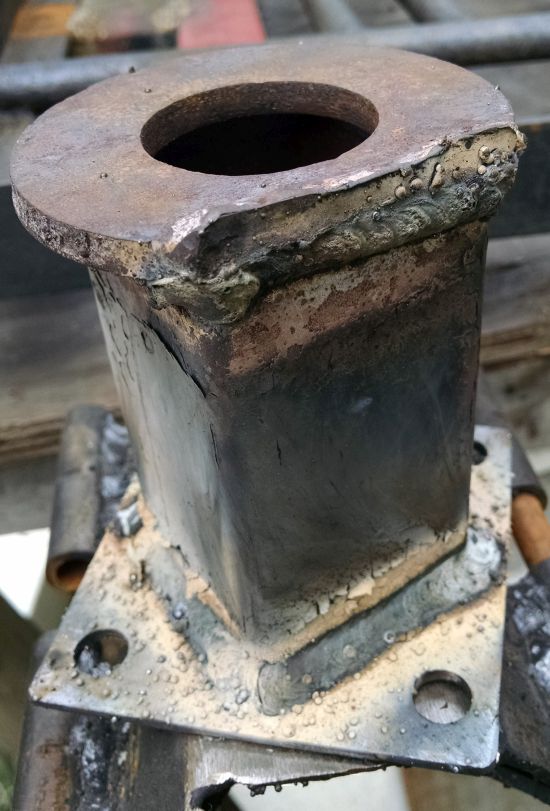
I start making the sprocket supports. These supports have 2 bearings on them and will be welded to the frame rails with a steel plate I make to raise the frame rails. The frame rail bearing is a jack shaft bearing and with a bearing holder I cut out of the frame. Waist not, want not. I use a 2x2 square tubing for the axle tube, 1/16 inch thick, and eyeball the round bearing holder in place, then weld. I make the plates for the flange pillow block bearing.
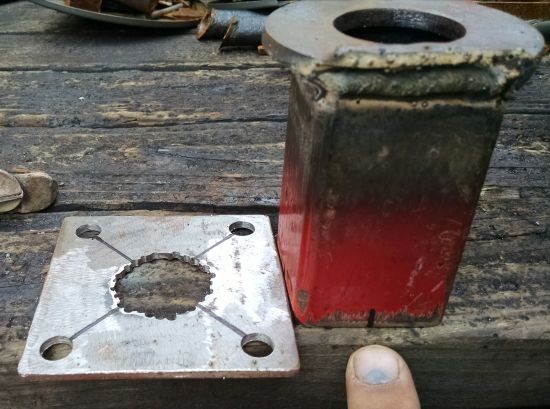
How I centered the axle tube on the plates. I draw lines from bolt hole to bolt hole to X it out. Then I mark the center on the sides of the axle tubes
Then sit the axle tube on the plate and line up all the marks. Now it's centered with the bolt holes, not the plate itself. The flange pillow block is cimetric with the bolt holes. Doesn't matter about the shape of the plate.
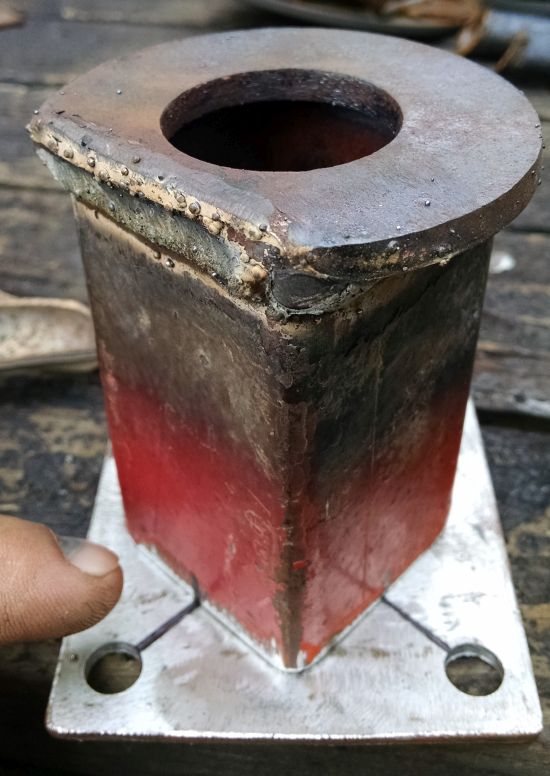
Weld them together.
Time to weld the assemble together with the flat plate welded on frame rail already. Sorry, no pics of me making the plates on the frame rails. Just a 1/8 plate, 4x12, with a hole for the axle to go through.
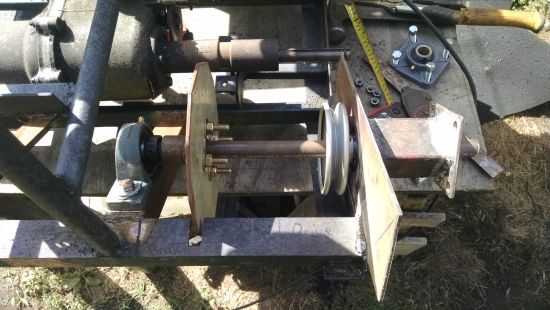
All welded together.
Mock up of rotor and drive pulley. Clearanced the frame for the rotor. I'll be making the brake calipers from scratch and will be hanging off this part of the frame.
Support bracing for the axle tubes made from concrete rebar. More bracing will be added later. I'll be making this section of the frame as solid as possible.
Pic of the tail end of things. With the tracks on, width will be 50 inches.
Video of me doing the work.
mr.modified Veteran Member
2015 Build-Off Top 3 Winner
2015 Build-Off Top 3 Winner
2016 Build-Off Top 3 Winner
2016 Build-Off Top 3 Winner
2018 Build-Off Finalist
2018 Build-Off Finalist
2022 Build-Off Entrant
2022 Build-Off Entrant
2500+ Posts
2500+ Posts!
1st Place Build-Off 2014
1st Place Build-Off Winner 2014
2023 Build-Off Entrant
2023 Build-Off Entrant
Age : 34 Join date : 2013-11-02 Points : 7137 Posts : 2907 Location : New Jersey USA