| | | W.H.A.M.S. |  |
|
+11kawasaki220 Moose redlinemotorsportts Creepycrawler willis923 Doc Sprocket 1997 Murray B440 craftsmancole LAWN MOWER MUDDER Angchor 15 posters | |
| Author | Message |
|---|
1997 Murray
Veteran Member

2014 Build-Off Finalist
2014 Build-Off Finalist
2015 Build-Off Finalist
2015 Build-Off Finalist
2016 Build-Off Entrant
2016 Build-Off Entrant
Join date : 2013-11-13
Posts : 1311
|  Subject: Re: W.H.A.M.S. Subject: Re: W.H.A.M.S.  June 23rd 2014, 10:14 am June 23rd 2014, 10:14 am | |
| hey! that mower is from the same store as my white! by the everson farm equipment sticker  | |
| | | | Angchor
Member


Age : 67
Join date : 2014-04-14
Points : 4302
Posts : 491
Location : Index, Washington
| | Subject: Re: W.H.A.M.S. June 23rd 2014, 1:21 pm | |
| - B440 wrote:
- Before you put that front end back together, you may want to add the lawn tractor "poor man's power steering" to it. Google it or look here for pics: http://simpletractors.com/Club2/topic.asp?ARCHIVE=true&TOPIC_ID=121649
You can get the parts from Mcmaster Carr.com, search for thrust bearings. At this point, I am looking for solutions that do not involve buying a bunch of parts. And I am more concerned with a sleeve or bushings for the shaft, than with thrust bearings. But the thrust bearngs are also important! I'll be doing something about that as well. Even if it is just to stack washers, and grease them. It's not like this will get used every day, all day. Whatever solution I come up with, will last plenty long enough by my standards.  - 1997 Murray wrote:
- hey! that mower is from the same store as my white! by the everson farm equipment sticker
That is too weird! I can hardly wait to start getting it back together, so I can take a pic of it completed, and compare the two! | |
| | | | kawasaki220
Established Member


2014 Build-Off Entrant
2014 Build-Off Entrant
Age : 23
Join date : 2014-01-22
Points : 4454
Posts : 546
Location : north carolina
| | Subject: Re: W.H.A.M.S. June 23rd 2014, 4:44 pm | |
| man where dose everyone get these all wheel steer , lookin good man keep it up | |
| | | | B440
Member

Join date : 2014-01-22
Points : 4087
Posts : 226
Location : Thompson, CT
| | Subject: Re: W.H.A.M.S. June 24th 2014, 11:27 am | |
| - kawasaki220 wrote:
- man where dose everyone get these all wheel steer , lookin good man keep it up
Craigslist! Don't worry; You're not missing anything. AWS means more parts, more problems, more money spent. It's a great concept, but the 1990's machines had poor engineering built in to them. The steering mechanisms need to be completely redone for off-road duty. | |
| | | | Angchor
Member
Age : 67
Join date : 2014-04-14
Points : 4302
Posts : 491
Location : Index, Washington
| | Subject: Re: W.H.A.M.S. June 26th 2014, 1:40 am | |
| Made a bit of good progress yesterday. The center swivel for the front axle was quite worn.  Only a little of the inner ring was left. 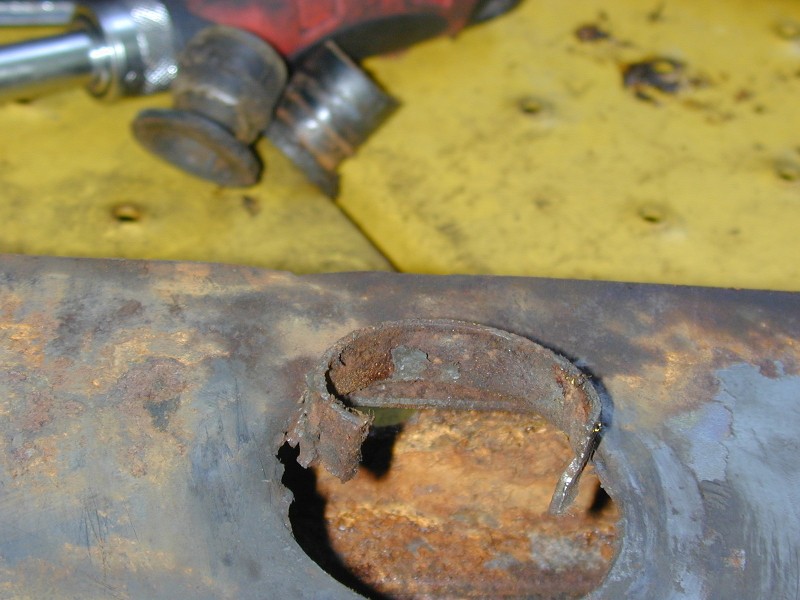 So I cut off what was left and cleaned it up. Then I cut some exhaust pipe of the right diameter, and welded it on. 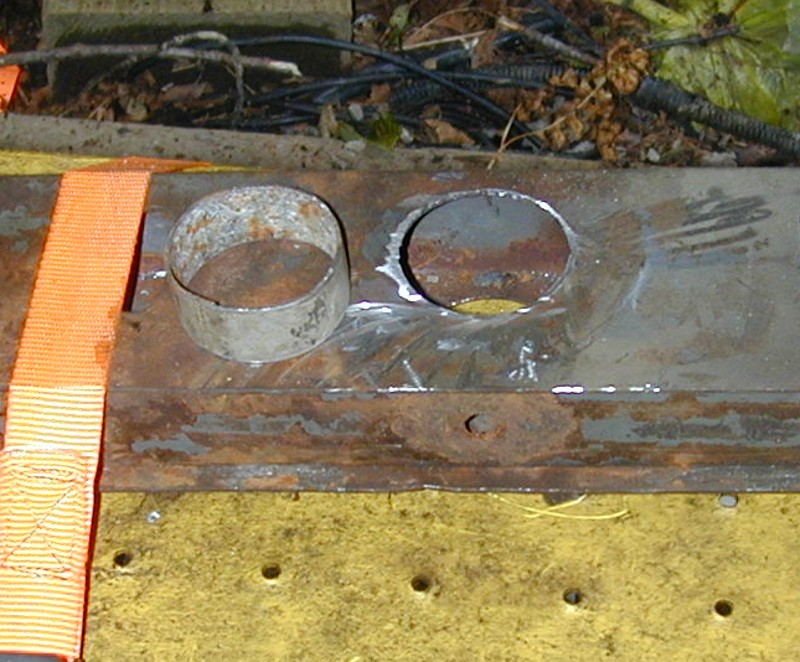 Then I used another piece of exhaust pipe, and I drove that one through the rings I had just welded to both sides. My thinking is that this will now last the rest of the time that I will be using this tractor.  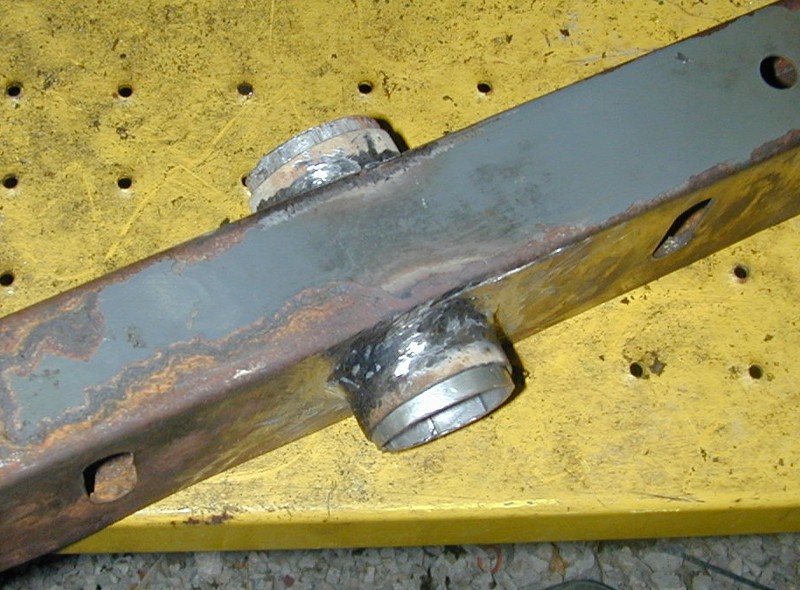 That was yesterday's work. A lot of that time was simply figuring out what I wanted to do, then finding the materials. Also several hours of working with a file to make things fit. ~~~~~~~ Today, I went to bible study, then volunteered for the food bank. After that, there wasn't much work day left. But I did get started on figuring out how I am going to fix those axle shafts. Here is what the bores in the axle, look like. The top one is the good one, the bottom one, is the worn out one. 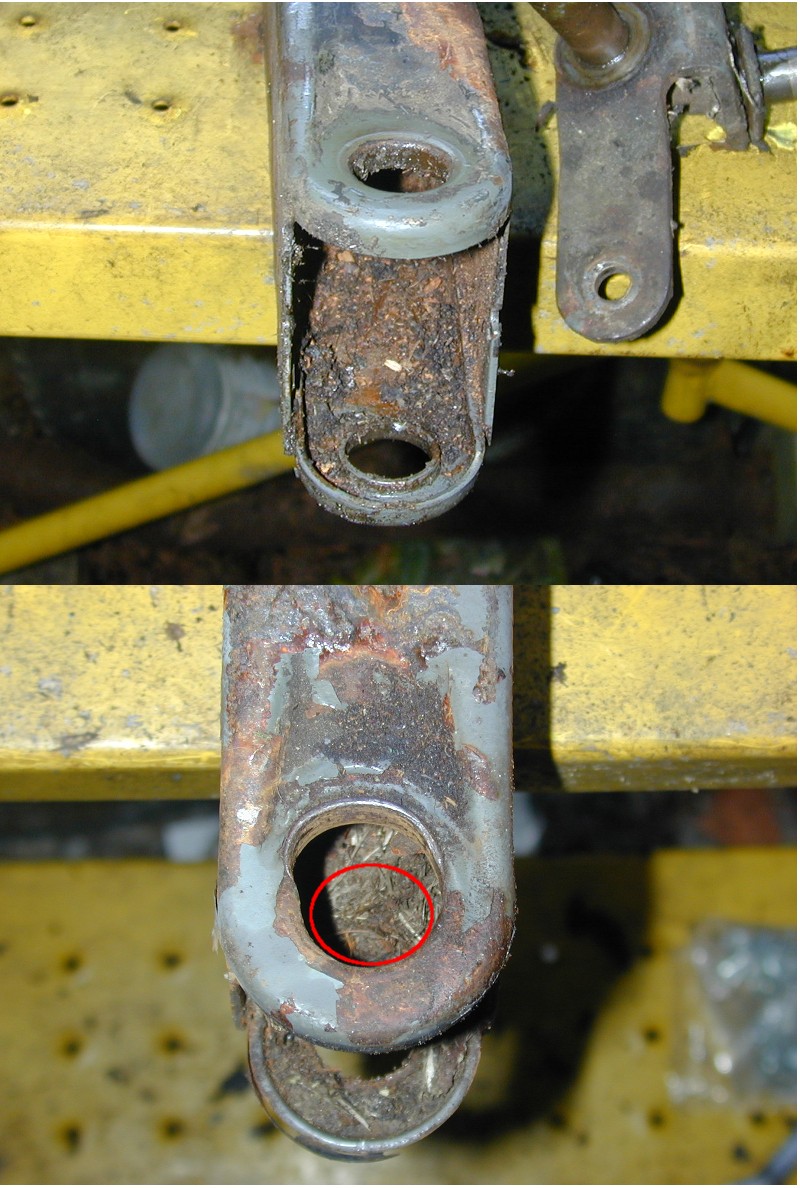 The red circle I drew on the bottom one, is the original bore. No wonder that axle was flopping around so much!  Now here is the plan. I cut a washer that had the same bore diameter as the original bore on the axle. I will weld that to the axle, tomorrow.  After that, I am going to try to figure out a good combination of bronze bushings, and various peices of PVC and stainless or aluminum tubing, (Just using what I have around.), to fab an "axle shaft housing" that I can put a zerk fitting in. And thereby have an axle housing that has bronze busings, and that I can keep packed with grease. If there had been anywhere nearby where I could have gotten the needle thrust bearings, I would have done that as well. As it is, I will just make do with washers and grease. I also was unable to find push nuts that were large enough. Biggest I could find were 1/2". I probably could reuse the old one, but I don't trust those things brand new, let alone used... So I bought a couple 5/8" bolts. I will cut the heads off the bolts, then weld them to the tops of the axles. Then use nylocks and plenty of washers and grease.  The plastic that the original bushings are made of are actually nylon. I might cut the heads off of those and use them for trhust bearings between the metal washers. If they wear faster than I think they will, it will be easy enough to keep grease in there, and keep the tension adjusted using the nylock nuts. | |
| | | | Doc Sprocket
Site VIP

2018 Build-Off Entrant
2018 Build-Off Entrant
2021 Winner of Winners
2021 Winner of Winners
1st Place Build-Off 2016
1st Place Build-Off Winner 2016
Age : 51
Join date : 2013-04-21
Points : 7201
Posts : 2914
Location : Ontario Canada
| | Subject: Re: W.H.A.M.S. June 26th 2014, 6:04 am | |
| Wow... Some pretty serious wear in the frontend there, you've got your hands full. Good to see you're on top of it! | |
| | | | Angchor
Member
Age : 67
Join date : 2014-04-14
Points : 4302
Posts : 491
Location : Index, Washington
| | Subject: Re: W.H.A.M.S. June 26th 2014, 5:54 pm | |
| Almost halfway done with what I set as my goal for the day. Ok, I am starting with the side of the axle framing that was not damaged. I decided that I will use a piece of thick walled aluminum tubing, as a sort of axle shaft housing. The bronze busings that I have are a tight press fitting inside it. 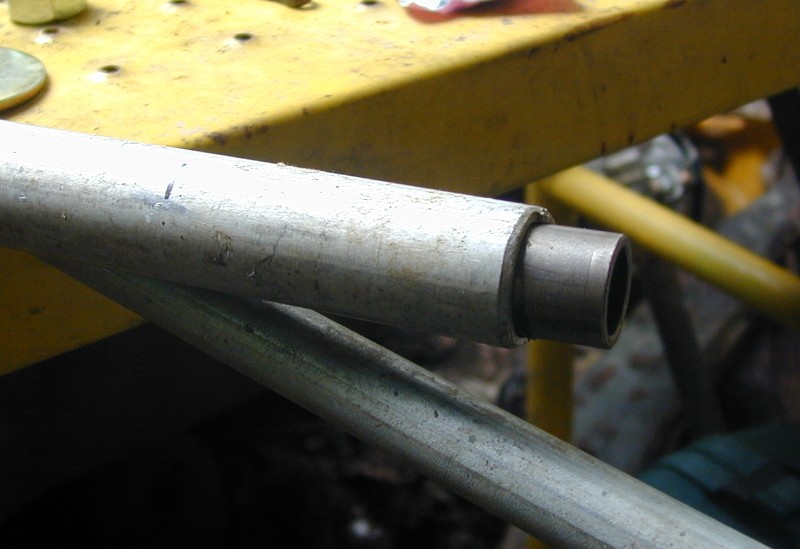 Then use a piece of PVC pipe inside the aluminum tubing, as a solid stop for the bushings, so they cannot be pushed in, any farther. The PVC will work fine for this. Given that the aluminum tubing fits snugly inside the axle frame, and on the outside of the frame will be a few washers. So the steel and aluminum are going to be taking almost all of the 'thrust' force of that axle shaft. The PVC pipe is really pretty much just an indexer. The axle shaft is a snug fit in the bushings. And a very loose fit in the PVC. The first thing I do is to press the bushings in, using a 1/2" bolt and washers and a couple of backwards, flanged bushings. I want the bronze bushings to be sitting where they will be, after final assembly. 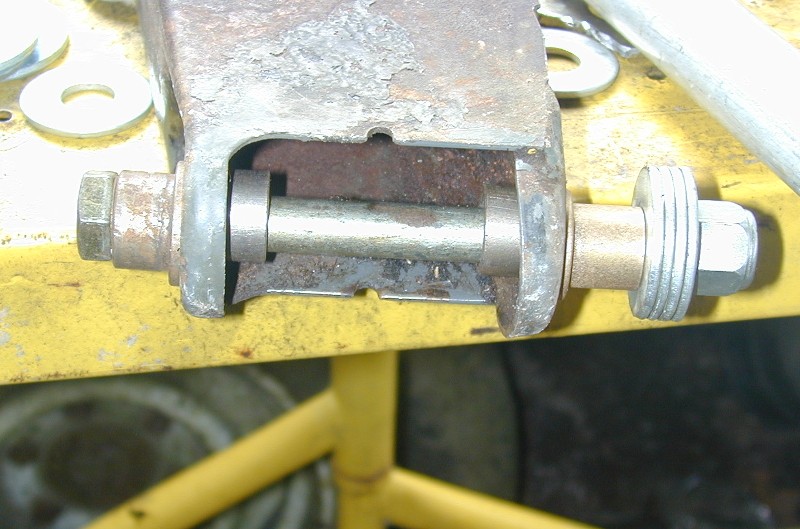 Then I cut the PVC pipe to be a snug fit between them. Then removed the pipe and the bushings. 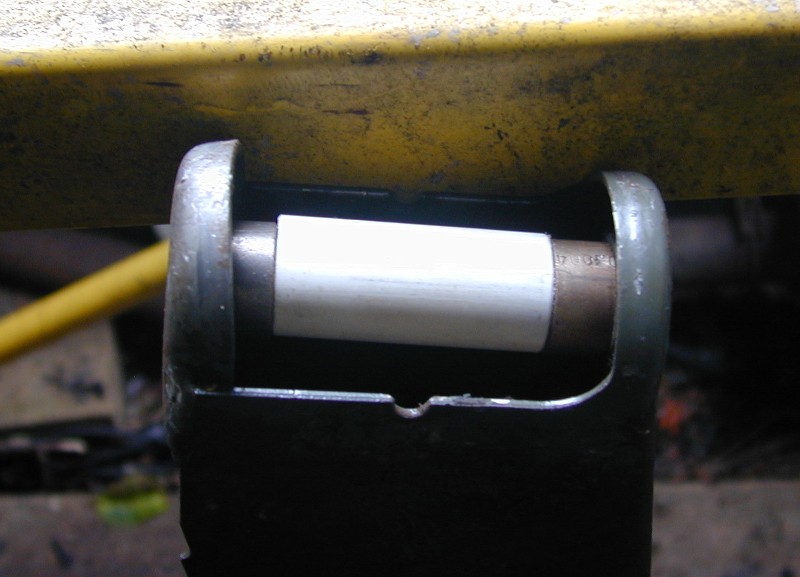 Ok, I didn't get a picture of when I cut and sized the aluminum tubing. But here is where I inserted the pvc pipe piece.  Then I set the aluminum tube into the frame and centered it. then set the bronze bushings into the bores on the frame. Then fed the same 1/2" bolt with backward bushings, and nut and washers on it.  Then used that to press the bushings in, once again. This time pressing them into the aluminum tubing as well. 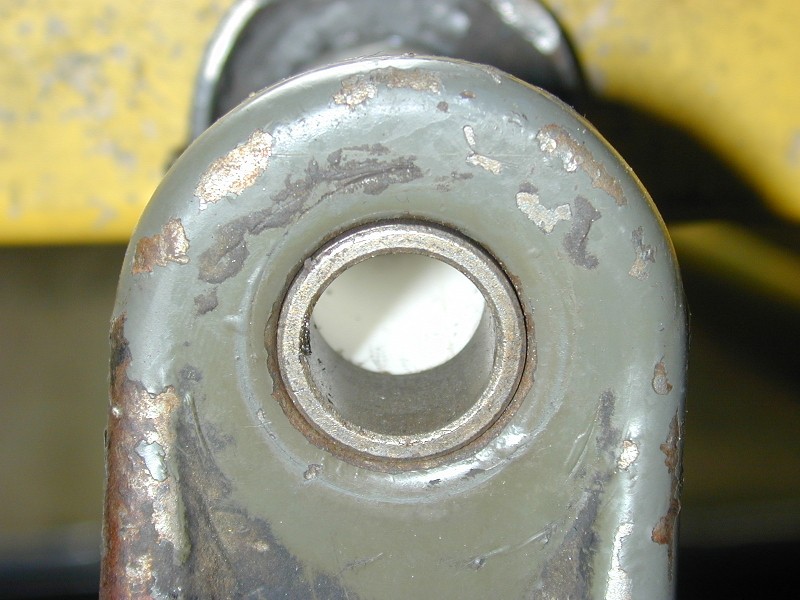 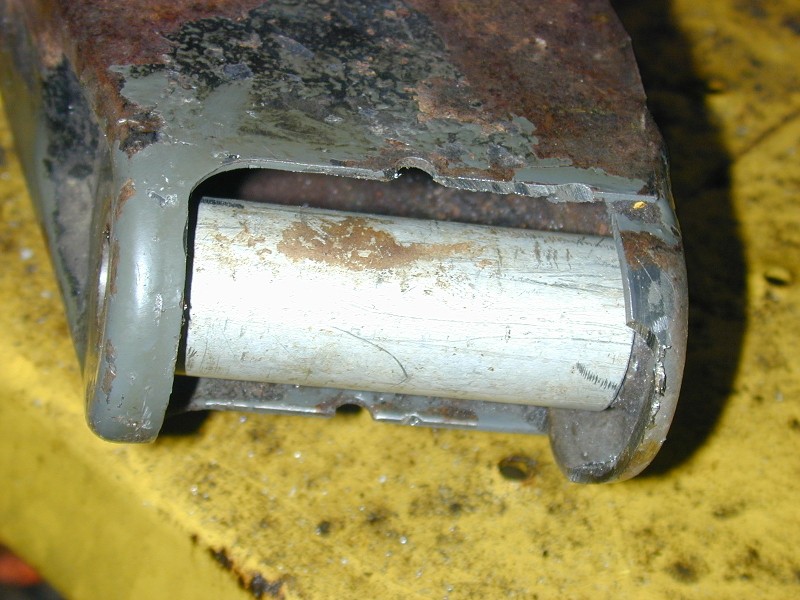 Finally, I removed the bolt. Drilled and tapped for a zerk fitting. And it's all ready to go back together. 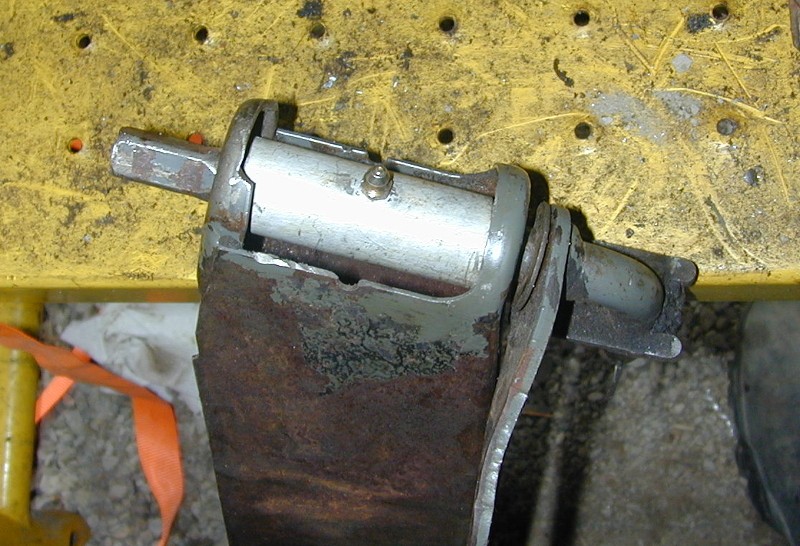 Next up. I need to weld the washer onto the other side of the frame, then go through this entire process all over, on that side. One note...I am swapping the axle frame, end for end. So the washer will end up on the side that was originally good. And this side will end up where it was originally worn all caterwhompus. My reasoning is that it will last longer this way. There is obviously extra forces at work on the "driver' side of that front axle. I felt it was better to put it back together with the better side of the frame, on that side. Since there was no wear on the 'passenger' side... Putting the washer on that side should present no problem, And since I can pump these full of grease... I'll just give them a few squirts every other time I use the tractor, and this fix should last virtually forever. Or at least until I am no longer able to use the tractor myself. LOL | |
| | | | Angchor
Member
Age : 67
Join date : 2014-04-14
Points : 4302
Posts : 491
Location : Index, Washington
| | Subject: Re: W.H.A.M.S. June 27th 2014, 6:19 pm | |
| Very rainy day today. Plus I have other stuff I need to get done. So I won't get a lot done today. I did get the bolt heads cut off, and got the bolts welded to the axle shafts. Then did some grinding, and a LOT of work with files, to get everything to go back together. 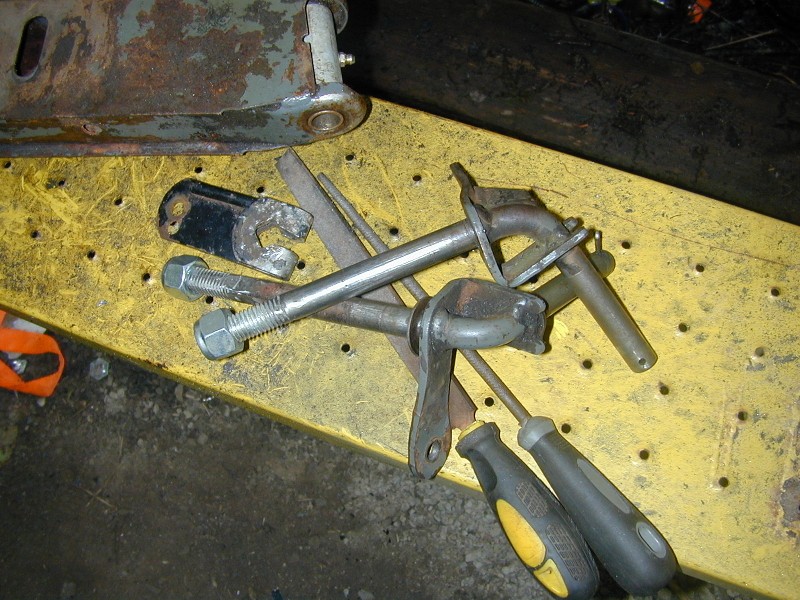 They turned out better than I expected. I also got the front 'carrier' plate bent back to the way it was supposed to be. In the following picture, at the top is the frame as it was when I removed the axle. In the middle, is the frame after I straightened it back out. At the bottom is the 'carrier plate' that I mentioned above, laying on top of the frame.  The axle assembly that I have been working on, will be sandwiched between the frame and the carrier plate. I can now start to get the front end back together. Once back together, I need to figure out some way to come forward from the frame itself, to build a combination, battery box, bumper, and tow point. It would be easier for me if they had built the axle into the frame somehow. But the way it is, the axle just sits against the front of the frame, and swivels on that piece of exhaust pipe. Then is held in place by that carrier plate. Plus two bolts that go through but don't really hold anything, because they have to allow the axle to flex. I'm going to have to use really thick and heavy angle iron, notched for the axle. More on that, when I get that far. | |
| | | | Angchor
Member
Age : 67
Join date : 2014-04-14
Points : 4302
Posts : 491
Location : Index, Washington
| | Subject: Re: W.H.A.M.S. July 1st 2014, 11:08 pm | |
| There is a thread on here asking what tractor do you dream of owning? I've got to say... any tractor that I have my hands on. By that I mean, working on it. I love working on this thing! ~~~~~~~ Its starting to go back together again. Here it is, yesterday. 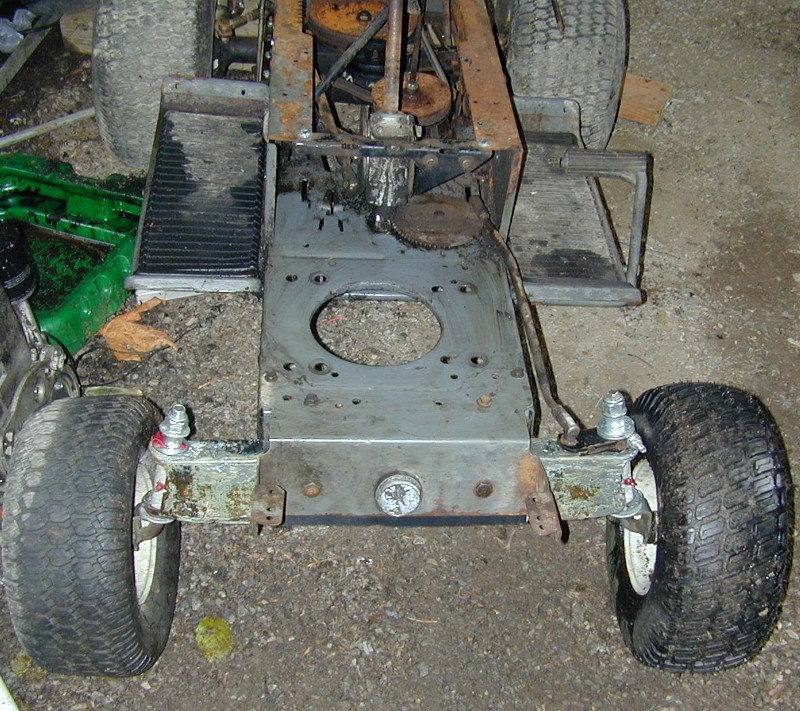 And here it is today.  The angle iron that I am using is 5/16 thick. Really heavy stuff! There are at least 4 reasons for this huge thing. 1. Bumper. (I'll probably cut it off so the ends of the bumper line up with the center line of the tires.) 2. Weight. I need weight on the front of my tractors. I weigh so much that even a moderately powerful takeoff results in a wheelie. I don't want to do wheelie bars, so the next best thing is to put more weight out front. 3. Battery box. I'll build up from this, to make a battery box for a full size battery. (More weight. And longer lasting charge.) 4. Tow point. There is no point on this frame that makes a good tow point. Anywhere that you hook to, will cause warpage and bending of the frame. I will probably just bolt every bit of this together, because I'd like to be able to remove it later. I also reserve the right, as a creative person, to completely change this up, before I am finished. LOL I may just make a removeable gas tank to go on top of the hood, and then hide the battery inside the console. | |
| | | | RCTankboy
Member
Join date : 2014-04-02
Points : 3814
Posts : 39
| | Subject: Re: W.H.A.M.S. July 2nd 2014, 8:06 am | |
| Angchor,
I love what youre doing with this tractor. I love the time and attention you take documenting it, and I especially love the creativity you display in devising solutions to problems like the worn steering.
I am now finally convicted enough to get my build on the forums. I am taking an extra day off from work this Independence holiday to use to get "stage 1" complete. Ill do my level best to get the thread started.
Im feeling really motivated now. Keep inspiring us!
PS: Be gentle after you guys see it. It wont exactly look like a tractor when Im done, and its meant for long trail rides, not hardcore Romping. (My dream tractor is a 4wd diesel for the romping!)
| |
| | | | Angchor
Member
Age : 67
Join date : 2014-04-14
Points : 4302
Posts : 491
Location : Index, Washington
| | Subject: Re: W.H.A.M.S. July 2nd 2014, 8:16 pm | |
| RCTankboy, Thank you for that feedback. Especially since you confirmed what I had hoped would be the case. That I would help to inspire others, and that I could show what you can do with almost no budget, and a willingness to think outside the box. My front axle setup, for instance. The original plastic was a joke. What I have replaced it with, is a thousand times better, and cost very little. About 2.50 apiece for 4 bronze bushings. (Compared to over 8 dollars apiece for the original crap plastic. ) About 3 dollars worth of washers. Two bolts with nylock nuts, probably another 4 dollars there. And some scrap PVC pipe and aluminum pipe. Plus, I used all hand tools, an angle grinder, and a cheapo HF welder. It would have been nicer with a cutoff saw to keep things square. And a grinding wheel, stationary sander, etc... In a dry, well lighted, heated shop with a solid, level floor. But I got it done, and done well, in a badly sloped gravel driveway, under a tarp, with less than 130 dollars worth of tools. (Including the welder.) Today, I volunteerd at the food bank again, and by the time I got back here, it was too hot, and I am too tired, to go out there and do anything major. So I think I'll just take it easy the rest of the day, and read some of the old threads here. By the way... there is a great deal of inspiriation there, as well. Oh, I also got the dash pretty much set up yesterday, and ready to put back on.  I am setting this one up a lot like the last one. A. Is the choke. (Gonna have to make a gas pedal.) B. Is the ignition switch. C. Is the killswitch. D is the battery cutoff switch. On this one, I am using a universal ignition switch made for homemade vehicles, ratrods, and just about any vehicle that has lost it's ignition switch and you can't find a replacement. Still not sure if I am going to hide the battery inside and have to carry the gas tank to town with me, when I catch a ride to town. Or if I am going with the stock gas tank, and having to take the battery with me when I catch a ride. Or even just make a solid battery box on the front. Right now I am leaning toward having to carry the battery, or making a solid lockable box for it. I've had some problem with spillage in friend's cars when I carry the gas tank with me. Even wrapped in a garbage bag, it still tends to smell the car up. I am looking forward to seeing your tractor build!!! | |
| | | | willis923
Veteran Member

Age : 27
Join date : 2013-04-10
Points : 5644
Posts : 1408
Location : Galway NY
| | Subject: Re: W.H.A.M.S. July 2nd 2014, 10:55 pm | |
| i just had a brainblast! Make a heavy duty, lockable hood! then mount your battery low, and the fuel tank above it! then pop a padlock on it, and Viola! safe and secure | |
| | | | kawasaki220
Established Member
2014 Build-Off Entrant
2014 Build-Off Entrant
Age : 23
Join date : 2014-01-22
Points : 4454
Posts : 546
Location : north carolina
| | Subject: Re: W.H.A.M.S. July 3rd 2014, 8:00 am | |
| thats looking good and are you painting it its original color | |
| | | | Angchor
Member
Age : 67
Join date : 2014-04-14
Points : 4302
Posts : 491
Location : Index, Washington
| | Subject: Re: W.H.A.M.S. July 3rd 2014, 10:50 am | |
| - willis923 wrote:
- i just had a brainblast! Make a heavy duty, lockable hood! then mount your battery low, and the fuel tank above it! then pop a padlock on it, and Viola! safe and secure
You mean as in, run the hood all the way out to the bumper, and hide the battery and tank behind that? Sounds like it could be pretty cool. Stretched hood! But I doubt that I'll go to that much trouble. Who knows? I do know that if I leave the tank in it's original location, I had already planned on a padlock or two, to hold the hood down. Because I need to get to the tank to put gas in, and don't want to have to unbolt the hood every time. - kawasaki220 wrote:
- thats looking good and are you painting it its original color
If I paint it at all, I'll wait till later. Right now I am just trying to get it to where I can actually use it. If I do paint it, it might be either ODgreen, or forest green. | |
| | | | Angchor
Member
Age : 67
Join date : 2014-04-14
Points : 4302
Posts : 491
Location : Index, Washington
| | Subject: Re: W.H.A.M.S. July 3rd 2014, 8:00 pm | |
| I got the bumper all bolted on. The battery is just sitting there. Its starting to look more and more like a tractor again. 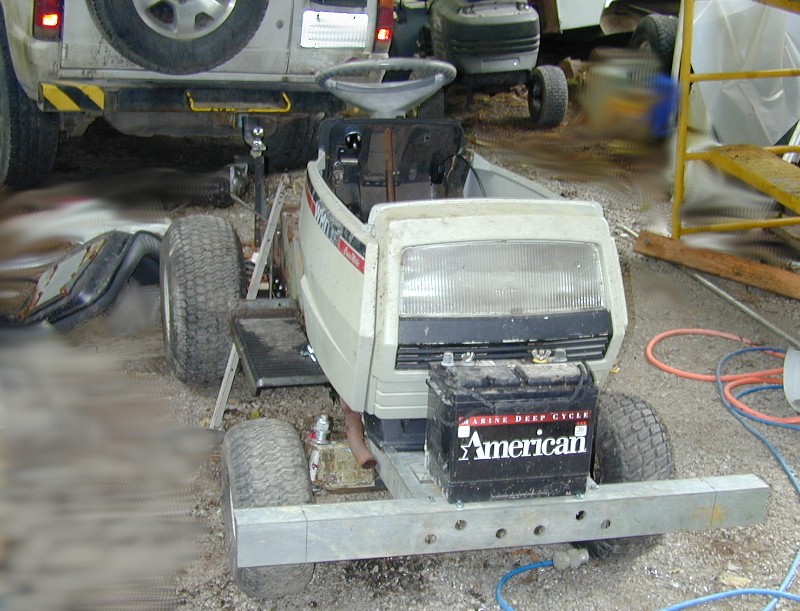 Measured and marked for the places to cut off the ends. Then got to looking at it and thinking. (Any time I say the word, "thinking", that's your cue to say "uh oh!") Why cut it off? Only reason I can think of, is to keep people from cutting/banging their leg on it as they go around the front of my tractor. Since I am probably going to be the only person legitimately that close to my tractor... No one else should be hitting their leg, right? And I know to pay attention. Plus, I can paint it black with yellow stripes just like I painted my homemade bumper on the back of my isusu trooper which you can see in the background. (Painted it that way for the exact same reason.) Last... With it this wide, anyplace that that bumper will fit through, the rest of the tractor will fit through. And that will keep me from trying to go through somewhere where I might get stuck, partway through. That said... I'd like to figure out some way to cover those outside corners, and make them less likely to cut or bruise someone. Maybe I'll use pipe insulation. Or maybe even pieces of PVC pipe. Both? We'll see... | |
| | | | Guest
Guest
| | Subject: Re: W.H.A.M.S. July 3rd 2014, 10:55 pm | |
| this is awesome!!! good job imma see how bad mine are and see if i cant get something going cause im sure mine are shot |
| | | | Doc Sprocket
Site VIP
2018 Build-Off Entrant
2018 Build-Off Entrant
2021 Winner of Winners
2021 Winner of Winners
1st Place Build-Off 2016
1st Place Build-Off Winner 2016
Age : 51
Join date : 2013-04-21
Points : 7201
Posts : 2914
Location : Ontario Canada
| | Subject: Re: W.H.A.M.S. July 4th 2014, 8:49 am | |
| Looks great! I love all the little innovations!Inspiration is contagious! (I may have to copyright that) | |
| | | | Angchor
Member
Age : 67
Join date : 2014-04-14
Points : 4302
Posts : 491
Location : Index, Washington
| | Subject: Re: W.H.A.M.S. July 4th 2014, 11:08 pm | |
| Today I rebuilt/cleaned the carb, one more time. I did find more granulated grunk in the float bowl! Had to have come from up inside the carb. Because I used a new fuel line and new fuel filter when I ran it before. So, I decided to take it off and clean it as completely as possible. Then spent part of the day just putting things back on, and then taking them back off, so I could figure out what kind of space I have for various items. Finally... Bolted the dash in place. Got the linkages for the carb and governor sorted out, and got started on the wiring. 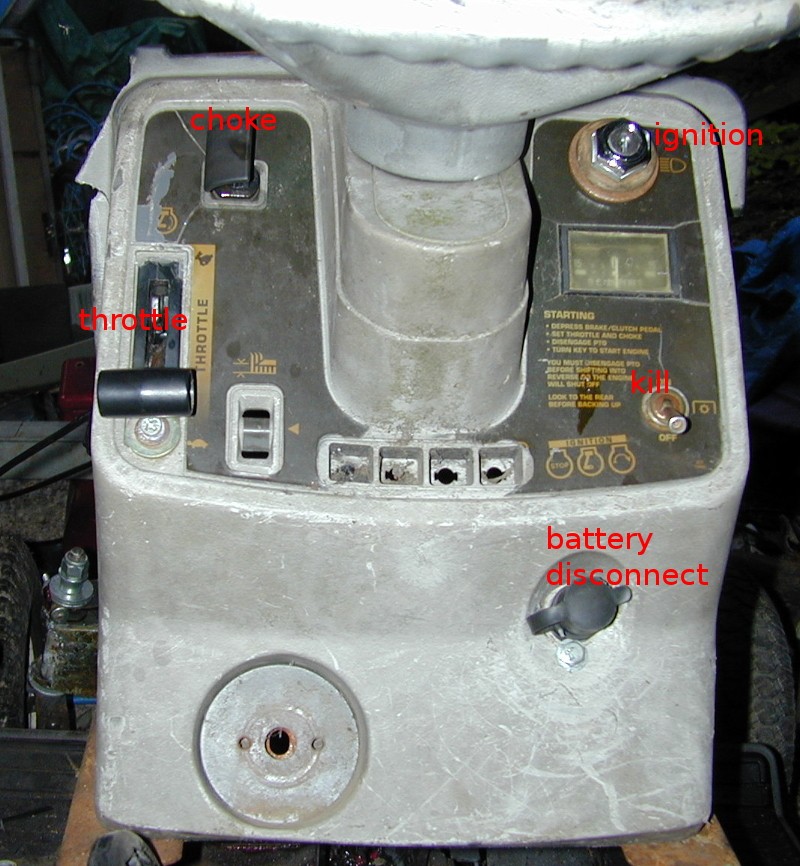 I decided to stick with the original throttle, for now. Instead of a gas pedal. (So I hooked up the throttle lever to the throttle, instead of the choke, and put the original choke lever in for the choke.) I am a bit anxious to get this back together, and get it running, so I can drive it. My experience so far with the BEAST... I never sit around and blip the throttle with my foot anyway. Nor do I tend to stomp into it and let off of it frequently. If I am headed downhill, I mostly have my foot off the throttle, and let the engine "brake" my way down the hill. Maybe having to give it just a little throttle to keep it from dieing. Coming back up, I tend to get it to a certain point in the throttle, then have to sit there and try to keep my foot steady around the bends, over all the huge bumps, etc. It looks like there is enough friction in the throttle lever, to keep it wherever I set it. So I won't have to be constantly resetting it. So I can concentrate on driving, and enjoying myself. As well as the fact that I can keep my feet on the floorboards, so I can keep the thing balanced. So basically I am going to try it like this until I get a chance to drive it a bit and see whether I like it or not. I did make a couple modifications, though. 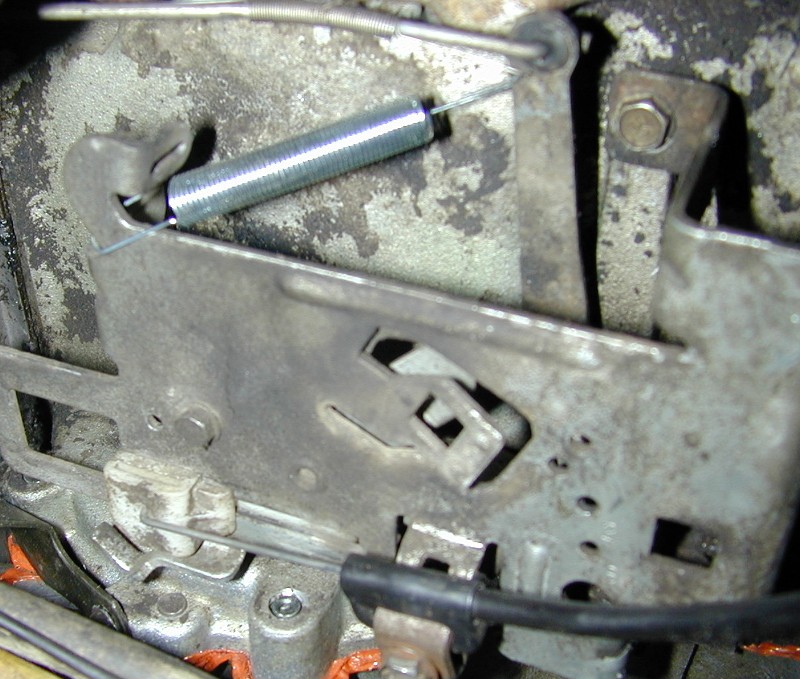 I put a light spring on the governor arm. Without that, it never really came all the way back.  Once the throttle cable was set up, I was not getting full travel. It would go all the way open, but not all the way closed. So I did a FearlessFront job on the spring tang on the throttle-governor connection. The tang is pointed to by the red arrow. The yellow arrow shows the direction that I bent it. If you do this, don't bend it much. I only bent it just barely far enough to make the throttle completely close whenever I turn it all the way down. These mods give me fuller control over just how open or closed the throttle plate is, but I don't believe either modification will keep the governor from doing what it is supposed to do. At least not keep it from limiting the RPMs. Also, I removed the rod that was originally in the choke linkage, that the governor is supposed to hit, when the gov kicks in. It never came anywhere close to touching the gov, anyway. It was just sitting there, doing nothing. I had to drill a new hole in the choke linkage, because the end of it was broken off. The battery disconnect switch now has a waterproof cover on it. I wish I had one for the ignition switch. | |
| | | | Angchor
Member
Age : 67
Join date : 2014-04-14
Points : 4302
Posts : 491
Location : Index, Washington
| | Subject: Re: W.H.A.M.S. July 6th 2014, 10:14 pm | |
| Got the engine the rest of the way back together, yesterday. Then got the electrical work all finished. (All that's left is the charging circuit. I may not even use that.) I used an old pair of jumper cables to make all my battery cabling out of. Here is something a bit different. I want to keep all the gas lines and such, as far up under the hood as possible. I also want to lock the hood. All this is so that I can lock the tractor to a jersey barrier at the bottom of the hill, and leave it unattended all day while I am in town. Also need to put in a gas cutoff, so that the gas doesn't just keep draining from the tank through the carb, if the float gets stuck. Didn't want to have to open the hood each time, just to do the gas cutoff. Soooo... 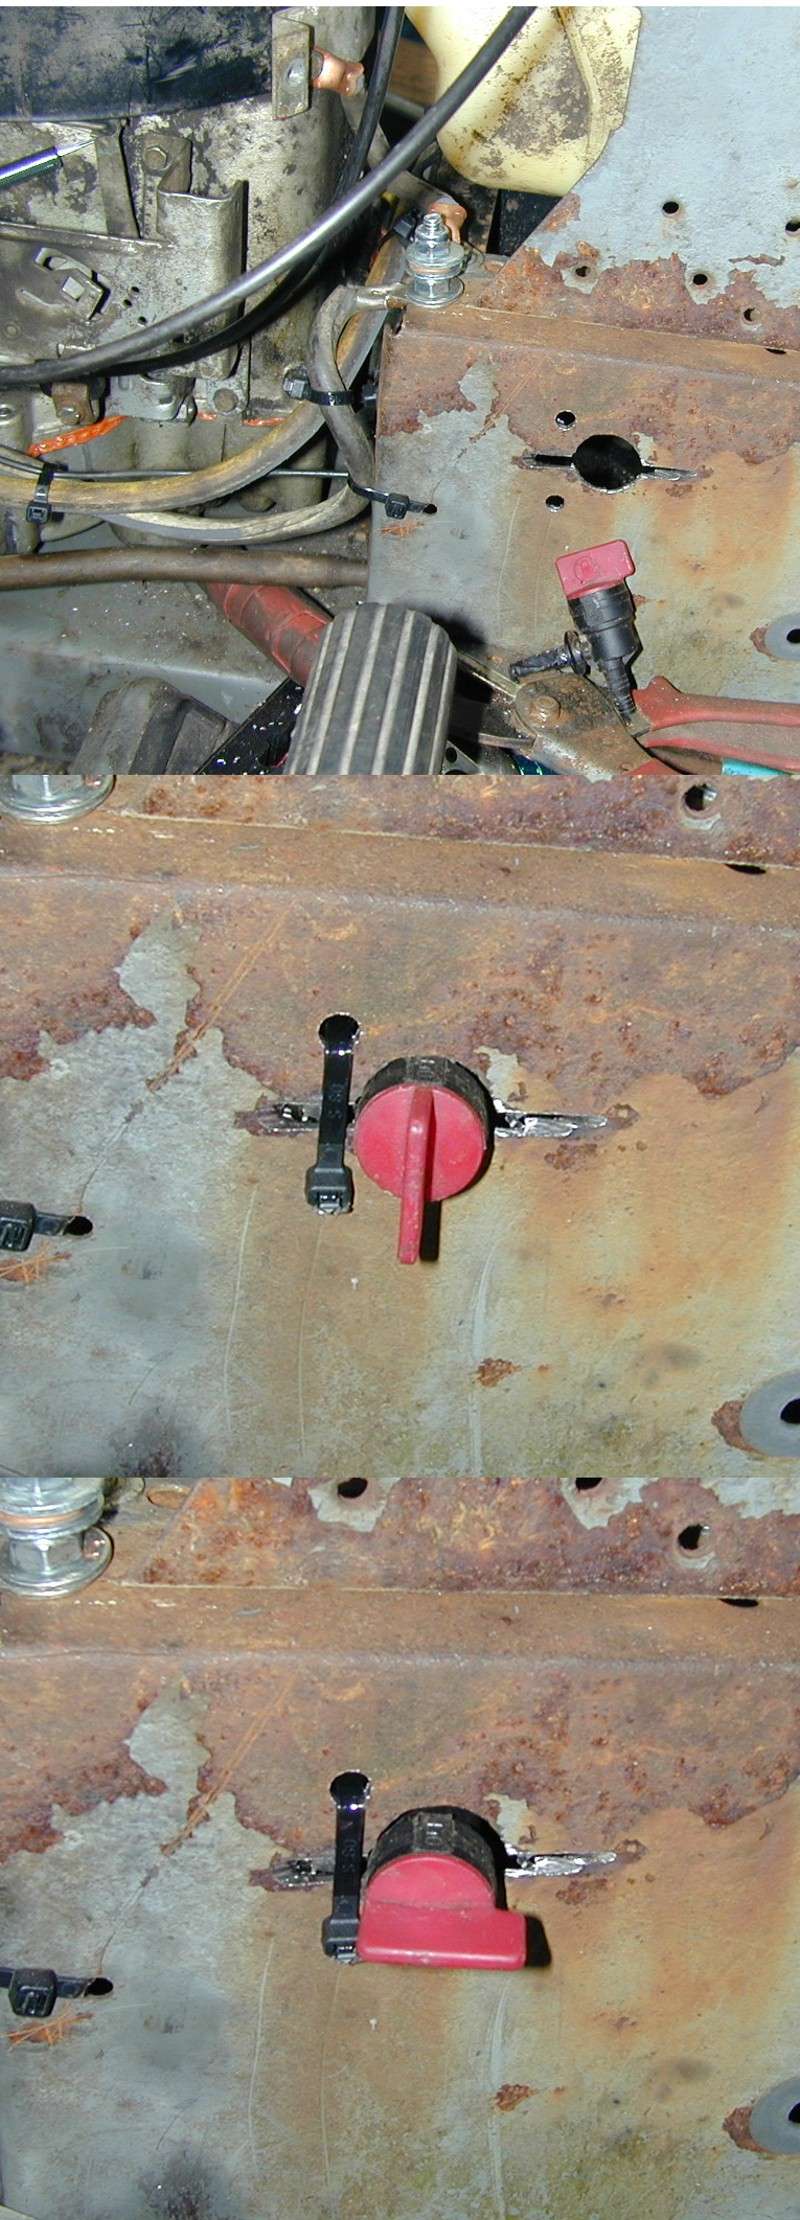 The gas cutoff is from an old generator. I drilled a hole that will be just below the side of the 'hood'. Then had to cut the slot, because of the handle on the cutoff. Now, with the line coming from the gas tank, to the cutoff, then from the cutoff, headed toward the carb... All installed and tightened down... I thread the end through that zip tie I have there. (At that point, the zip tie is open.) Then I am able to drop the tank in, and keep threading the line through the zip tie. Once the tank is in place, I reach in with needlenose, and pull the cutoff through that hole, hold it in place, and tighten the zip tie, to hold it in place. Tight quarters in there. Would have been nice to put it somewhere else, but because this is a gravity fed system, the 'good' places to do this, would all have been too high up. So... Yeah. I made something as difficult to work on, as the factory usually does. LOL That's alright. Cut the zip tie, and pull the tank, to be able to get this back out of there. Also had to do some welding to make a new stud, out of an old bolt hole. LOL I twisted off the bolt, in that bolt hole. Spent a couple hours trying to drill it out and breaking drill bits off in it. Then gave up and cut off a new bolt and welded it into the old bolt hole. May well be the first thing I think of, next time, instead of reaching for the drill... ~~~~~~~ Today... Filled the oil. Put in some gas. Put in a new plug... And... Nuttin. The starter solenoid is shot. So, I jumpered the starter. Still nuttin. Had to rebuild the starter. Still wouldn't turn over. I think the problem was that I didn't put a gasket in. So things inside the engine were too tight at first. Tested the starter solenoid again at this point, just in case. Solenoid is definitely shot. Removed the spark plug. And the belt. Spent an hour... First, turning it over by hand for a while, with a socket. Then used a drill for a while. Then finally the starter would turn it. So I let the starter do the job in several 15 to 30 second tasks. So that the starter wouldn't get too hot. When it was spinning easily again, I replaced the plug, and tried again. Took several tries, but it did finally start. I let it run about 5 minutes, turned it off, replaced the belt, and tried again. It started and ran just fine. Then I let it cool completely, and tried again. Worked fine, Even started with the clutch pedal NOT pushed in, and the FNR in neutral. So I think the 'mini-breakin' worked. LOL All this, so that I could test the pulley system. At this point it looks like it will work. Barely. There were sparks flying everywhere. I figured out the problem was that the shifter arm for 'speeds', that pulls the variable pulley back and forth... Was being cut by the lip of the pulley. (I am going to have to weld that. It cut almost through, before I saw it.) For now, I put a spring on that arm, to pull it up away from the pulley. But that causes other problems, so I am going to have to fix things right. To do that... Remember how I mentioned that the bracket that holds the variable pulley was bent and warped? Well, that's the problem. So now I am going to have to take all that back off of there, straighten things out, weld in some reinforcements... And see if I can get it to work right again. Tomorrow is town day, so I may not get anything done on the tractor. I will, however, be buying a new starter solenoid. LOL Oh, also. That spring that I put on the governor... I took that back off of there. Turned out, it keeps the engine from being able to rev more than halfway. Take it off, and you get full revs again. BUT... It never goes more than just over half of what I would consider normal speed. So, I am going to have to make a gas pedal after all. But I am thinking of doing the linkage steup differently from the norm. I'll explain that when I get to actually doing it. | |
| | | | Guest
Guest
| | Subject: Re: W.H.A.M.S. July 6th 2014, 10:45 pm | |
| sweet write up keep up the good work!!! everyday i get on to check on your build lol you go full detail on what your doing i like that |
| | | | Doc Sprocket
Site VIP
2018 Build-Off Entrant
2018 Build-Off Entrant
2021 Winner of Winners
2021 Winner of Winners
1st Place Build-Off 2016
1st Place Build-Off Winner 2016
Age : 51
Join date : 2013-04-21
Points : 7201
Posts : 2914
Location : Ontario Canada
| | Subject: Re: W.H.A.M.S. July 7th 2014, 9:49 am | |
| You're doing great, I'm diggin' it! I got lost here, though- - Angchor wrote:
Also, I removed the rod that was originally in the choke linkage, that the governor is supposed to hit, when the gov kicks in. It never came anywhere close to touching the gov, anyway. It was just sitting there, doing nothing. The governor doesn't actuate the choke. Shouldn't ever, anyways- unless a previous owner seriously screwed things up. Normally, the dashboard throttle control causes the arm to push the rod, when it's jacked up full to choke position (on machines that have a combination throttle/choke lever). unless I missed something somewhere? Also- I think you're right about the gasket thing- probably had insufficient crank endplay. | |
| | | | Angchor
Member
Age : 67
Join date : 2014-04-14
Points : 4302
Posts : 491
Location : Index, Washington
| | Subject: Re: W.H.A.M.S. July 7th 2014, 2:37 pm | |
| - Doc Sprocket wrote:
- The governor doesn't actuate the choke. Shouldn't ever, anyways- unless a previous owner seriously screwed things up. Normally, the dashboard throttle control causes the arm to push the rod, when it's jacked up full to choke position (on machines that have a combination throttle/choke lever). unless I missed something somewhere?
Also- I think you're right about the gasket thing- probably had insufficient crank endplay. You are correct, Doc. If I am going to try to include details, I should be at least as careful about what I say, as I am about what I actually do, on the machine. LOL 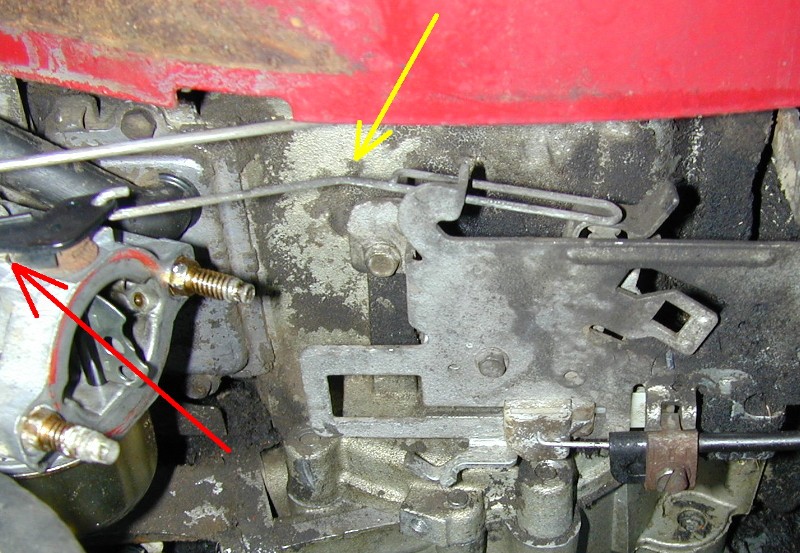 The yellow arrow points to the rod that is now removed. In that picture, the 'throttle' is pulled as far as it goes, and as you can see, the linkage never came anywhere close to contacting that choke rod. The red arrow points to where I had to drill a new hole, to put the choke strictly on the control of the cable. I am going to try to repurpose that rod that I removed. (The yellow arrow.) In my foot throttle setup. But that is all I will say about that, for now. Also, of course, now that I have run it in, and the crank endplay is now sufficient... If I decide to put a gasket in it in the future, it'll have too much end play. LOL Thanks for watching. And correcting, when I need it. | |
| | | | Angchor
Member
Age : 67
Join date : 2014-04-14
Points : 4302
Posts : 491
Location : Index, Washington
| | Subject: Re: W.H.A.M.S. July 13th 2014, 6:35 pm | |
| The past few days were a bit frustrating. I was working to get it to the point where I could actually drive it. This meant getting things buttoned up with the engine, and several other things. I had setbacks because things broke. The attachment for the gas tank. The starter. (This was AFTER rebuilding it. It broke the plastic part on the bottom, when I tightened the bolt to hold the battery cable on. I fixed that with JBWeld.) And some other things I can't remember right now. Then I find that the new engine pulley that I was so proud of, was not going to work.  The story on that pulley... I went to a local tractor place, to get the pulley. (Town and Country Tractor, in Monroe Wa.) I went in and asked for a pulley, strictly by pulley information. I wanted a 4&1/2" pulley with a 5/8" pitch, and a one inch bore. It can't get any simpler than that. They could have just gone back to the pulleys and looked to see if they had one that size. Instead, they spent half an hour asking me all kinds of stupid questions. What is this off of? What is it for? Serial number, because make and model isn't good enough. Why are you putting on a different size? Are you sure it will work? What are you going to do about belt retainers? Etc... All very stupid questions, because I had already TOLD them exactly what pulley I wanted. None of that other info mattered. They don't even bother going and looking at their existing stock of pulleys, to see if they have one. They want to special order it, or nothing at all. So, ok, we order it. It's going to cost 45 dollars. WHAT???!!? Ok, I want the pulley, so lets go ahead and order it. He goes through the motions. Even calls the 'warehouse' to make sure they have one... I pay for it. And he tells me that it will absolutely be here by tuesday afternoon. (This is a friday.) I go back in, on tuesday to pick up my pulley. It's not there. Now, understand... I am still stranded up here above the landslide. Every time I want to go to town, I have to make arrangements with a friend to come and pick me up. The conversation with the tractor shop guy: Did we call you to let you know the part was in? No. Then why did you come to pick up the part? You told me it would absolutely be here by tuesday afternoon. I didn't know I was supposed to wait for a phone call. (They never told me that they would call when the part was in.) Yeah, you were. Well, if you knew it wasn't going to be here on tuesday, why didn't you call and tell me that it wouldn't be in? We don't do that. We'd be on the phone all day long calling people and telling them that their part isn't in yet. (More words than that. The insinuation being that if I ordered it on friday, and it actually came in on tuesday, they would have to call me saturday, sunday and monday, all three days, telling me my part isn't in yet. When what I meant was... you TOLD me it would absolutely be here by tuesday. When you discovered it wouldn't be, it would have been courteous of you to let me know that.)(He slipped and let me know they knew by monday.) Ok, whatever. I go home and think about it. I call the next day, and tell them to cancel the order and put the money back on my debit card. So, I am waiting and watching, to see when the money gets put back on my debit card. Two weeks later, I get a call, telling me that the pulley came in. After I pick my jaw up from the table, where it dropped at the audacity of them just leaving the order intact instead of doing as I asked and cancelling and putting the money back in my account... I thought about it for a minute, and decided to just go back in and pick it up. If I didn't, I'd still be waiting another two weeks for them to put the money back in my account, anyway. So, I get the new pulley home. I notice that it looks like it is 1/2" pitch, and it doesn't look any more than maybe 1/4" bigger in diameter than the pulley I took off. (He obviously ordered the diameter according to the make and model of the tractor, instead of ordering a 4&1/2" pulley, like I asked.) It looks like the belt will ride in it, ok, even if it is only 1/2" pitch, and I am thinking, that that will in essence make it a larger size. It IS a 1" bore w/the right keyway. It's nice solid steel. And it has 2 set screws. One right on the keyway. So I decide to go ahead and try it. Took me most of a workday, to get that done. I had to machine some spacers, etc... Get it installed. (Picture above) Ok, it looks like it does act as a bigger pulley. Yet if I put the clutch in, it probably lets off enough to let go. But there will be no idler necessary. So that sat like that for a couple of weeks, until I finally got it to where I could test it yesterday... And it's a no-go. (Or I guess technically, always-go. LOL Because it never lets off enough NOT to send you speeding forward or reverse, even with the clutch in.) I had to put the old pulley back on. So... 45 dollars wasted and a BUNCH of frustration with that company. I'll never buy anything there again, if I can help it. I'll probably eventually rescue most of the wasted time, by ordering a bigger belt for the front, and trying again. ~~~~~~~ Ok, so I did get it running yesterday. I put the old pulley and belt retainers back on. And that took care of being able to use the clutch as intended. The carb needs a real rebuild kit, with new needle valve. The engine starts, and runs until the bowl runs out of gas. Because the needle sticks closed. Tap on the bottom of the bowl. It lets go. You have to get it started again. Then it runs fine. But now you have to tap on the bottom of the bowl again, to get the needle to re-seat, and not just keep dumping gas into the crankcase once the engine is turned off. I replaced the spark plug, with what is supposed to be the correct plug. (What was in there was a plug meant for a truck.) You can get the engine to run, but it takes a LOT of nursing. And it dies at the least provocation. After I put the truck plug back in, the engine starts at the first crank, and runs like a champ. The truck plug goes WAY farther into the plug hole, than the stock plug does. The one on the left is the one that the manual says is supposed to be in there. It ran crappy with that one. The one in the middle is the plug that was in there. It runs well with that one.  The plug on the right is the one I decided to try today. It's a bit of a compromise between the two. The engine started on the very first crank, and ran smoothly. So I think I have found my plug! LOL I plan today, on trying to take her out on the road, and see how she does. I've got a bunch of other stuff to do, so I might not get anything other than a test drive, done. If she works ok, then next it'll be on, to reassembling the hood. Working out the battery mount. (To box or not to box, that is the question.) Then possibly working on a gas pedal, and a brake pedal. I plan on going ahead and using it, if it works out today. And just keeping the other one running, just in case I have down time on this one. ~~~~~~~ Now THAT is a wall of text! | |
| | | | willis923
Veteran Member
Age : 27
Join date : 2013-04-10
Points : 5644
Posts : 1408
Location : Galway NY
| | Subject: Re: W.H.A.M.S. July 13th 2014, 7:53 pm | |
| be careful with those plugs. remember, the more threads, the further it goes into the cylinder. could cause some damage. i believe the CORRECT plug is a Champion J8c. i would cross refrence that to an NGK plug | |
| | | | Angchor
Member
Age : 67
Join date : 2014-04-14
Points : 4302
Posts : 491
Location : Index, Washington
| | Subject: Re: W.H.A.M.S. July 13th 2014, 9:37 pm | |
| Man, that's 3 times that I wrote this post, and it just disappeared!!! One more try, and that's it! That middle plug was in the engine when I got it. It was running fine, so I will assume that a plug of that length will not damage anything. Nevertheless I replaced it with the plug on the right. Which is a simlar type of plug, but it is almost as short as the 'legit' plug. I did get to do a test drive today. I had some problems. 1.) I need to replace the kill switch. The one I am using is internally bad, and will kill the engine without me touching the switch. 2.) The rear belt jumped. This was within the vari-drive pulley. The rear belt is on top, and the front belt is on the bottom. The rear belt decided it liked the looks of the bottom of the pulley, and it joined the front belt down there in the same groove. I am going to have to have a better look at the belt and pulley geometry and see what the problem is. This happened at the bottom of the hill. I had a few coniption fits for a bit, until I figured out what the problem was, and fixed it. (The reason I am doing this in the first place, is because it is almost impossible for me to climb that hill, on my own.) But then the engine was very difficult to start, and it kept dieing, once it did start. So I had to put the tractor in it's lowest possible gear, push the clutch partway in, and very carefully nurse it, to get it to climb very very slowly back up that hill. I was afraid I was going to have to walk back up, and then figure out some way to go down there and get the tractor back up, by towing it or something. It may be that I will have to replace the plug with a longer one, once again. But I am hoping that the real problem is in how the carb is adjusted. 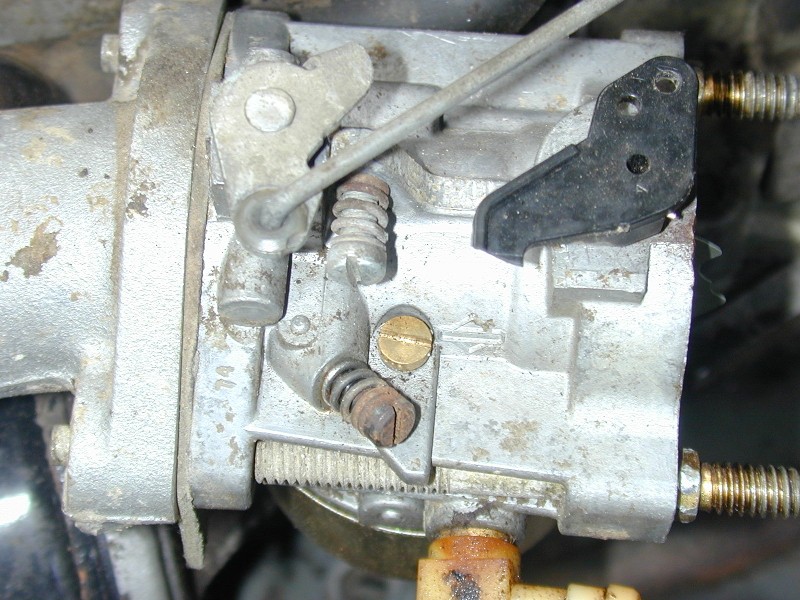 Stretch has a good carb adjustment video. But his has 3 adjustment screws. As you can see in the pic, mine has two. One for idle speed, and one for idle mixture. (The brass one is not adjustable.) Can anyone tell me a good protocol for adjusting this thing from scratch? | |
| | | | B440
Member
Join date : 2014-01-22
Points : 4087
Posts : 226
Location : Thompson, CT
| | Subject: Re: W.H.A.M.S. July 13th 2014, 11:14 pm | |
| If you're running a single-cylinder flathead (L-head) engine, the length of the spark plug will never interfere with the valves or piston. The only time you may incur damage, is if the threads are exposed to combustion, carbon may build up on them, and you may strip out the threads on the head when you try to remove the plug. The brass adjustment screw with the spring is idle mixture. At full throttle, it does not do very much. The main jet inside the carb should be your concern, unless you are just idling around? 1.5 turns out from fully seated is a good place to start on the idle screw mixture. more here: http://www.briggsandstratton.com/eu/en/support/faqs/adjusting-the-carburetor | |
| | | | Sponsored content
| | | | | | | W.H.A.M.S. | |
|
| | Permissions in this forum: | You cannot reply to topics in this forum
| |
| |
| |