| | | Project : Argoceptor! |  |
|
+11Dave.MTD frostypaws CraftsmanQuad19 prancstaman MatthewD TheBeal Creepycrawler RichieRichOverdrive Hillbilly Homer Crazy_Carl TourMax 15 posters | |
| Author | Message |
|---|
Hillbilly Homer
Member

Join date : 2012-04-22
Posts : 197
| | | | | TourMax
Member
Join date : 2018-10-06
Points : 2516
Posts : 438
|  Subject: Re: Project : Argoceptor! Subject: Re: Project : Argoceptor!  November 25th 2018, 5:35 pm November 25th 2018, 5:35 pm | |
| And it begins: 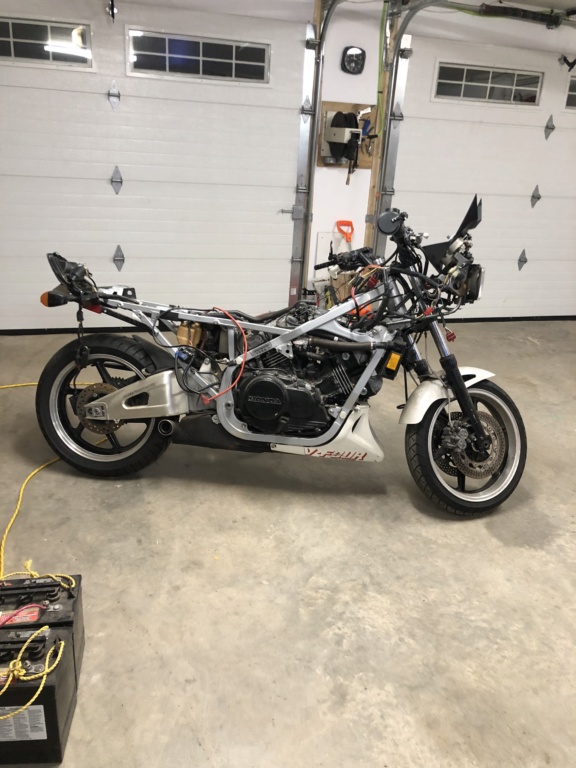 Step one was a rebuild of worn out parts on the Argo. Turned out to be mostly just chains, seals and bearings. With that coming to a close, its time for step 2: Engine swap. Step 3 will be some steering changes and step 4 will be 8 wheel i dependant suspension. Pulled the ol’ ‘Ceptor in from cold storage and started pulling off the bodywork. It hasn't run in several years, so I wanted to make sure it was still mechanically solid. Ran fine when I put it away last time, so it should be a fairly easy job waking it up. But it was not to be. Before I bought it many moons ago, the PO had wrecked it. The front end to be precise. In the process of “repairing” it, they had swapped on an 83-84 fuse panel. Well, this is an 85 and thats a one year part. So they had hacked and spliced the harness, stealing power from places they had no business messing with. So when I tried to kick it over: nothing. Thier bodge had finally failed. I traced it all down and figured out what the issue was, chopped out thier mess and ran an adequate sized jumper to get power where it needed to be. I know the carbs are a mess by now, so a couple squirts of fuel down the throats and kick it over. Coughs a couple times, catches and runs a few seconds and then shuts down. Thats good enough for today and I push it aside to bring the stuff back in the garage for the night. Tomorrow I’ll yank the carbs and drop them in the ultrasonic cleaner. Once I know it runs decently, I’ll yank the engine and start measuring and fitting in the Argo. 
Last edited by TourMax on November 25th 2018, 6:25 pm; edited 1 time in total | |
| | | | TourMax
Member
Join date : 2018-10-06
Points : 2516
Posts : 438
| | Subject: Re: Project : Argoceptor! November 25th 2018, 5:43 pm | |
| - Hillbilly Homer wrote:
- TourMax wrote:
- “waxed paper trick”
 Without a walking foot on your sewing machine (instead of just pressing down like a regular machine, it lifts and moves forward on the material), the leather grabs and sticks as you try and move it under a fixed pressure foot. In order to get around the grabbing and sticking that leather can do, you just put a sheet of waxed paper on top of the leather and under the presser foot. The waxed paper lets it slide under the presser foot and the needle punches right through the waxed paper like it's not even there. It's not perfect, but it will let you sew leather relatively easily without a walking presser foot machine. Walking foot machines are really expensive and I don't do enough leather work to warrant the expense. You can sew leather without using the waxed paper, but the results are usually not as good as they could be.  | |
| | | | TourMax
Member
Join date : 2018-10-06
Points : 2516
Posts : 438
| | Subject: Re: Project : Argoceptor! November 26th 2018, 7:00 pm | |
| yanked the carbs today and dropped 'em in the ultrasonic cleaner.
Dropped them back on the bike. Jumped a 12v battery to it and after a few cranks, started right up.
Ran a little ragged until it cleared it's throat and then it settled down into a nice steady idle.
So it's soild. tomorrow I'll pul the engine out of the Honda frame and start working out the details of the engine swap. | |
| | | | TourMax
Member
Join date : 2018-10-06
Points : 2516
Posts : 438
| | Subject: Re: Project : Argoceptor! December 1st 2018, 7:04 pm | |
| Getting closer to the final form of the seats:    I decided to go with the two side benches instead of a single rear bench across the back. If needed, I can get more people in there that way. The battery/storage compartment will still be there, but the top lid will be strong enough to be used as a step and there will be a fold down outside step to aid entry instead of trying to scramble in over the sides. The rear benches will get backs on them anyways. The front seat back will be raised on a frame la bit from what you see and the center portion will fold down to be used as an armrest or a pass through area if you need to get from the front seat to the back. For example: water entry and you need to get to the back to lower an outboard motor for water travel or maybe if you need to get something out of the rear storage compartment. | |
| | | | TourMax
Member
Join date : 2018-10-06
Points : 2516
Posts : 438
| | Subject: Re: Project : Argoceptor! December 1st 2018, 7:10 pm | |
| Getting closer to the final form of the seats: I decided to go with the two side benches instead of a single rear bench across the back. If needed, I can get more people in there that way. The battery/storage compartment will still be there, but the top lid will be strong enough to be used as a step and there will be a fold down outside step to aid entry instead of trying to scramble in over the sides. The rear benches will get backs on them anyways. The front seat back will be raised on a frame just a bit from what you see and the center portion will fold down to be used as an armrest or a pass through area if you need to get from the front seat to the back. For example: water entry and you need to get to the back to lower an outboard motor for water travel or maybe if you need to get something out of the rear storage compartment. | |
| | | | TheBeal
Veteran Member


Age : 29
Join date : 2013-06-06
Points : 5504
Posts : 1398
Location : Central PA
| | Subject: Re: Project : Argoceptor! December 1st 2018, 7:36 pm | |
| Im looking forward to seeing how the seats come out. Looks good so far
| |
| | | | TourMax
Member
Join date : 2018-10-06
Points : 2516
Posts : 438
| | Subject: Re: Project : Argoceptor! December 2nd 2018, 1:02 pm | |
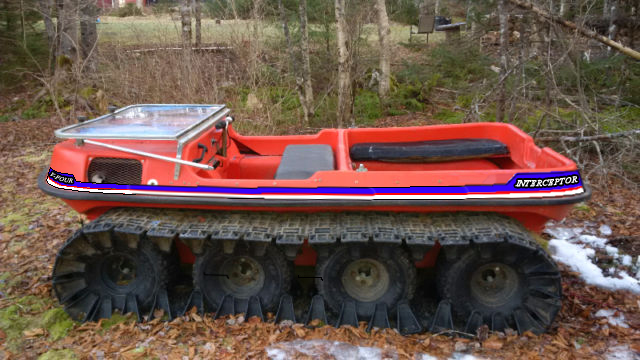
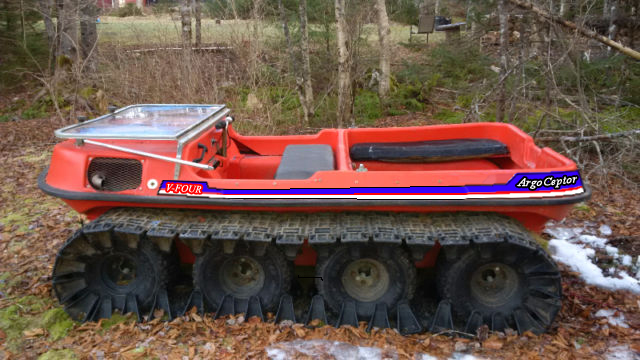
| The V45 is going to be taller than the Kohler Magnum. Especially so with the V45 airbox (tossing the irbox means no end of problems with CV carbs so I'm keeping it). So I need some way to cover it in the engine bay and that will look somewhat like it should be there. Sticking a scoop on the stock HDPE "hood" wasn't going to look good at all and I wasn't looking forward to the thought of it. Then i remembered I had a hood scoop I was building for my 83 Mustang up in the rafters. I shelved it when I found a stock 83 hood bulge to use instead. I pulled it out and set it on the stock hood: 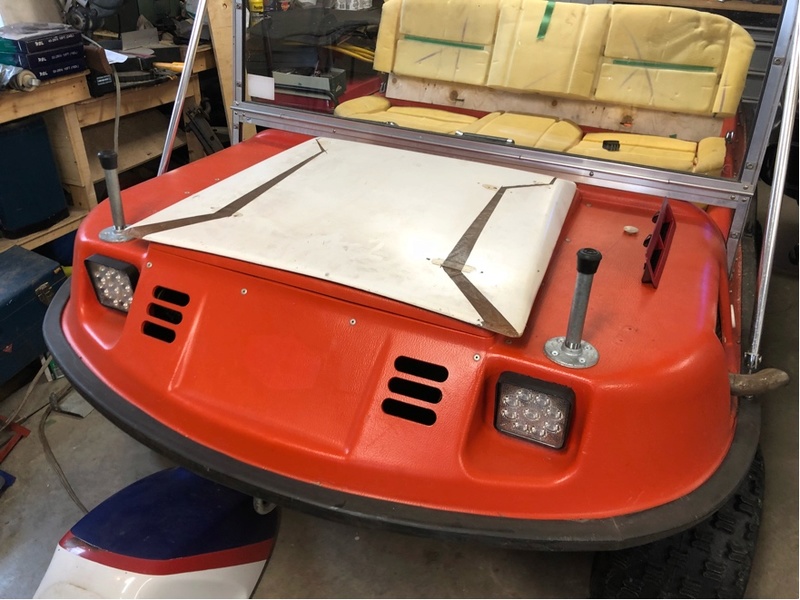 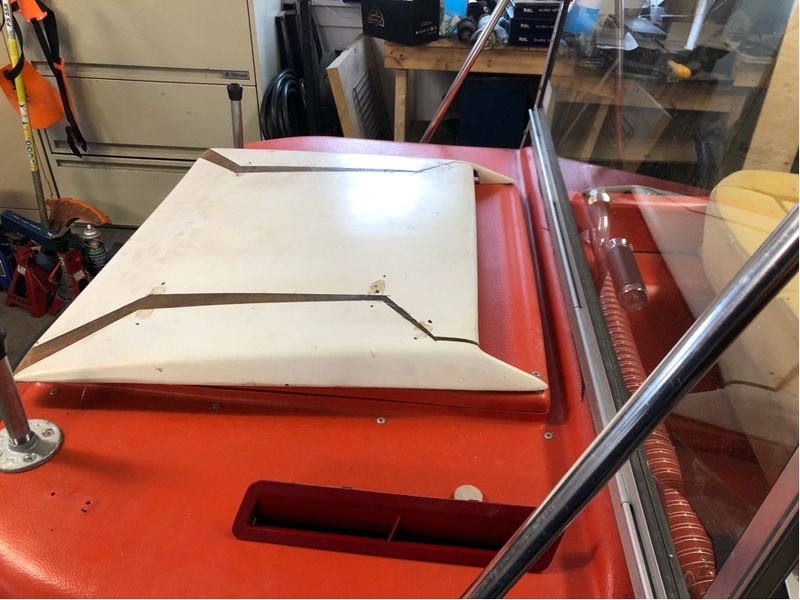 Yup, I like that! It's already very close to the right size and since it's fiberglass, it's an easy job to modify it to fit the opening and raise it up a bit. It would also be easy to add a small "bulge" in it (sometimes called a "power dome" in Ford speak) to give some extra clearance, if needed. You can also see a Pontiac Firebird hood vent (red thing) in that pic. I'm thinking of finding a spot to incorporate them also, just to help in shedding engine bay heat (well, cause it looks kinda cool too!) You might ask why the opening is to the rear instead of facing front like a traditional scoop. I've seen them done that way before and it looks kinda cool (not mine, pic I found on the net):  But the opening on mine is more for cooling than anything else. Since the Argo is essentially a sealed "tub", when it will be drawing air in over the radiator (the V45 is water cooled with puller fans) it needs a way out. The hood scoop opening at the back will allow the heat to escape and having it escape at the base of the windshield may also help with keeping the glass clear (rain, snow fog, etc). Facing rearward also makes more sense to me for water travel: forward opening wouldn't be great if entering water too fast (by mistake) or if a wave happens to breach over the front. Engine bay heat might be a bit of a problem with the windshield folded down, but I don't tend to drive the Argo with it down anyways. In keeping with the "ArgoCeptor" theme, I'm going to find a way to incorporate the instrument panel from the Interceptor in to the Argo: 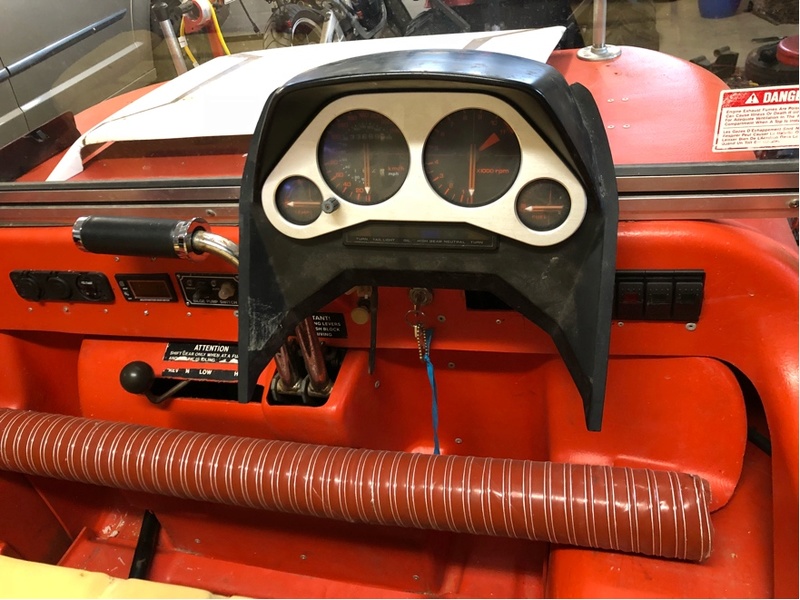 Has all the stuff I need to monitor the V45 and a few other neat bits. I may even hook up the speedo. I can either build or buy a correction gearbox for the speedo cable to get it close to actual speed. Getting the drive for it off one of the axles is easy peasy. I'll probably have to make up fiberglass dash piece to fit it all in. Likely one that spans the whole width of the body and make it a bit more "cockpit" like. I'll just make it so it can be attached with fasteners to the existing HDPE body rather than try to fiberglass it directly to the HDPE (fiberglassing to HDPE is a recipe for failure!). I'm also thinking of adding striped to the body, in keeping with the white red and blue Interceptor theme: 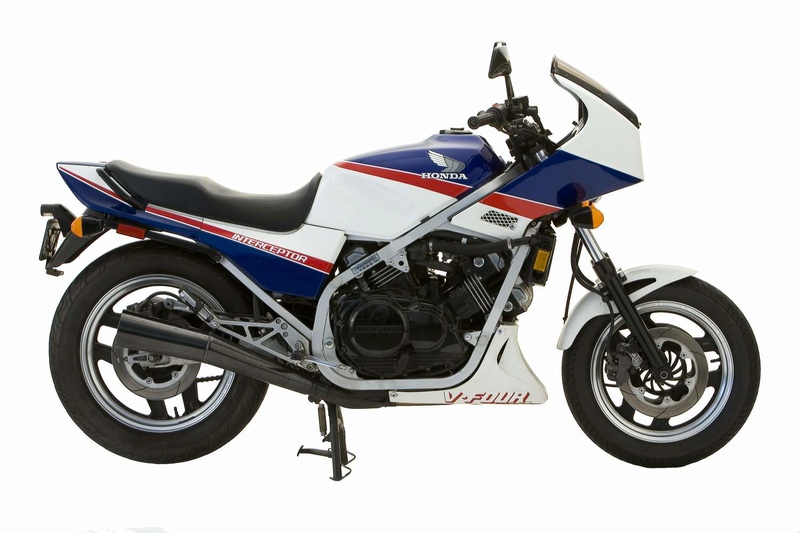 I'd like to paint the orange HDPE body white and do the red and white interceptor style stripes, but the HDPE won't really take paint well and sooner or later it will turn into just a chipped and flaking mess. But I can have some vinyl graphics made up and apply them to the body. Probably white base, with a red and white stripe on it that will go on the upper body half front to back, incorporating the name "ArgoCeptor" at the rear and maybe the "V45" or "V-Four" logo on the hood somewhere. Have to think on that one for a while. It looks good in my mind's eye, just not sure how it will translate to real life... | |
| | | | TourMax
Member
Join date : 2018-10-06
Points : 2516
Posts : 438
| | Subject: Re: Project : Argoceptor! December 2nd 2018, 9:19 pm | |
| Put some work into getting the kohler ready to pull. With most of the bits out, i could take better measurements. That big v4 750 is going to be a squeeze! I’m not sure if it will fit lengthwise. Its a good 8-10” longer than the kohler and the Argo transmission might be an issue, space wise. Theres room in the tub to go further forward with the v4, but its hard to say how tight a fit it will be untill I actually set it down in the engine bay. I also don’t want to get the front cylinder header pipes too close to the plastic hull. I may end up having to see if I can sneak the argo transmission back a few inches, but there’s precious little room for driver and passenger legs in the front seat already. Height of the V4 is also a problem. Well, it’s not a problem if I dont use hood. Yeah...thats not going to happen! I will have to modify the airbox. It’s just too tall with it sitting down in the engine V between the cylinders. But it only means making a cut and rotating the front half of it down to level. I can then plastic weld a patch piece in and there should be minimal distruption to the airbox other than added volume (not always a bad thing!). The hood I have a couple options. I can make a spacer to pop the oem hood up about 3-4 inches: 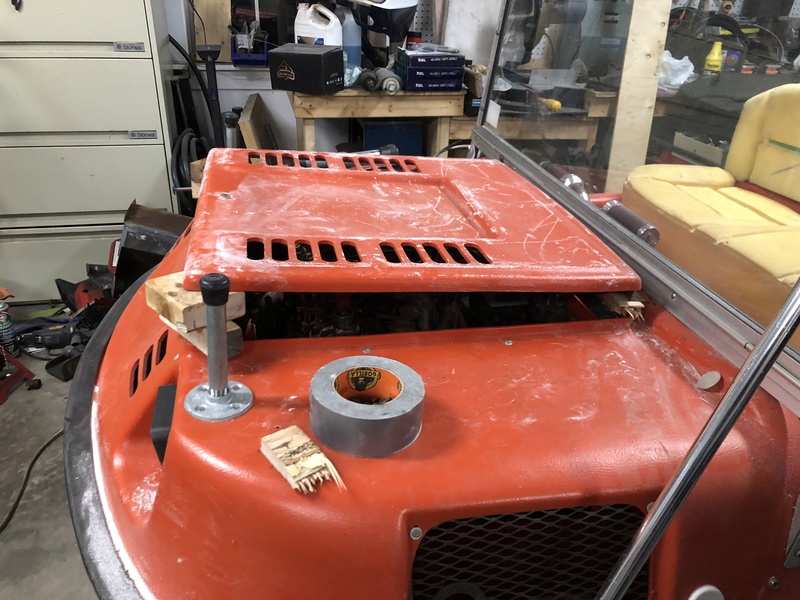 But I have to leave the rear lower than the front in order to still be able to lower the windshield and still get the hieght I need in the front to clear the V4. Second and third options are I can mount the fiberglass hood facing forward or rearward:   Opening facing forward still doesn’t look right to me and the hood slopes to the back pretty severely to clear the windshield pivot. I’m also not sure how to make the opening look like anything else besides “unfinished, even if I add some kind of meshing. I could make it look like something finished, ut it will always stand out as “odd”. The angles are just all wrong. Open rearward still looks the best, but the front still looks pretty high. The scoop is actually sitting level across the top as it has a taper built in to it for the “scoop forward” orientation, so the “nose high” is a bit of an illusion from the angles. I think I’m still going to go with the rear facing fiberglass hood. The front I can mitigate the “blocky look” by sculpting the side and ledging edge to more of a taper to meet the body and the V4 engine is only about 10” wide at the aircleaner and heads. That means I may still have to make a “bump” in the middle at the front, but thats pretty easy to make look OK on a hood. I might even be a to add the firebird vents to the sides of the buldge to make it look more intergrated and pull it all togther more visually. Iow: like the bulge is designed to be there. The v4 swap is not exactly “falling together” like it’s meant to be, but a plan is taking shape... | |
| | | | TourMax
Member
Join date : 2018-10-06
Points : 2516
Posts : 438
| | | | | TourMax
Member
Join date : 2018-10-06
Points : 2516
Posts : 438
| | Subject: Re: Project : Argoceptor! December 3rd 2018, 6:20 pm | |
| I officiated over 2 divorces today: 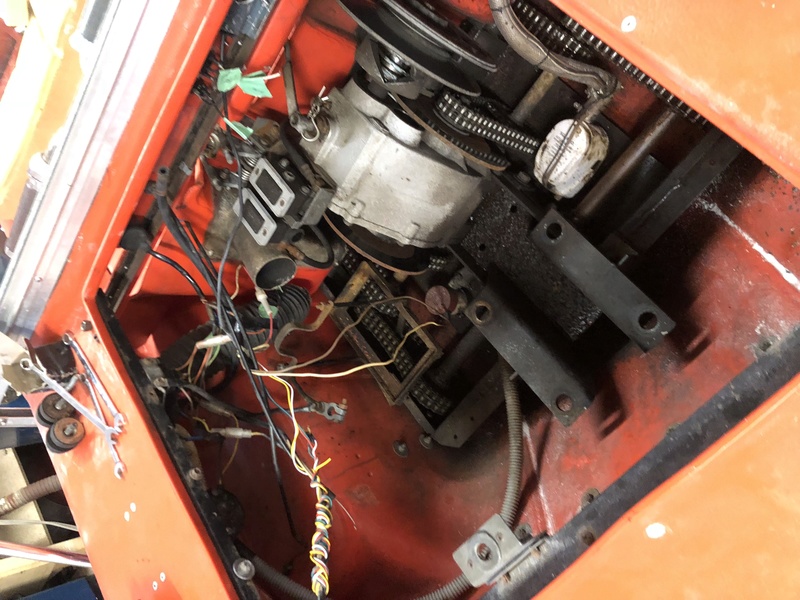 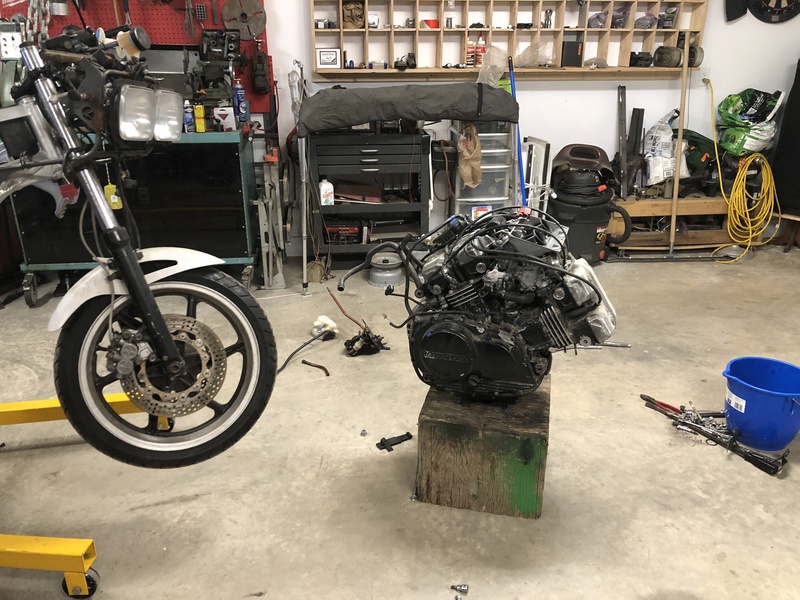 After the official proceedings were finished, they went their separate ways for that happy and swinging single time everyone experiences after getting out of a dying/dead relationship:  Then they noticed someone new that they might like to “get with”:  Then the always awkward first date, a night cap at the end and inevitably, someone ends up in bed with someone else:  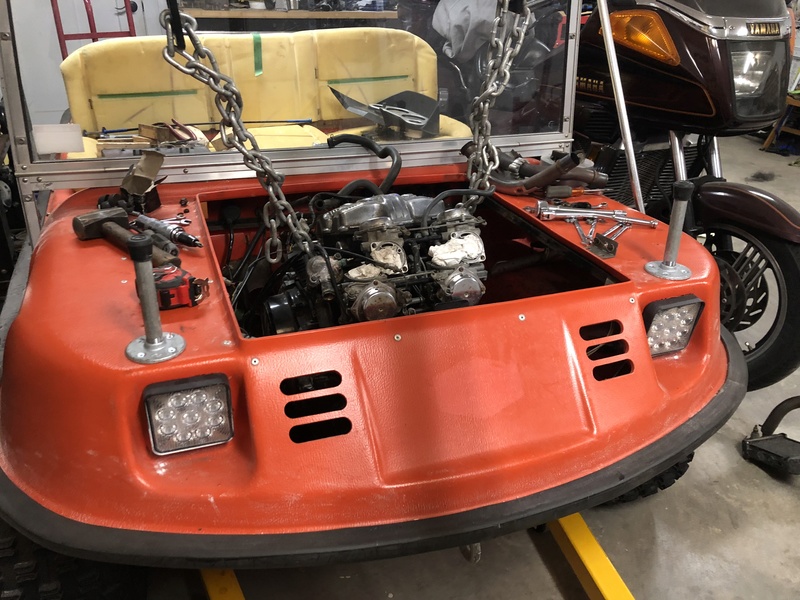 It was awkward, slightly uncomfortable and maybe even a bit painful, but still strangely satisfying. Both have enough curiosity to want to try a second date!  Man, that V-four looks the business sitting in there! Quite a serious looking piece of kit! Like a 60’s muscle car with too much engine in too small a chassis, it looks ready to party! So the big V45 fits....well, mostly. It’s sitting quite high right now, but there’s a good 5” it can be dropped. The old Kohler engine mount bracket is narrower than the V45 oil pan and the engine is sitting up on top of it right now:  There may also be an additional inch or two I can drop if I rework the “power pack” tray. But with just the 5” drop from removing the Kohler bracket, that will get all of the V45 under the stock hood height. All of it except for the carb plenum/air cleaner housing. Thats easily handled with a custom hood. The real issue is its further forward than what I measured, which may be a problem with packaging it all inside the Argo body. Anything that alters the airbox too much turns CV carbs in to a total jetting nightmare... Tomorrow I’ll look at getting it fit in there at a proper height. Which means cutting the Kohler engine mount brackets off. Sort of a “not turning back” point, but in reality I can always weld them back on if needed. Lots more to sort out and build, but its a good start! | |
| | | | TourMax
Member
Join date : 2018-10-06
Points : 2516
Posts : 438
| | Subject: Re: Project : Argoceptor! December 4th 2018, 9:59 am | |
| Still playing around with photoshop:  That's starting to look pretty good! | |
| | | | TourMax
Member
Join date : 2018-10-06
Points : 2516
Posts : 438
| | Subject: Re: Project : Argoceptor! December 4th 2018, 2:20 pm | |
| Decided to just pull the whole power pack tray in order to fit the V45 engine. And then teh Joy of PO damage popped out at me: 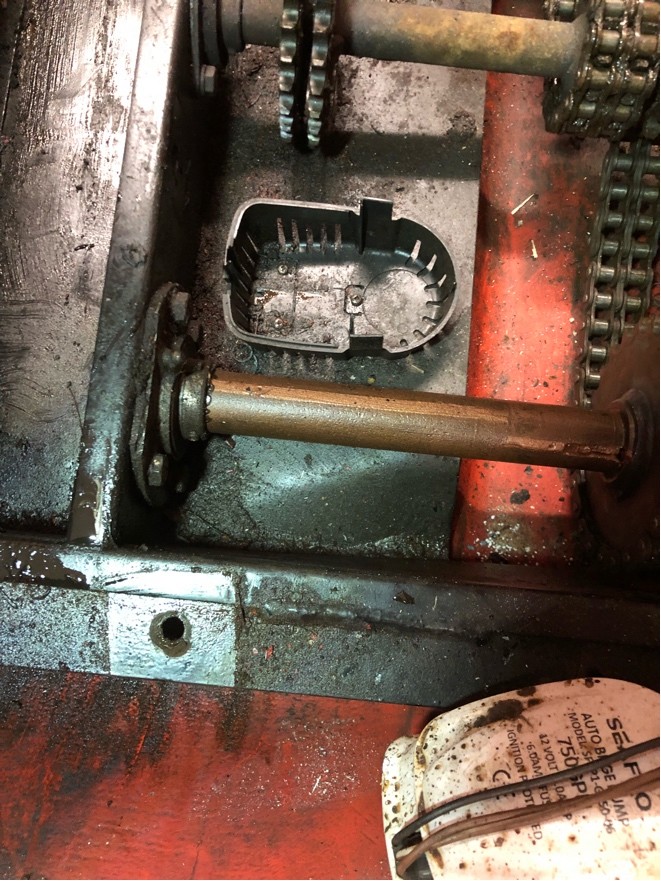  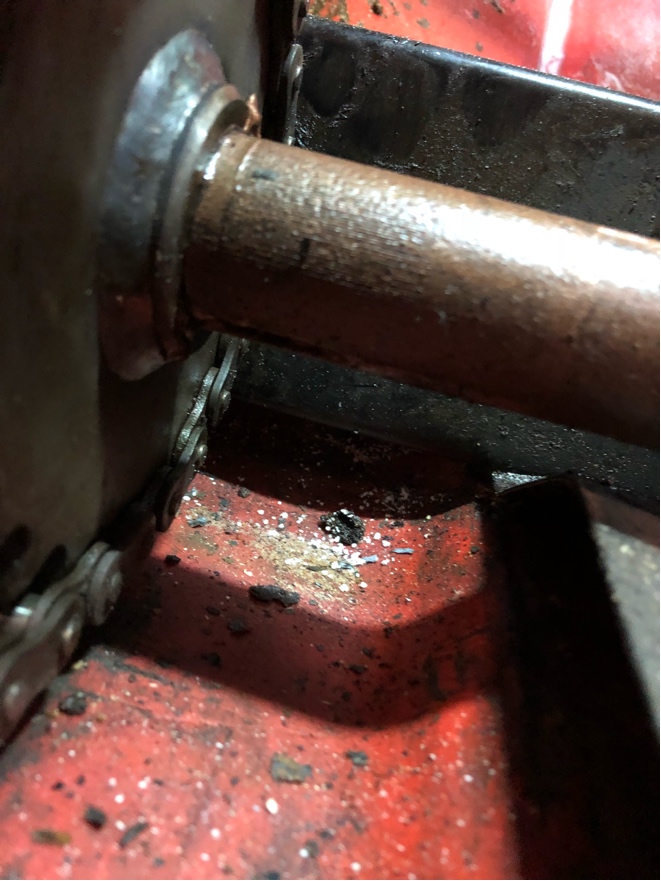 It's hit something pretty hard in it's past. The plastic tub and skid plate are fine, but the steel frame plate is bent up a good 3" in the worst spot. You can even see where it w jammed up into the drive sprockets, which wore a new "channel" in the metal! Oh well, time to be the BFH out.... | |
| | | | MatthewD
Veteran Member

2015 Build-Off Entrant
2015 Build-Off Entrant
2016 Build-Off Entrant
2016 Build-Off Entrant
Age : 22
Join date : 2014-11-16
Points : 5544
Posts : 1993
Location : Northern Ireland
| | Subject: Re: Project : Argoceptor! December 4th 2018, 6:07 pm | |
| Really nice project with a lot of thought and fabrication going into it. Looking forward to seeing more progress! | |
| | | | prancstaman
Veteran Member
Join date : 2015-02-02
Points : 4887
Posts : 1412
Location : Cleveland,Ohio
| | Subject: Re: Project : Argoceptor! December 4th 2018, 6:34 pm | |
| Pounding that dent out, that should get rid of some more driveline noise that you mentioned about earlier. | |
| | | | TourMax
Member
Join date : 2018-10-06
Points : 2516
Posts : 438
| | Subject: Re: Project : Argoceptor! December 4th 2018, 7:57 pm | |
| Well, there it sits; 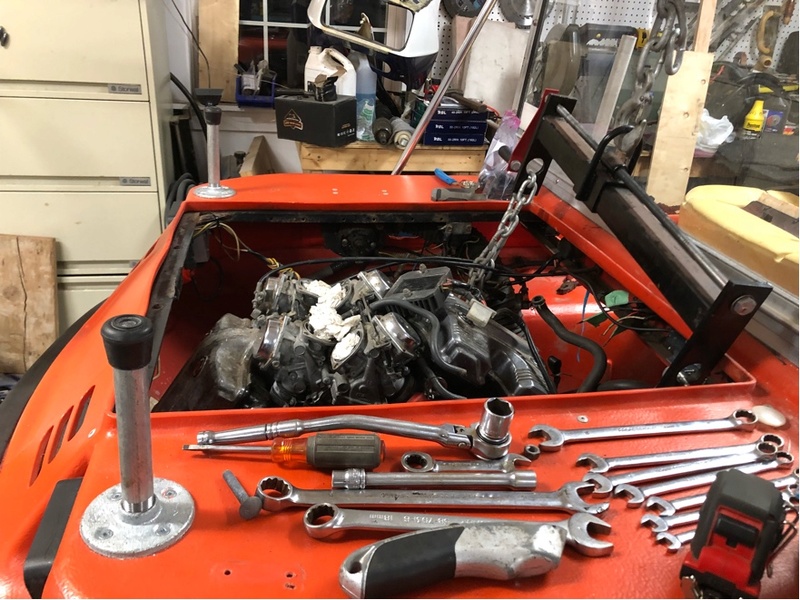 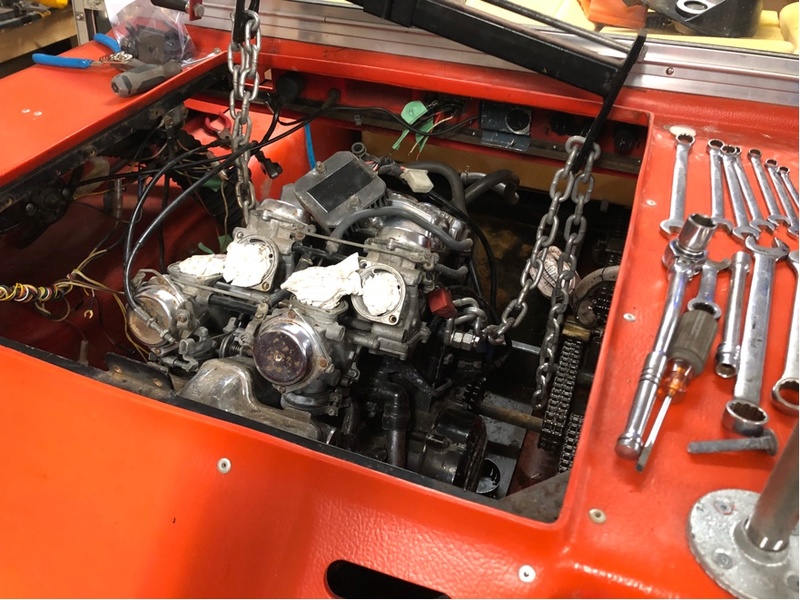 All 88 screaming Honda horses! No mounts built yet, but that's where it needs to sit to line up with the Argo transmission and adequately clear the front of the tub and the frame. It also means the Argo transmission has to slide back about 1.5-2.5 inches to clear the back of the V45 transmission case. Not that big a deal as I've got new double 40 chain to replace the worn out transmission to idler shaft chains. I'll just make the chain a little longer and the chain doesn't care if it's running straight up and down or on a little bit of an angle. As long as the sprokets are in the same plane, chains are happy to just go about thier business. There should also be enough clearance to the firewall to slide it back that much. If not, it doesn't really matter as I think I'm going to have to make a new firewall anyways. The front footwell isn't exactly what you would call "roomy" to start with, but you'll never notice an inch or two of less. Looks like about a 12" run from the V45 output sprocket to the Argo input shaft. The V45 output will sit lower than the Argo input, so that will have an upward run. Again, chain doesn't care about it's orientation as far as that goes. Here you can see the issue the airbox poses: 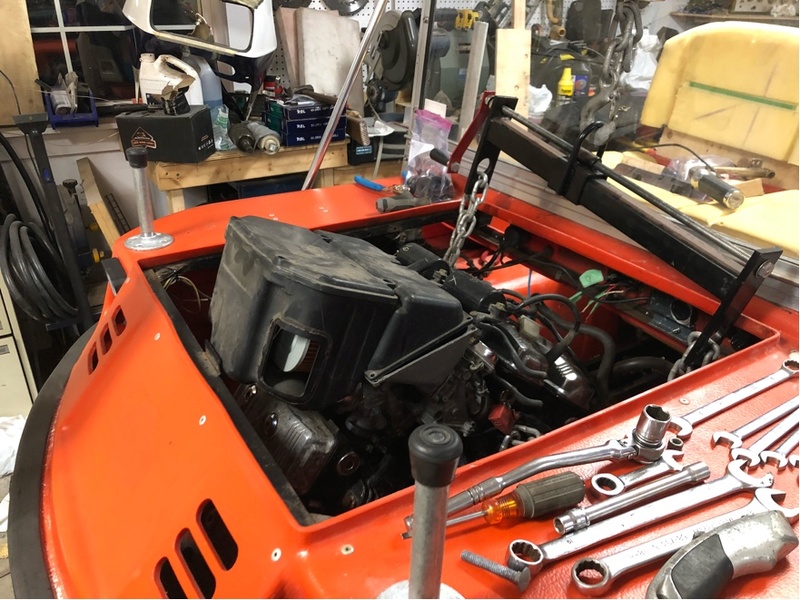 Sits pretty high as it is. I think I can cut the box just behind the upper airbox lid screws and angle the forward portion down. That would make it easy to get under a custom hood with a reasonable "bulge"in the center. Its a bit of work to get this all to fit, but nothing outside of my wheelhouse. Pretty basic fabrication stuff for me actually. Oh, the height the whole rig is sitting at on teh jack stands is probably where it will end up once I'm finished the suspension fabrication. It will go from about 5" at the lowest point on the tub/skidplate to about 11-12" at the lowest point. Not a huge jump in ground clearance, but adequate for me as the rig is pretty hard to get stuck as it is with the HDPE just sliding over everything. I just want to drag and gouge it less than I do now. No tto mention, suspension to soak up the impacts before it gets to the ol' bod.... | |
| | | | TourMax
Member
Join date : 2018-10-06
Points : 2516
Posts : 438
| | Subject: Re: Project : Argoceptor! December 6th 2018, 10:13 am | |
| So I’m fitting the engine to the power pack “sled” today and thinking about steering and braking.
Steering will remain skid steer (for now) but I want to divorce the steering and braking functions to allow me to convert to “motorcycle” type steering (ie:handle bars). The bars are easy: a pivot, two levers and design a linkage to the existing trans brakes master cylinders. Good to go.
The braking system is a little harder. I have no desire to make the new bard pull back style to activate the brakes, I want to use the right hand master cylinder, like a motorcycle. Plan is to use all the interceptor “clip ons” and switch gear, to continue the interceptor theme.
No real room to add a couple calipers to the existing brake rotors. I considered adding a single large disc to the Argo trans input shaft since it's so long:
But I realized I'd be asking the transmission (and it's cast aluminum case) to deal with a relatively large shock load when the brakes locked up and all eight wheels of force was fed back in through the system. Shock loads break things and the transmission was not designed to deal with that. Likely why the factory turning/stopping brakes are on the output shafts vice the input.
So, I need to add one (or two) rotors to the drive system somewhere. Probably have to make them another chain driven component off one of the axle shafts somewhere as the shafts are at the bottom of the hull and no room to put a rotor on them directly.
Need to think on that one a bit more but I will figure it out.... | |
| | | | prancstaman
Veteran Member
Join date : 2015-02-02
Points : 4887
Posts : 1412
Location : Cleveland,Ohio
| | | | | TourMax
Member
Join date : 2018-10-06
Points : 2516
Posts : 438
| | | | | TourMax
Member
Join date : 2018-10-06
Points : 2516
Posts : 438
| | Subject: Re: Project : Argoceptor! December 6th 2018, 11:12 pm | |
| Well, engine mounted to the power pack “sled”: 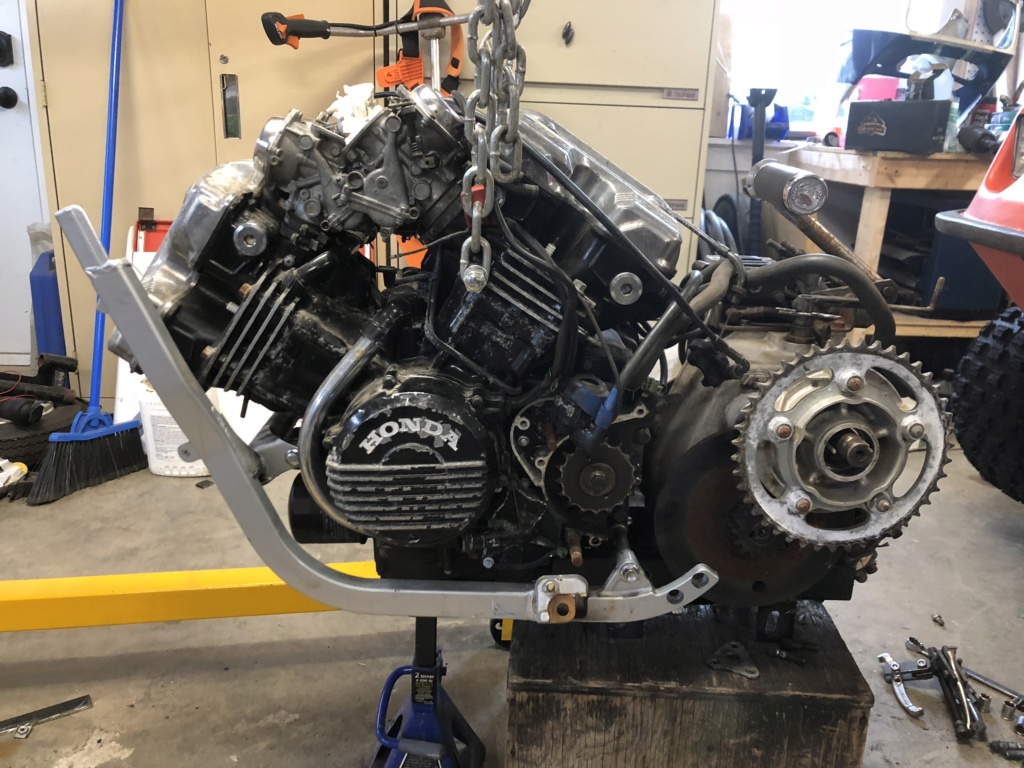 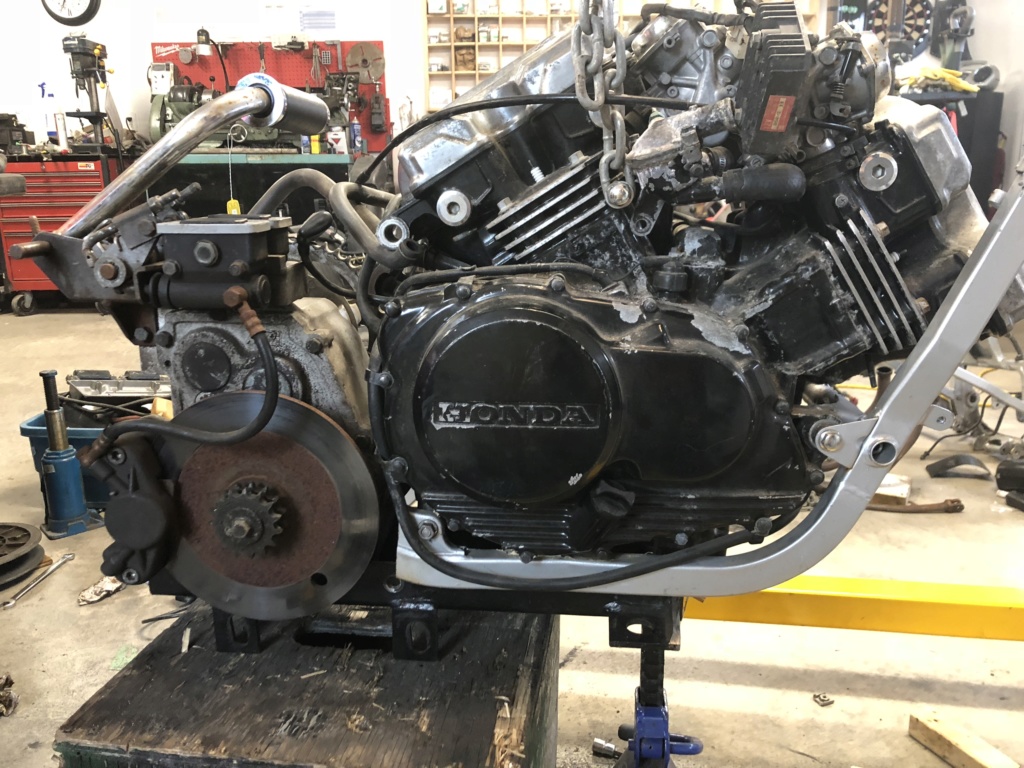 I elected to go the “simple route” for engine mounting. I just lopped the bottom of the VF frame off, used some 2” angle to make a platform on the sled and welded the frame rails directly to the 2” angle. The frame aleady had perfectly allgned mounts for the V4 engine, so I figured “why re-invent the wheel”? As a 90 degree V and a 360 degree crank pin, the V4 has perfect primary balance, so it doesnt vibrate. That's why Honda could mount it to solid mounts in the VF frame as a stressed member and the same reason why I can just straight up weld the frame sections to the argo “sled”. You do get a second order vibe at around 7,000-8,000 rpm, but its just a very mild “buzz” at worst. If you feel it at all that is. I don’t plan to ever have the rpm that high in the Argo anyways. No need to be trying to rip along at 75-80 mph in an 8x8 Argo! Yipes! Dropped it all into the engine bay: 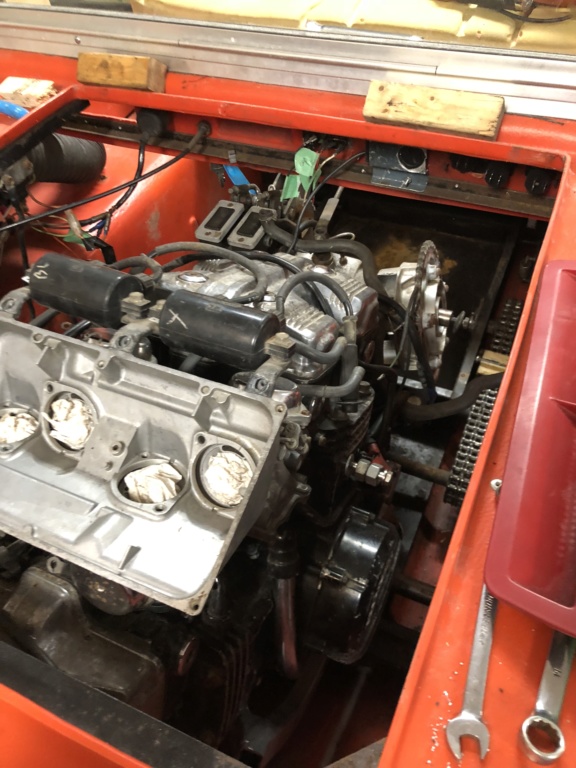  Pretty good! Its a little further forward than I had wanted, but it was nessesary to clear things like the oil pan and a few other bits. Might make it a touch more nose heavy, but I’m hoping the planned group 27 battery mounted in its new spot at the very rear of the rig will help balance that out some. Time will tell... The Argo trans is slid back about an inch and will get slotted mounting holes so I can make adjusters to tension the drive chain between the V45 and the Argo input shaft. The Argo output chains will still be the stock argo ajusters on the back of the sled. The v45 is offset to the LH side in order to line up the vf output sprocket and the argo input sprocket a little closer. Looks like I will still have to make an offset output sprocket to get the final lineup correct. Not much, maybe 3/4-1” offset. Engine offset to the left isn’t such a bad thing for balance as the driver sits on the tight side of this rig. The Argo input sprocket build will be more involved than just an offset sprocket like the V45 output. The sprocket and carrier will be reused from the CBR wheel that was on the VF. I’m currently also looking at machining out the wheel center to reuse the “cush drive” in the wheel hub. Basically, the sprocket carrier pushes into the wheel hub where there are rubber dampers. These dampers take up vibration and shock loads to make life easier on things like the gearboxes and chains. Would be nice to be able to incorporate it to make life easier on the Argo transmission as well as the VF box. I have a general plan worked out on how to do it, i just have to see if I have the clearances. Building the exhaust is going to be “fun”. Its pretty tight up at the front cylinders and the rear pipes on the the V4’s are always a tight fit. Add in the fact I plan dual mufflers with rear exits and exhaust becomes a major project/pain all by itself. Ugh. Exhaust fabrication is never easy... I’m toying with using the stock Argo hood: 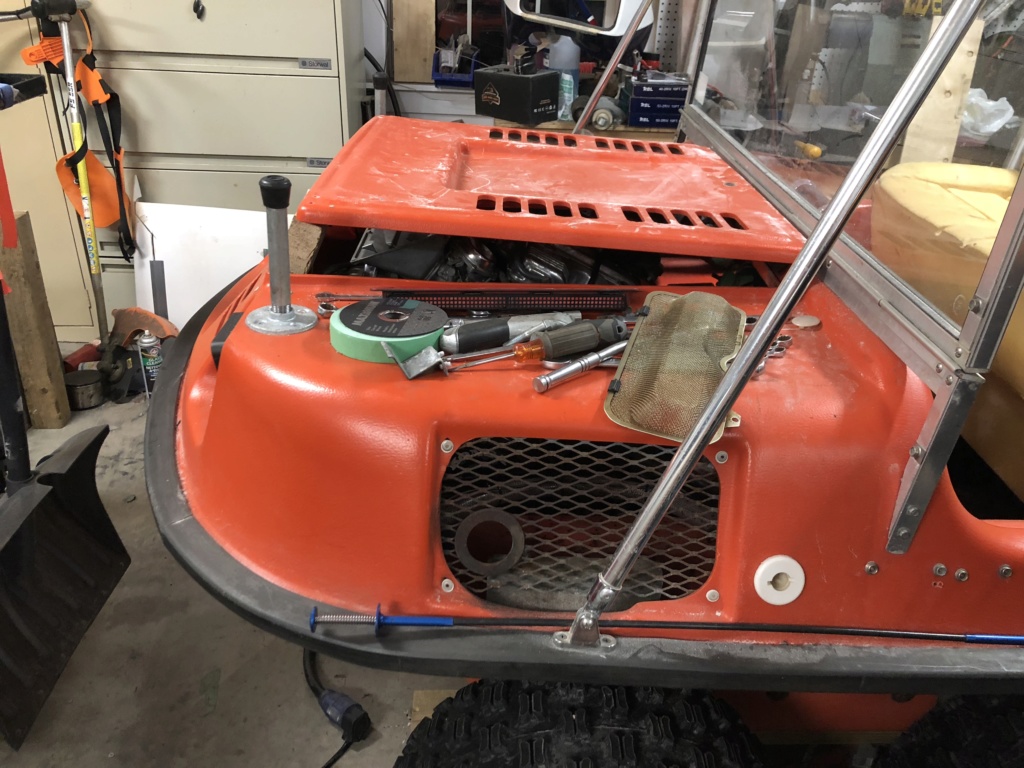 Theres no way it will clear the intake as it is, but if I turn it around backwards and make a spacer piece to raise it up, it will work. Looks a little “off” to my eye as it needs to be higher in the front (to clear the airbox) than the back (low enough to let the windshield fold). Still thinking about that or the custom fiberglass hood. Either way, I need about an additional 4” at the front to clear the airbox... | |
| | | | TourMax
Member
Join date : 2018-10-06
Points : 2516
Posts : 438
| | Subject: Re: Project : Argoceptor! December 7th 2018, 8:38 am | |
| Yeah, pretty sure I’m going to go with a custom fiberglass hood: 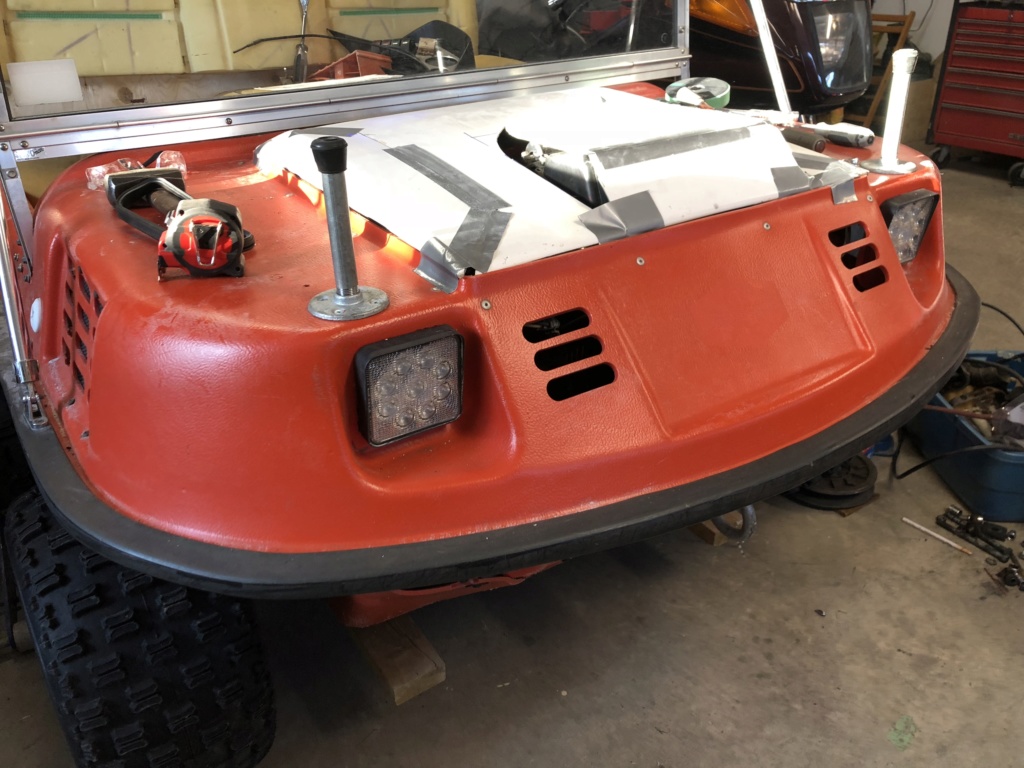 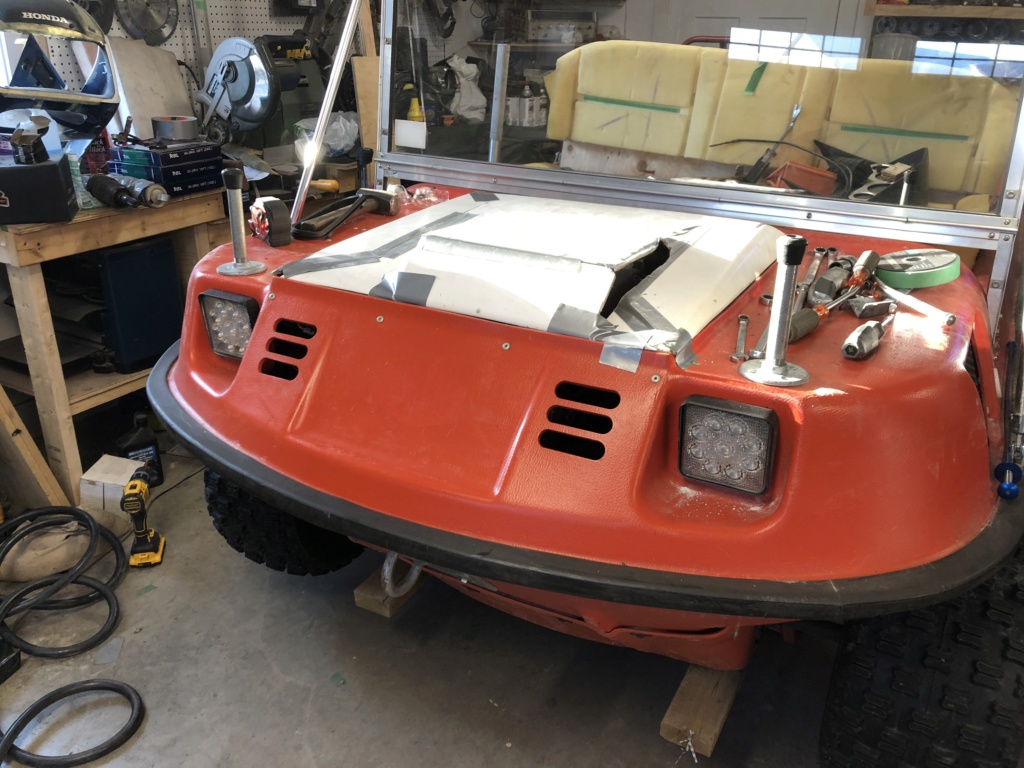  Sorry about the crap pics, the sun choose that exact moment to clear and come right in the window, directly on the hood. Thats just a rough mock up, but you can see the shape. The bulge over the airbox will be rounded off and blended into the rest of the hood so it looks like it should be there. It’s just standard fiberglass procedures to get it the way I want it and I’m pretty good with ‘glass.... Its just going to be easier to rework the fiberglass into something that looks like its supposed to be there as opposed to the stock hood with some kind of “spacer” to get it high enough to clear the airbox. That the entire rear of the fiberglass hood is wide open is a big plus for shedding engine bay heat and I always have the option of adding additional venting to the rest of the hood surface if I need it. | |
| | | | TourMax
Member
Join date : 2018-10-06
Points : 2516
Posts : 438
| | Subject: Re: Project : Argoceptor! December 8th 2018, 6:44 pm | |
| Didn't do much to the Argo today. Fiberglassed the hood pieces back together and started a wire frame for the hood blister:   Just a start, but you can start to see the shape. Its mostly like a fat teardrop. The one side is kicked out wider to accommodate airbox ducting. I decided there was no other way to make it fit and look good than to duct the airbox. So the plenum of the airbox over the carbs will remain unchanged, but the filter will be relocated to the RH side of the engine and ducting connecting the plenum to the air filter housing. Hopefully, that won’t change the airbox characteristics too much to the point where I have to get down in to the carb body casting ports to make it run right. If it becomes too much of a problem, I may just yank the 4 keihins and drop a custom manifold and a small 2bbl (think: Volkswagen bug) on there. Then its a straight cable actuated carb instead of CV slides and not as hypersensitive to airbox chages. I may loose some HP off the top end. But seeing as I’m starting with 90hp, i can loose 30 hp and still be at 60hp. Hp peak is up around 9 grand and I’ll never be there anyways (or at least I SHOULDN’T be there in an argo!). Even 60hp is more than enough and a single 2bbl might actually improve lower end torque. | |
| | | | TourMax
Member
Join date : 2018-10-06
Points : 2516
Posts : 438
| | Subject: Re: Project : Argoceptor! December 9th 2018, 12:21 pm | |
| OK, so the way this is going, I could very well end up with the "fastest" Argo 8x8 ever built.
On land at least.
In the water though, its still going to be a 2-3 mph slug-fest. That seems kind of like dating a beautiful girl with a fat ass. Starts out great, but just disappointing in the end...
So I'm thinking I need to do something about the water speed. This is all just me tossing ideas around, so nothing is out of bounds. It's also a VERY long term thing, if I do it at all.
Problems opposing water speed are many:
1. Displacement hull.
They only go so fast and the shorter the hull and blunter the stern, the slower it goes.
2. Propulsion.
Yeah, eight churning tires are only even going to produce so much thrust and it's a pathetic amount at that.
3. Drag.
Kind of part of #1 and #2, but those eight tires hanging out there are drag monsters, even when turning.
So, what to do about those issues:
1. Displacement hull.
There's really only one way to deal with the argo's hull; get it up and out of the water. That means getting it on plane. That means thrust and hydrodynamic drag reduction. Getting it on plane is also a balance issue, as the Argo is quite nose heavy in the best of conditions.
2. Propulsion.
Couple routes here. I could power a jet drive off the V45 engine or I can just hang an outboard with enough power on it. Jet drive off the existing powertrain is appealing from a weight perspective, but an outboard is attractive from the simplicity angle. Outboard also gives me lots of trimming options and steering is simple. I'd have to devise a way to raise and lower it every time I enter water deep enough to use it. Tires will still work fine for short crossings though.
3. Drag.
The 300 pound gorilla sitting in the corner of the room. it's those tires really. Not a chance in hell of getting it up on plane while those tires are (essentially) the bottom surface on the rig. Too much drag, too much turbulence. But, I may have a way around it. The rig will eventually get a suspension. Which means the tires will be capable of raising and lowering on their A arms. If I make a "frame" under the hull, I can devise a way to lift the tires up to as far as they will go, have a "slide out" foil surface under them and possibly eliminate the darg component and give it a chance to get on plane.
It's not outside the realm of possibility to get it on plane. Vehicles like the Gibbs Quadski and Terraquad already use the same type of scheme (ie: retract tires, motorcycle engine, jet drive) and you can get the kitchen table up on plane if you wanted to. Sure, the Gibbs amphibs (and any other similar rig) are a compromise and does both roles OK but neither stellar. But the Argo is already a compromise in the same fashion, although it can be argued it is biased towards land performance instead of water.
So the question is: can I build it in the garage and still have the whole rig usable and not a temperamental pile of cra.........err, junk.
Like I said this is just spit balling. There's a couple years worth of work on the engine and suspension before I can even consider looking at water speed increases. | |
| | | | CraftsmanQuad19
Veteran Member

2018 Build-Off Entrant
2018 Build-Off Entrant
2019 Build-Off Finalist
2019 Build-Off Finalist
Age : 23
Join date : 2016-04-12
Points : 5745
Posts : 2618
Location : Indiana
| | Subject: Re: Project : Argoceptor! December 9th 2018, 2:08 pm | |
| I'm not sold on the foil idea, but I think the Jet drive would be awesome. You could probably pick up a jet ski with a bad engine for really cheap with everything you would need. Then just attach the output to the existing land steering mechanism, and you'll be all set. Since you've already said you're good with fiberglass, grafting the intake of the jet drive onto the bottom of the argo chassis should be no problem for you.
That would be much cooler than an outbord hanging off the back | |
| | | | Creepycrawler
Established Member


2024 Build-Off Entrant
2024 Build-Off Entrant
Age : 36
Join date : 2013-07-02
Points : 4810
Posts : 731
Location : Logan Ohio
| | Subject: Re: Project : Argoceptor! December 9th 2018, 8:22 pm | |
| Check out the Hustler brand amphibous rigs, some of those had jet drives factory | |
| | | | TourMax
Member
Join date : 2018-10-06
Points : 2516
Posts : 438
| | Subject: Re: Project : Argoceptor! December 9th 2018, 10:14 pm | |
| - CraftsmanQuad19 wrote:
- I'm not sold on the foil idea, but I think the Jet drive would be awesome. You could probably pick up a jet ski with a bad engine for really cheap with everything you would need. Then just attach the output to the existing land steering mechanism, and you'll be all set. Since you've already said you're good with fiberglass, grafting the intake of the jet drive onto the bottom of the argo chassis should be no problem for you.
That would be much cooler than an outbord hanging off the back Foils would be mostly if I cant get the tires high enough to get them out of the water to plane. The front 3 sets don’t have a chance to be lifted high enough to clear the water before it planes, so I may need the foils to streamline the tires to “get it up”. I’m leaning more towards an outboard for power reasons. Most jet drive multiwheel ambphibs don’t even get close to plane. With an outboard, i csn play with ho, trims and prop characteristics to give it the best chsnce to “get up out of the hole”... | |
| | | | Sponsored content
| | | | | | | Project : Argoceptor! | |
|
Similar topics |  |
|
| | Permissions in this forum: | You cannot reply to topics in this forum
| |
| |
| | Who is online? | In total there are 24 users online :: 0 Registered, 0 Hidden and 24 Guests
None
Most users ever online was 412 on January 7th 2023, 7:59 am
|
|