Well I did some more tonight. Went ahead and bolted the engine down with 3 of the 4 bolts. I have a bolt in the 4th hole, but I am waiting till I get an engine pulley on there before I finalize that bolt.
Also cleaned up the other head, another nasty gasket:
Pulled the carb and intake manifold off. Cleaned the intake manifold and painted today. Intake gaskets are still good to go!
Also painted the fan screen for the flywheel:
Painted up the engine tins and fan shroud:
Really diggin the red/grey scheme for the frame and engine. The body will be black.
Soooooo................
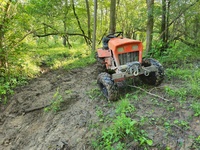
Curiosity got the best of me. With the large tires on the back, I wanted to sit the rear fenders down to see what I had in the way of clearance. Not much. About half and inch. I do have to say it looked great, better than the pics. Expecially in the back. The contour of the fender matched the tire perfectly! These are NOT THE TAILLIGHTS I will have in the final product of the tractor.
I have plans tomorrow and Friday so I probably won't have updates for the tractor until Saturday or Sunday. My sister and her husband is in town from out of state. We are visiting them tomorrow at my parents and Friday I will be attending the Southwest Street Rod Nationals at the fairgrounds with them. I'll try to remember to take some pictures this year! LOL. I may share some with my next update!
Alright... how do you have the air filter attached? I mean, I see the stud sand wing nut... but where did that come from? Is this a different carb than what I have....
MightyRaze Administrator
2017 Build-Off Finalist
2017 Build-Off Finalist
2018 Build-Off Top 3 Winner
2018 Build-Off Top 3 Winner
2019 Build-Off Top 3 Winner
2019 Build-Off Top 3 Winner
2021 Winner of Winners
2021 Winner of Winners
1st Place Build-Off 2022
1st Place Build-Off Winner 2022
10,000 POSTS!
10,000 POSTS!
2024 Build-Off Entrant
2024 Build-Off Entrant
Age : 49 Join date : 2016-09-06 Points : 15341 Posts : 10809 Location : Oklahoma
Plan to Move the front axle forward, I will be lowing the front a little bit. This will be custom. I see myself watching Doc's video on Ackermann Angles at least a dozen times. --Complete, did move axle forward, just not as far as originally planned. I didn't want to lower, this is a gasser build, not RatRod
Will need to rework steering. --Complete. created new steering linkages for new axle location.
New/different shoes all around. Current fronts will go to Li'l Red, the Backs to one of the Suburbans. --Complete.
Will pulley swap the engine and the transmission. I know the 6speed has a tapered shaft, but I think I may be able to work around that. I want more speed, I just don't want 50mph speed! LOL --Complete. Will pulley swap the engine to 9 inch. Decided not to swap trans.
Hope to have a Rad new Paintjob --Partially complete...
I need to replace many gaskets sump, head, ect on the engine and possibly replace the cowling --Complete. Sump gasket, oil seal, and head gaskets replaced
Will try to have!
Redo lights, Change fronts to LED behind the lenses. Change backs to something "retro"
working marker, with signal lights
More than just black pipe exhaust, Maybe something chrome tipped and hotrod feel
lower and replace existing seat, current sits way too tall --New seat purchased
keep the lift arm as a brake lever? --Complete.
Change to a hard fuel line --Complete.
Summary:
Need to finish wiring install lights install dash (need a couple switches) paint outer body black install new engine pulley and run belt
Alright... how do you have the air filter attached? I mean, I see the stud sand wing nut... but where did that come from? Is this a different carb than what I have....
mightyraze wrote:
I cannot remember what tractor/engine I got it from at this time, but it is a breather stud for this carb.
If I can remember where I got it, I will let you know.
OK, I remembered. I got it off the breather from the 82 Murray GT that I am planning on using next year's build-off.
Here is the part:
From Engine Briggs 401707-0130. I think the briggs part # is 394546. Mounting strap assembly air-cleaner.
I guess all I need to wrap this up is some more paint and some front marker/blinkers.
Decided to go with the grey on the dash piece and will paint the screws red. I'm going to use "ballsdeepmudmowers" use of a throttle lever for the choke! It will work great for this. I'm only going to have a foot throttle on this build.
Got the foot boards soaking to get the stick-em out.
HAHA, it's coming. Maybe in the next week or so. :-)
I was reviewing my pictures and looking over the build at this point and what supplies I have purchased. Over on the shelf was a part that should have been on the tractor by now. The fuel filter!
Lookin good! We gonna see 'er rolling soon mighty??
Man I am pushing to have this thing running this weekend. It's a short time and Easter is this weekend so I do not know. That is my goal! I was going over my wiring schematic I made and I had some major issues to resolve. End result, another set of lights for the Squatch!
TheBeal wrote:
Oh right. maybe I remember how that goes now.... For whatever reason i was thinking these oppys had 2 wingnuts on the airfilter box... I dunno.
Some had this post that went all the way through that buttoned the top half of the airbox to the bottom. like the one I showed in my craigslist engine I mentioned earlier.
Some Just the bottom of the airbox bolted to the carb, bottom airbox had 2 studs for a riser inside the filter that a screw on top of the box screwed into. (image courtesy of ebay search)
Also there was one where the 2 studs on the bottom came all the way out the top of the airbox with 2 wingnuts on top. (image courtesy of ebay search)
HAHA! I personally haven't seen the one with 2 wingnuts on top personally.
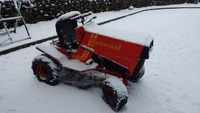
Small but good progress tonight. Got my footboards painted.
Started installing the electrical. First the important stuff that makes the engine go v-room! Also realized I need to come up with a gas petal. I do not want to do the bike brake handle.
Like to run a cable from the ground point to the engine.
Making clean connectors, taking my time.
Started laying out the stitches on the dash piece. I will use the throttle for the choke and the PTO hole for a horn button.


![Mightyraze's "Sasquatch II" [2017 Build-Off Entry] [Finalist] - Page 6 845561842](/users/2812/37/66/46/smiles/845561842.gif)

![Mightyraze's "Sasquatch II" [2017 Build-Off Entry] [Finalist] - Page 6 Sig115](https://i.servimg.com/u/f86/19/98/54/71/sig115.png)
![Mightyraze's "Sasquatch II" [2017 Build-Off Entry] [Finalist] - Page 6 Sig214](https://i.servimg.com/u/f86/19/98/54/71/sig214.png)
![Mightyraze's "Sasquatch II" [2017 Build-Off Entry] [Finalist] - Page 6 Sig314](https://i.servimg.com/u/f86/19/98/54/71/sig314.png)
![Mightyraze's "Sasquatch II" [2017 Build-Off Entry] [Finalist] - Page 6 Img_2076](https://i.servimg.com/u/f11/19/56/75/89/img_2076.jpg)
![Mightyraze's "Sasquatch II" [2017 Build-Off Entry] [Finalist] - Page 6 Img_2078](https://i.servimg.com/u/f11/19/56/75/89/img_2078.jpg)
![Mightyraze's "Sasquatch II" [2017 Build-Off Entry] [Finalist] - Page 6 Img_2075](https://i.servimg.com/u/f11/19/56/75/89/img_2075.jpg)
![Mightyraze's "Sasquatch II" [2017 Build-Off Entry] [Finalist] - Page 6 Img_2073](https://i.servimg.com/u/f11/19/56/75/89/img_2073.jpg)
![Mightyraze's "Sasquatch II" [2017 Build-Off Entry] [Finalist] - Page 6 Img_2077](https://i.servimg.com/u/f11/19/56/75/89/img_2077.jpg)
![Mightyraze's "Sasquatch II" [2017 Build-Off Entry] [Finalist] - Page 6 Img_2074](https://i.servimg.com/u/f11/19/56/75/89/img_2074.jpg)
![Mightyraze's "Sasquatch II" [2017 Build-Off Entry] [Finalist] - Page 6 Img_2079](https://i.servimg.com/u/f11/19/56/75/89/img_2079.jpg)
![Mightyraze's "Sasquatch II" [2017 Build-Off Entry] [Finalist] - Page 6 Img_2082](https://i.servimg.com/u/f11/19/56/75/89/img_2082.jpg)
![Mightyraze's "Sasquatch II" [2017 Build-Off Entry] [Finalist] - Page 6 Img_2081](https://i.servimg.com/u/f11/19/56/75/89/img_2081.jpg)
![Mightyraze's "Sasquatch II" [2017 Build-Off Entry] [Finalist] - Page 6 Img_2080](https://i.servimg.com/u/f11/19/56/75/89/img_2080.jpg)

![Mightyraze's "Sasquatch II" [2017 Build-Off Entry] [Finalist] - Page 6 Img_2083](https://i.servimg.com/u/f11/19/56/75/89/img_2083.jpg)

![Mightyraze's "Sasquatch II" [2017 Build-Off Entry] [Finalist] - Page 6 Img_2084](https://i.servimg.com/u/f11/19/56/75/89/img_2084.jpg)
![Mightyraze's "Sasquatch II" [2017 Build-Off Entry] [Finalist] - Page 6 Img_2085](https://i.servimg.com/u/f11/19/56/75/89/img_2085.jpg)
![Mightyraze's "Sasquatch II" [2017 Build-Off Entry] [Finalist] - Page 6 Part1_10](https://i.servimg.com/u/f11/19/56/75/89/part1_10.jpg)
![Mightyraze's "Sasquatch II" [2017 Build-Off Entry] [Finalist] - Page 6 Img_2086](https://i.servimg.com/u/f11/19/56/75/89/img_2086.jpg)
![Mightyraze's "Sasquatch II" [2017 Build-Off Entry] [Finalist] - Page 6 Img_2087](https://i.servimg.com/u/f11/19/56/75/89/img_2087.jpg)
![Mightyraze's "Sasquatch II" [2017 Build-Off Entry] [Finalist] - Page 6 Img_2088](https://i.servimg.com/u/f11/19/56/75/89/img_2088.jpg)
![Mightyraze's "Sasquatch II" [2017 Build-Off Entry] [Finalist] - Page 6 Img_2089](https://i.servimg.com/u/f11/19/56/75/89/img_2089.jpg)
![Mightyraze's "Sasquatch II" [2017 Build-Off Entry] [Finalist] - Page 6 2240318088](/users/2812/37/66/46/smiles/2240318088.gif)
![Mightyraze's "Sasquatch II" [2017 Build-Off Entry] [Finalist] - Page 6 Img_2092](https://i.servimg.com/u/f11/19/56/75/89/img_2092.jpg)
![Mightyraze's "Sasquatch II" [2017 Build-Off Entry] [Finalist] - Page 6 Img_2090](https://i.servimg.com/u/f11/19/56/75/89/img_2090.jpg)
![Mightyraze's "Sasquatch II" [2017 Build-Off Entry] [Finalist] - Page 6 Img_2091](https://i.servimg.com/u/f11/19/56/75/89/img_2091.jpg)

![Mightyraze's "Sasquatch II" [2017 Build-Off Entry] [Finalist] - Page 6 Img_2093](https://i.servimg.com/u/f11/19/56/75/89/img_2093.jpg)
![Mightyraze's "Sasquatch II" [2017 Build-Off Entry] [Finalist] - Page 6 1098998679](/users/2812/37/66/46/smiles/1098998679.gif)
![Mightyraze's "Sasquatch II" [2017 Build-Off Entry] [Finalist] - Page 6 Img_2094](https://i.servimg.com/u/f11/19/56/75/89/img_2094.jpg)
![Mightyraze's "Sasquatch II" [2017 Build-Off Entry] [Finalist] - Page 6 Atltf_10](https://i.servimg.com/u/f11/19/56/75/89/atltf_10.jpg)
![Mightyraze's "Sasquatch II" [2017 Build-Off Entry] [Finalist] - Page 6 Atltf_11](https://i.servimg.com/u/f11/19/56/75/89/atltf_11.jpg)
![Mightyraze's "Sasquatch II" [2017 Build-Off Entry] [Finalist] - Page 6 Img_2096](https://i.servimg.com/u/f11/19/56/75/89/img_2096.jpg)
![Mightyraze's "Sasquatch II" [2017 Build-Off Entry] [Finalist] - Page 6 Img_2097](https://i.servimg.com/u/f11/19/56/75/89/img_2097.jpg)
![Mightyraze's "Sasquatch II" [2017 Build-Off Entry] [Finalist] - Page 6 Img_2095](https://i.servimg.com/u/f11/19/56/75/89/img_2095.jpg)
![Mightyraze's "Sasquatch II" [2017 Build-Off Entry] [Finalist] - Page 6 Img_2098](https://i.servimg.com/u/f11/19/56/75/89/img_2098.jpg)
![Mightyraze's "Sasquatch II" [2017 Build-Off Entry] [Finalist] - Page 6 Img_2099](https://i.servimg.com/u/f11/19/56/75/89/img_2099.jpg)
