| | Utility MX |  |
|
+9redzz02 Deluxe66 Thunderdivine redlinemotorsportts jamcco jonjunk willis923 Doc Sprocket MoMower 13 posters |
|
| Author | Message |
|---|
redlinemotorsportts
Moderator

2014 Build-Off Entrant
2014 Build-Off Entrant
Join date : 2013-03-18
Posts : 3131
|  Subject: Re: Utility MX Subject: Re: Utility MX  October 6th 2014, 4:03 pm October 6th 2014, 4:03 pm | |
| Looks good man, really skinny. Should look really sporty | |
|
| | |
Deluxe66
Member

Age : 47
Join date : 2014-05-23
Points : 3755
Posts : 120
Location : Finland
| | Subject: Re: Utility MX October 7th 2014, 6:31 am | |
| Thanks I am really waiting for the final result is it going to work or not. At todays lunch brake I was supposed to test how to instal the inner tube but I was at shopping. I found an sales ad about used scooter rims and tires so I went on shopping. I am intending to improve the trailer offroad level. Update about this should appear to "Silver Thingy" in future. I also bought one complete scooter front brake system for future use | |
|
| | |
Deluxe66
Member
Age : 47
Join date : 2014-05-23
Points : 3755
Posts : 120
Location : Finland
| | Subject: Re: Utility MX October 8th 2014, 4:55 am | |
| Now this project is at the point what I have been waiting for. First tire is on the rim with air inside. 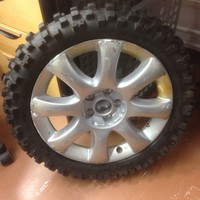 Valve needs more space but I have some experience about taking material off 3 more and I have an four wheeler  | |
|
| | |
Deluxe66
Member
Age : 47
Join date : 2014-05-23
Points : 3755
Posts : 120
Location : Finland
| | Subject: Re: Utility MX October 14th 2014, 5:39 am | |
| All rims are now welded and only needs to grind the groove to the center of rim. I have desided not to use the Yard-Man front axle because it needs lot of modification to fit the 16" rims so I will made totally new. Because of new axle I have an possibility to get more ground clearance to the front. According my plan it will be 15". I think it is enough I am trying to get the steering knuckle or something as close as possible to the rim center line. This should give me lighter steering. I have desided to use about 40" wheelbase. It seems that front frame will be about 14" wide if I choose 45 degree wheel turning angle. I am aiming for 30 degree fron axle tilting agle. Front axle will not have any suspension. Only suspension is my backbone and some springs to the seat. | |
|
| | |
Deluxe66
Member
Age : 47
Join date : 2014-05-23
Points : 3755
Posts : 120
Location : Finland
| | Subject: Re: Utility MX October 29th 2014, 6:02 am | |
| Now I have some progress with this one. Some dimension changes at least on the wheelbase. I am now making the steel frame and decided to move the front axle in front of original frame. am not god at explaining so I will post picture as soon as axle area has some progress. Here is photo about the extra tube frame. I am using these tubes also when I am making the skid plate  Tomorrow I will hopefully have this frame welded and I will also cut space for the front wheels. Friently neighbor with big lathe took the 3 rims and he will make the groove to the midlle. This saves lot of time. Next proplem area will be the steering. I will try to figure out something maybe not the nicest solution but hopefully wheels are turning when I turn the steering wheel  | |
|
| | |
Deluxe66
Member
Age : 47
Join date : 2014-05-23
Points : 3755
Posts : 120
Location : Finland
| | Subject: Re: Utility MX October 30th 2014, 6:15 am | |
| Here is the layout how it is going to be. You need to open this photo to able to see the tilting axle. For some reason it is not shown on this small picture. 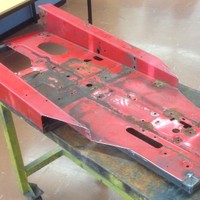 I did not have enough time to weld the tiltin axle in place but maybe next time. I also prepared more tubes to the front. It is quit slow work because I am using used and already painted tubes. This will continue next week. | |
|
| | |
Deluxe66
Member
Age : 47
Join date : 2014-05-23
Points : 3755
Posts : 120
Location : Finland
| | Subject: Re: Utility MX November 4th 2014, 5:06 am | |
| Front axle is now able to bolt on. The triangle shabe of steel plate is bolted so front axle is easy to mount and take away if needed. Those tubes above the frame has at least two functions. One is to force the tilting agle to 30 degrees and other is that I am going to use those for mounting the streering parts. I may use those also for mounting the pedals? More supports will be made after steering is ready.  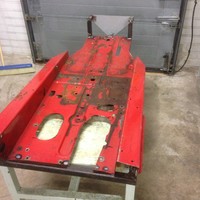 I have to put all steering parts in front of axle. Some armor is needed but first I need to make workable steering. To be continued... | |
|
| | |
Deluxe66
Member
Age : 47
Join date : 2014-05-23
Points : 3755
Posts : 120
Location : Finland
| | Subject: Re: Utility MX November 6th 2014, 4:58 am | |
| Some parts for front axle. Later these will be more complicated looking  I have started to work with lathe and hopefully have more parts ready beginning of next week. | |
|
| | |
Deluxe66
Member
Age : 47
Join date : 2014-05-23
Points : 3755
Posts : 120
Location : Finland
| | Subject: Re: Utility MX November 11th 2014, 4:59 am | |
| Now I had time to make some more parts for this project. Front axle is now waiting for the plate where rim is bolted and then some final weldings. 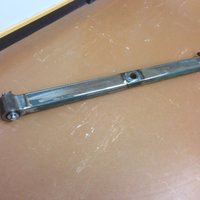  I have used ball bearings and just hope that those will be good enough. Taper bearing would be the correct solution but those ball bearings costs about 4 dollars a piece so I will buy new ones if needed. I have got some ideas about the steering and will post pictures as soon as something is done. | |
|
| | |
Thunderdivine
Veteran Member


Join date : 2012-12-21
Points : 6337
Posts : 2101
Location : Norway, Europe
| |
| | |
Deluxe66
Member
Age : 47
Join date : 2014-05-23
Points : 3755
Posts : 120
Location : Finland
| | Subject: Re: Utility MX November 12th 2014, 7:24 am | |
| Thanks. Today I welded more about the front axle. More supprots will be welded as soon as I have made some testings with rims so that all works as planned.  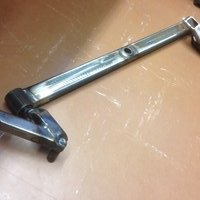 Next I will make parts for steering. Friendly neighbor has made grooves to all rims so I can now proceed also with those. I have already bought the inner tubes. I would like to go for a test drive already yesterday | |
|
| | |
Doc Sprocket
Site VIP

2018 Build-Off Entrant
2018 Build-Off Entrant
2021 Winner of Winners
2021 Winner of Winners
1st Place Build-Off 2016
1st Place Build-Off Winner 2016
Age : 51
Join date : 2013-04-21
Points : 7112
Posts : 2914
Location : Ontario Canada
| |
| | |
Deluxe66
Member
Age : 47
Join date : 2014-05-23
Points : 3755
Posts : 120
Location : Finland
| | Subject: Re: Utility MX November 13th 2014, 5:20 am | |
| Thanks. More about the front. I cutted the tapered parts from road car front "hubs". Those are casted iron so welding is not the best solution but hopefully strong enough. Joints are from another car and the taper angle part diameter is bigger but it does not matter this is good enough for me. Next I need to instal rim and look is this going to work or not? Metal parts are easy to cut and weld differently if needed 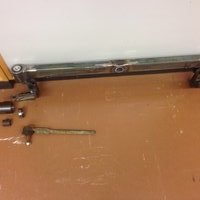 Hubs or something are almost done. Only the plate with rim bolt pattern are on its way. Well no horry because there is lot of other work to do. 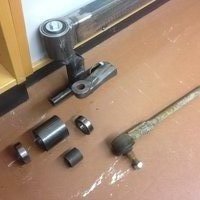 This might be my steering box   For your information I am intending to use only some of the metal parts not the blue box  This has been an chain hoist. I need to keep this idea in secret because I do not have clue woud it work or not. So I will study this idea in my laboratory first and if you do not see these later this idea was not so good. This project will continue in next possible free time. | |
|
| | |
Deluxe66
Member
Age : 47
Join date : 2014-05-23
Points : 3755
Posts : 120
Location : Finland
| | Subject: Re: Utility MX November 19th 2014, 5:32 am | |
| Some progress about steering. I am going to use frame and one "transmission" from the chain hoist. This will also change the rotation direction. Smal gear is 5 and bigger is 18 = gear ratio 1:3,6. This will be mounted right next to steering wheel so worries about mud between the gears. If I need to stop driving beacuse the mud hole is so deep that steering wheel is govered by mud then I have achieved good enough offroad level After this chain hoist gear box I need to add more gears. I am going to use bicycle parts and industrial chain parts. Bicycle chain is 1/2" so I can use 1/2" 8 spike industrial sprocket and chain. Bicylce sprocket has 38 spikes = gear ratio 1:4,75. Total gear ratio with this combination is 1:17,1. With this total gear ratio it should be about 1,6 rounds to get wheels from center to left/right. I will most likely use road car steering wheel so I believe that this will be good enough solution. If not then I will change something. 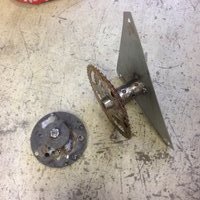 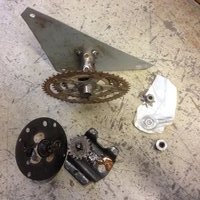 Here is photo about the bicycle hub welded in place. I will use about 4" long steering arm so that when wheel are straight the joint is directly at same point as front axle tilting point. This should minimize the wheel turning when front axle is tilting. I will test this and if this is not working then I will use another style. I am aiming for low speeds so some errors in steering is allowed. 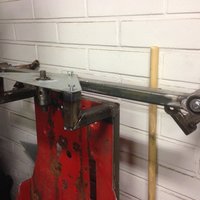 Now I have the steel plates with rim pattern so I can now also proceed with wheel assembly issue. | |
|
| | |
Thunderdivine
Veteran Member
Join date : 2012-12-21
Points : 6337
Posts : 2101
Location : Norway, Europe
| |
| | |
Deluxe66
Member
Age : 47
Join date : 2014-05-23
Points : 3755
Posts : 120
Location : Finland
| | Subject: Re: Utility MX November 19th 2014, 11:22 am | |
| Aijaa.com does not have bigger picture available or I do not know how to get it. If you click to the thumbnail does it open bigger to aijaa.com page? I need to be logged in to atltf forum before the link is available. I can add direct link from now and also that thumbnail | |
|
| | |
Deluxe66
Member
Age : 47
Join date : 2014-05-23
Points : 3755
Posts : 120
Location : Finland
| | Subject: Re: Utility MX November 20th 2014, 5:17 am | |
| Here is todays special. Well not so special but something anyways. This time I will add all possible ways to add pictures from Aijaa.com service. If none of these works then I might need to learn how to use some other photo service. This is almost like in christmas I do not what I get in front of my eyes <a href="http://aijaa.com/1VVVUW" target="_blank"><img src="http://i10.aijaa.com/t/00613/13591722.t.jpg"></a> 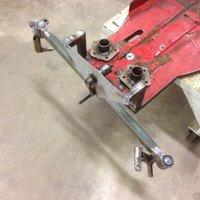 http://aijaa.com/1VVVUWIMG 2499http://aijaa.com/1VVVUW http://aijaa.com/1VVVUWIMG 2499http://aijaa.com/1VVVUWNow the steering arm is made so that joint will be directly at the same point as front axle tilting point. Next I will modify rest of the rods and joinst so that I will be able turn the wheels by turning the steering arm. After that I can easily see how much the wheels turn when front axle is tilting. Finally I have two parts ready for painting Those front wheel hubs are ready for painting. I am intending to make the front axle ready so I have more parts to paint at ones. | |
|
| | |
Deluxe66
Member
Age : 47
Join date : 2014-05-23
Points : 3755
Posts : 120
Location : Finland
| | Subject: Re: Utility MX November 20th 2014, 5:21 am | |
| Quite boring I guessed right what is going to be on that photo No big pictures either I will be waiting for your comments are yuo able to see those bigger somehow or not. | |
|
| | |
Deluxe66
Member
Age : 47
Join date : 2014-05-23
Points : 3755
Posts : 120
Location : Finland
| | Subject: Re: Utility MX November 21st 2014, 1:55 am | |
| Here is photo about the rear rim plate IMG 2500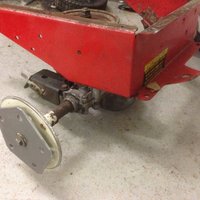 I will weld it and after that drill holes through the original rim. Then weld the bolt to both plate and original rim. I planned more about the steering yesterday and now all plans are ready. Most likely something will change during the working but at least I can start to do something. | |
|
| | |
Deluxe66
Member
Age : 47
Join date : 2014-05-23
Points : 3755
Posts : 120
Location : Finland
| | Subject: Re: Utility MX November 25th 2014, 6:18 am | |
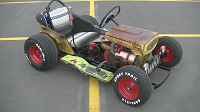
| Steering steering. Soon this tractor has more arms than I do IMG 2517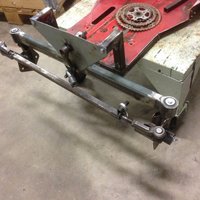 Due to the limited space I welded the other heim joint bolt above the tie rod or some arm I do not the name. This will twist the rod put I think those tie rod ends can handle the twisting forces. Those rod ends are taken from road car. I tryed to obtain some ackermann geometry and it seems that inner wheel is turning bit more so good enough for me. As you might see from the photo the plate for wheels are almost inner that the turning axle. This design should make the steering light. 16" car rim allows to widen the front axle so that dimension from turning axle to center of rim / wheel is smaller that original set up. This issue will be more clear to you after front wheel are bolted. Now I am struggling against the idea that I would use 110cc ATV engine instead of the Honda + Yardman rear axle. This tractor ground clearance will be about 16" in front and about 7" in rear if I use the Yardman rear axle. I am not happy with the design that have made for the mini Jeep. I think that those rear swing arms can not handle all forces. But those rear axle parts could work well on this tractor. This would also force me to make new and better design to the mini Jeep rear axle and I would also need to find new engine and why not bigger at the same time Here is photo about the mini Jeep layout. http://aijaa.com/sR3gyl Those rear swing arms could allow me to use suspension in rear or just weld those in place. Chain is designed to run inside of the square tube so I could drive over rock without damaging the sprockets. Center of tractor would have same ground clearance from front to rear. I would need to use extra intermediate axle after 110cc engine so that I get lower speed. I will think this idea and make decisions right after front axle is ready. | |
|
| | |
Deluxe66
Member
Age : 47
Join date : 2014-05-23
Points : 3755
Posts : 120
Location : Finland
| | Subject: Re: Utility MX November 26th 2014, 5:31 am | |
| Now the front axle is cloce to the finish line. Today I get all welded in place. Now I just need to weld all seams and it done. Here is couple of photos about the arms and joints. IMG 2519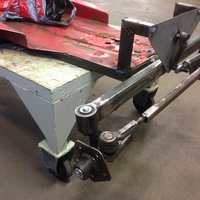 IMG 2518 IMG 2518 Wheels turn as I expected. When wheel are turned for example 45 degrees the wheels are turning only when front axle tilting on the other direction. Front axle titling has no effect when wheels are straight. I accept this design and just need to remember not to have thumbs inside of the steering wheel. Next I will weld the front axle and after that continue with the rest of the steering parts. | |
|
| | |
Deluxe66
Member
Age : 47
Join date : 2014-05-23
Points : 3755
Posts : 120
Location : Finland
| | Subject: Re: Utility MX November 27th 2014, 5:31 am | |
| Hello again. Here is some updates. I desided to recycle and went to my bicycle spare part collection I used one steel front wheel and made steering hub from that like this. IMG 2520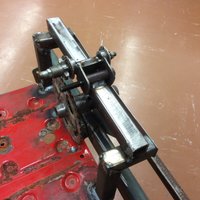 IMG 2521 IMG 2521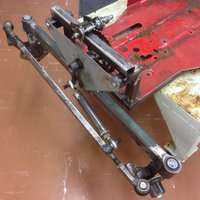 IMG 2522 IMG 2522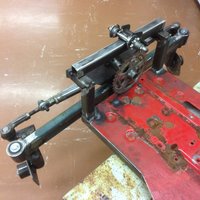 I made hinge point to subframe so that when I adjust the chain tension the whole streering axle is moving also. I might use car alternator belt tensioner parts for this chain tensioner system. Subframe will be bolted in final version. Little welds helped me on getting all in place and now it is easy to drill holes through both tubes. Triangle shape plate will be also welded to subframe with some extra tube on that gap that you can see on the photo. When this is ready I can take off the whole front axle with all streering parts just to opening some bolts. Front wheel hubs are now almost ready. I noticed that I need to make some wheel turning stoppers system so some more things to do with the hubs. Until next time. | |
|
| | |
redzz02
Site VIP
2014 Build-Off Entrant
2014 Build-Off Entrant
2016 Build-Off Top 3 Winner
2016 Build-Off Top 3 Winner
2021 Winner of Winners
2021 Winner of Winners
1st Place Build-Off 2015
1st Place Winner Build-Off 2015
1st Place Build-Off 2017
1st Place Build-Off Winner 2017
1st Place Build-Off 2018
1st Place Build-Off Winner 2018
Age : 29
Join date : 2010-05-12
Points : 6170
Posts : 899
Location : PA pittsburgh and pymatuning
| | Subject: Re: Utility MX November 27th 2014, 9:10 am | |
| definitely not what i was expecting from the title, but looks like you got your fab skills down and itll turn out good, good luck looks good! | |
|
| | |
Deluxe66
Member
Age : 47
Join date : 2014-05-23
Points : 3755
Posts : 120
Location : Finland
| |
| | |
Thunderdivine
Veteran Member
Join date : 2012-12-21
Points : 6337
Posts : 2101
Location : Norway, Europe
| | Subject: Re: Utility MX November 29th 2014, 8:51 am | |
| Yeah that worked, nice work. | |
|
| | |
Deluxe66
Member
Age : 47
Join date : 2014-05-23
Points : 3755
Posts : 120
Location : Finland
| | Subject: Re: Utility MX December 1st 2014, 5:08 am | |
| Thanks. Some progress. I used road car parts to make the steering axle. I welded the sprocket first to the hub axle "bolt" and then welded the steerin axle directly to the sprocket and just hope that this will be strong enough design. Some wobbling might occur but this is rotating only few rounds so hopefully it does not matter. IMG 2554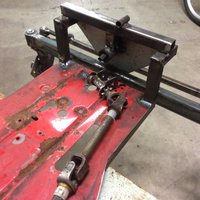 IMG 2555 IMG 2555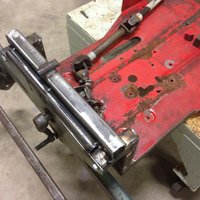 I also welded two more tubes. One short tube between subframe and that hub where bigger sprocket is. Other to the cap at front between the trianlge plate and subframe. Now I can drill holes through subframe and main frame. After that I can take front end in pieces and weld all seams. I have front axle skid plate in paper so that will be also next on the working list. Finally it seems that the list is getting shorter. | |
|
| | |
Sponsored content
| |
| | |
| | Utility MX | |
|