| | | Hill climbing BEAST |  |
|
+6Creepycrawler Stretch44875 Doc Sprocket willis923 CornShuck4CE Angchor 10 posters | |
| Author | Message |
|---|
Angchor
Member


Age : 67
Join date : 2014-04-14
Points : 4302
Posts : 491
Location : Index, Washington
|  Subject: Hill climbing BEAST Subject: Hill climbing BEAST  April 15th 2014, 5:27 pm April 15th 2014, 5:27 pm | |
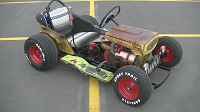
| Well, here you go. I am going to try my first thread here.
To give a quick rundown of what I am up to:
I have been stranded by a landslide, for more than 50 days. Myself and other members of our community built an ATV trail around the landslide. But the road will not be coming back for a long long time. Possibly never. (We are going to build a bridge in a different location, to gain access to the highway from our homes.)
This ATV trail is very steep. But it is wide enough for an ATV, and it is gravel.
Personally, I have health problems. I have an enlarged heart, for one. Just walking to the end of my driveway, leaves me out of breath, and needing to sit down for a while. So, while we have a nice gravel trail to bring supplies in, on... I can't get up and down that trail on my own.
I don't have an ATV, nor the budget to buy one. So I was looking around for possible solutions. I lit upon my riding lawnmower as a possible solution. Why not make that into a sort of ATV? LOL
So, I got started at it. I actually got all the work I will eventually be showing in this thread... done... Before I ever discovered that anyone else was doing this same sort of thing. So I need to lead with a caveat. Please understand, everything that I have done so far, I did without any guidance from anyone else. The ideas were my own. And everything I have done has been done to try to make do with what I have.
I think I'll probably try to break this up into several posts, instead of one incredibly long one. So be patient with me, if it takes me some time between posts.
I want to say as well, that i got this mower several years ago. When my health started going bad. The intentions was to use it pretty much like I intend to, now. Only, just riding it around my own property, carrying things, etc. I got it without the mower deck. never intended to put one on.
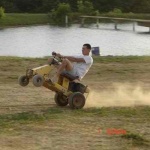
I did a bit of driving around with it... Tried to go up a small but steep hill..... And it flipped over completely backwards, right on top of me.
After that, it simply sat where I parked it. Under the trees, right out in the weather.
Where it slowly but surely rotted, rusted and corroded itself into the mess it was when I decided to try to use it for this purpose.
Next up, an explanation of why the backwards flip happened, and what I did about it.
Last edited by Angchor on April 26th 2014, 2:41 pm; edited 1 time in total | |
| | | | Angchor
Member
Age : 67
Join date : 2014-04-14
Points : 4302
Posts : 491
Location : Index, Washington
| | Subject: Re: Hill climbing BEAST April 15th 2014, 5:52 pm | |
| The reason it flipped over was a combination of things. For one, the hill was small, but steep. That put the mower at a high angle in the first place. But it would have made it up that hill with no problem, had I been able to "feather the throttle', to get it to go up there, slowly. The governor, (hereafter known as governator because of it's teminator tendencies.), decided it knew better than I did, what was needed. The motor started to bog down, and the governator threw the throttle wide open to try to get the revs back up. Shoom! On dry level ground, maybe the worst that would have happened, is that I would have popped a wheelie. Instead, it SLAMMED the entire tractor backwards, right on top of me. I was lucky to walk away alive! As it was flipping, I managed somehow to move sideways just enough not to get crushed, but my leg did get crushed. So I was unable to walk without crutches for a couple of weeks. Long story short, when I decided to try to get it running again, and try to make a hill climber, (The steep ATV trail hill.), out of it... I decided that that gevernator HAD TO GO!!! I spent a day looking things over. Trying to figure out exactly what had happened with the throttle, and why. I figured out what the governator was. I figured out what it was supposed to do. I figured out WHY it does what it does... And then I figured out how i wanted to get rid of it. I took the linkage rod off of the governator. Then I wired the lever for the governator, solidly in the "wide open" direction. Next, I realized that now I had to set up some kind of throttle lever system of my own, because there was only a choke setup on the tractor at the time. I took the piece of linkage rod that I had taken off the governator, and spent some time moving it around to different places, to see if I could figure out the best way to operate the throttle, using that rod. I decided that the best angle of approach was from the front of the tractor. So I fabbed up a bracket and some linkage to make that happen.  I re-used the spring from the governator, to act as the return spring for the throttle linkage. One note here: I learned many years ago that when you fab your own setup like this, the best way to hook up a return spring, is NOT to attach the spring so it pulls the opposite direction on the throttle linkage itself. (I'm talking about the piece that is on the carb itself. That controls the butterfly.) If you do that, you will wear out the throttle shaft inside the carb, a lot faster. Instead, do like I did. Fab it so that the only thing that has any affet on the throttle linkage is the rod itself. Push and pull, that's it. Then, put a spring on, somewhere on your own linkage, that will pull against YOUR linkage, thereby moving the rod, which in turn closes the throttle.
Last edited by Angchor on April 15th 2014, 6:13 pm; edited 1 time in total | |
| | | | Angchor
Member
Age : 67
Join date : 2014-04-14
Points : 4302
Posts : 491
Location : Index, Washington
| | Subject: Re: Hill climbing BEAST April 15th 2014, 6:08 pm | |
| Now, first of all, I want to say... I did figure out and understand WHY the governator was there, and what it was doing. I just didn't agree with letting some mechanical linkage take control of the throttle, instead of letting me do it. Limit it, yes. But completely control it? Ridiculous! I am not a stupid person. I know that over-revving the engine is not a good thing. My real point is that I don't need some piece of linkage to take control away from me, because if it doesn't, I'll over-rev and blow the thing up. To me, letting some system like that, take control away from me, is actually more dangerous. My flip on the hill, being the perfect example of what I mean. I always disconnect the anti-lock brake system on my motor vehicles, for the same reason. I don't need some freaking system taking over control of my braking. I can brake perfectly well, thank you very much, even in an emergency situation. But I HAVE almost had accidents because the ALB system decided that it knew better than me, and let me roll a LOT farther than I would have, had I been in control of the brakes myself. Ok, rant over. Now, all that being said... I have put limits of my own, into the 'system'. First of all, I built the linkage so that it would not travel much farther than was necessary. Second, I used a handbrake from a moped, to make a foot pedal from. (Actually, I used a plastic one from a scooter first, and that one broke. LOL So I replaced it with the all-metal one from the moped.) And when that was all set up, I bolted on some wood below that pedal, to restrict just how far that pedal can travel.  This... Is still a physical limiter to how much the engine can be revved with the foot pedal. But it allows me to have full control of the throttle, up to that limit. | |
| | | | Angchor
Member
Age : 67
Join date : 2014-04-14
Points : 4302
Posts : 491
Location : Index, Washington
| | Subject: Re: Hill climbing BEAST April 15th 2014, 6:16 pm | |
| I also decided to remove all the electrical safety switches.
I'll try to post some pictures of what I did there, later. | |
| | | | CornShuck4CE
Member

Age : 35
Join date : 2014-04-07
Points : 4119
Posts : 337
Location : Woodville Al
| | Subject: Re: Hill climbing BEAST April 15th 2014, 9:43 pm | |
| Sounds like you got it goin on bubba. Sorry for your pain. One of the first things i did to my offroad murray was foot throttle. My friend (i bilt a poulan for him) had went up a short steep hill and dun the same thing if he was under it. I might would have had to drag him out the wood. So i put a peace of railroad track on the front of it 45 pounds stopped the rarein up. Good thread. | |
| | | | Angchor
Member
Age : 67
Join date : 2014-04-14
Points : 4302
Posts : 491
Location : Index, Washington
| | Subject: Re: Hill climbing BEAST April 15th 2014, 10:25 pm | |
| i am thinking about putting a rack on the front so i can mount some weights, for that same reason.
Gotta say, it has been quite funny to see that while I was sitting here thinking I done done sumpthin unusual... Others have already thought and done the same things. Also makes me feel not quite so crazy, if you know what I mean. LOL | |
| | | | willis923
Veteran Member


Age : 27
Join date : 2013-04-10
Points : 5644
Posts : 1408
Location : Galway NY
| | Subject: Re: Hill climbing BEAST April 15th 2014, 11:09 pm | |
| youre crafty. i like what youve done so far.
-just for the future, it'd be great if you could keep the consecutive posts to a minimum. just gives a cleaner and less jumbled look. thanks- | |
| | | | Angchor
Member
Age : 67
Join date : 2014-04-14
Points : 4302
Posts : 491
Location : Index, Washington
| | Subject: Re: Hill climbing BEAST April 15th 2014, 11:14 pm | |
| - willis923 wrote:
- youre crafty. i like what youve done so far.
-just for the future, it'd be great if you could keep the consecutive posts to a minimum. just gives a cleaner and less jumbled look. thanks- Thank you. Will do. I didn't know which was worse, doing several consecutive posts like that, or making one looooooooooong post that took forever to read. Seemed to me like the lesser of two evils was breaking it up, so that there was a sort of natural stopping point between posts, for anyone that didn't want to sit through a novella. | |
| | | | Angchor
Member
Age : 67
Join date : 2014-04-14
Points : 4302
Posts : 491
Location : Index, Washington
| | Subject: Re: Hill climbing BEAST April 16th 2014, 1:51 am | |
| Ok, as requested... One big post. Electrical. As I said, I pulled and eliminated every safety switch there was. Then I made an assessment of what was needed to make this thing run. I need to power... The carb solenoid. The electric fuel pump. The starter solenoid. I need large power to the starter solenoid as well, and from there to the starter. I need a switch to ground the kill lead from the coil. I don't -need- to power anything else, really. Next, what did I have in the way of switches? The igniton switch. (Broken) The attachment clutch switch. Here is a pic that shows the backs of those switches. On the left is the ignition switch, and on the right is the accessory clutch switch.  I got out the cheapo volt-ohmeter, set it to ohms, and started testing. The ONLY connection that works at all on the ignition switch is the one between "A" and "Y". Those are connected when the switch is turned to the first position. The way the connections work on the clutch switch are: When the button is pushed closed... Terminals 1 and 3 are connected. Nothing else is connected to anything else. When the button is pulled open... 2 and 3 are connected. 4 and 5 are connected. 6 and 7 are connected. So this is how I wired up the machine. The wiring to the battery is obvious. Big cables connected to the battery. A wire runs from the large post on the starter solenoid, to provide power to everything else. (Use the post that is connected directly to the battery, not the one connected to the starter. Obvious, I know, but you just know someone is going to connect to the other side and then claim the instructions are bad. LOL) That wire is run to terminals 4 and 6 on the clutch switch, and to terminal y on the ignition switch. This will provide power to the three places it needs to go. A wire is then run from terminal a on the ignition switch, down to one of the the spade terminals on the bottom part of the starter solenoid. (Since this is not a momentary on connection, you have to remember to turn the key only long enough to get the engine started, then turn the key to the off position. Otherwise the starter will just continue to get power. I will eventually buy a new ignition switch and will end up powering everything from that switch. For now, this is the way it goes.) I have done it this way, because I want to have to use a key to start it. I may have to leave it sitting in a public place, and I don't want people to be able to simply push a button, and drive it away. It's got to be at least a little harder than that! LOL Yeah, I know a screwdriver can be used. Or anyone else's key. LOL But hey, the tweakers may not know that! The second spade terminal on the starter solenoid goes to ground. The remaining terminals at the clutch switch... Terminal 7 goes to the carb solenoid. Terminal 5 goes to the fuel pump. Terminal 1 goes to the kill line. And terminal 3 goes to ground. Now what happens... With the clutch switch pushed in, nothing is getting power, and the kill line is connected to ground. Pull the switch open, and the fuel pump and carb solenoid are getting power. And the kill is now ungrounded. Turn the ignition switch to the first position, and the starter should engage. When the engine has started, turn that key off. When you want to stop the tractor, just push in the big red clutch button. That turns off the power to the carb solenoid, and the fuel pump. And it grounds the kill line at the same time. ~~~~~~~ I have the trans apart right now. (Peerless 930.) The shifter would not move at all. After getting the trans open, I discovered that the shifter shaft was completely corroded in place in it's bore. I also discovered that the gearshaft that the shifter ring slides on... was very rusted. It's no wonder it wouldn't shift. I have worked on some pretty old wheel bearings on old cars. But I have NEVER smelled any worse old grease than what I smelled when I opened this case! It was enough to gag a maggot! Tomorrow I'll be getting some replacement parts. Some snap rings. Some shim washers, etc. Then I will completely clean everything, grease it well, and put it back together. I also need to get a v-groove idler pulley, and a belt. Once I have all the above, I can put it all back together and see if I can get it back on the road. That is when I will learn whether or not this old tractor is even going to be useful in carrying my large bulk, and at the same time, dragging a trailer full of supplies up that STEEP ATV trail. The tires are severely dry rotted. They need tubes. They may hold air long enough for me to make ONE trip down the hill and back up, but I'd better not dawdle down at the bottom, or I may not make it all the way back. LOL Future plans... I am thinking about either using the old attachment lowering handle as a 'parking brake'... Or using the parking brake lever from the center hump in a small car, as a parking brake. This should let me park on a hillside. I'll probably use the contact switch that I took out from under the seat, as a brake light switch, and then put some brake lights on the tractor. I may disconnect the clutch and the brake from each other. Make them completely separate mechanisms. | |
| | | | Doc Sprocket
Site VIP

2018 Build-Off Entrant
2018 Build-Off Entrant
2021 Winner of Winners
2021 Winner of Winners
1st Place Build-Off 2016
1st Place Build-Off Winner 2016
Age : 51
Join date : 2013-04-21
Points : 7201
Posts : 2914
Location : Ontario Canada
| | Subject: Re: Hill climbing BEAST April 16th 2014, 8:43 am | |
| Welcome to the party, sir! Necessity is the mother of invention, and like you, I've done what I've done with little or no external input. Not only is there nothing wrong with that, it's refreshing to see! Sure- we share ideas and bat tips and tricks around. But I can really appreciate a guy that simply blazes his own trails. Sounds like me! I wrote an article on governor function, and the implications of bypassing or removing it. May I humbly suggest you grab a cup of your favourite bevvy and sit down to good book? LOL... Here- https://www.atltf.com/t2575-governors-flywheels-and-an-internet-full-of-crap I actually wrote it for the go kart crowd, but it applies to any OPE engine. Meanwhile... Keep showing us what you've got going on, and feel free to ask any questions! | |
| | | | Angchor
Member
Age : 67
Join date : 2014-04-14
Points : 4302
Posts : 491
Location : Index, Washington
| | Subject: Re: Hill climbing BEAST April 16th 2014, 9:59 am | |
| - Doc Sprocket wrote:
- Welcome to the party, sir!
Necessity is the mother of invention, and like you, I've done what I've done with little or no external input. Not only is there nothing wrong with that, it's refreshing to see! Sure- we share ideas and bat tips and tricks around. But I can really appreciate a guy that simply blazes his own trails. Sounds like me!
I wrote an article on governor function, and the implications of bypassing or removing it. May I humbly suggest you grab a cup of your favourite bevvy and sit down to good book? LOL... Here- https://www.atltf.com/t2575-governors-flywheels-and-an-internet-full-of-crap I actually wrote it for the go kart crowd, but it applies to any OPE engine.
Meanwhile... Keep showing us what you've got going on, and feel free to ask any questions! Gotta say, I really like your mule! I am pretty much aiming for the same kind of build. Not fast, not fancy. Just as strong, reliable, and capable as I can make it. And useful in as many ways as possible. Towing/dragging/logging. Jumpstart of dead vehicles. Hauling a trailer full of stuff in places/ways I couldn't do it myself. Etc. Maybe even get me to town and back in an emergency! LOL Think I'll call it a "Yute". (Now I have to think of a cool way to make that an acronym. LOL) | |
| | | | Doc Sprocket
Site VIP
2018 Build-Off Entrant
2018 Build-Off Entrant
2021 Winner of Winners
2021 Winner of Winners
1st Place Build-Off 2016
1st Place Build-Off Winner 2016
Age : 51
Join date : 2013-04-21
Points : 7201
Posts : 2914
Location : Ontario Canada
| | Subject: Re: Hill climbing BEAST April 16th 2014, 12:45 pm | |
| - Angchor wrote:
- Doc Sprocket wrote:
- Welcome to the party, sir!
Necessity is the mother of invention, and like you, I've done what I've done with little or no external input. Not only is there nothing wrong with that, it's refreshing to see! Sure- we share ideas and bat tips and tricks around. But I can really appreciate a guy that simply blazes his own trails. Sounds like me!
I wrote an article on governor function, and the implications of bypassing or removing it. May I humbly suggest you grab a cup of your favourite bevvy and sit down to good book? LOL... Here- https://www.atltf.com/t2575-governors-flywheels-and-an-internet-full-of-crap I actually wrote it for the go kart crowd, but it applies to any OPE engine.
Meanwhile... Keep showing us what you've got going on, and feel free to ask any questions!
Gotta say, I really like your mule!
I am pretty much aiming for the same kind of build. Not fast, not fancy. Just as strong, reliable, and capable as I can make it.
And useful in as many ways as possible.
Towing/dragging/logging.
Jumpstart of dead vehicles.
Hauling a trailer full of stuff in places/ways I couldn't do it myself.
Etc.
Maybe even get me to town and back in an emergency! LOL
Think I'll call it a "Yute". (Now I have to think of a cool way to make that an acronym. LOL) Sounds good by me... And thank you! | |
| | | | Angchor
Member
Age : 67
Join date : 2014-04-14
Points : 4302
Posts : 491
Location : Index, Washington
| | Subject: Re: Hill climbing BEAST April 26th 2014, 12:17 pm | |
|
Yesterday, a friend drove up here in his pickup, to take me to town. He has ramps, so I just drove the tractor into the back of the truck, and we went to town to buy more parts for the tractor!
It was nice to have the lockable brake. So I just locked it, and we only needed one strap to hold the tractor in place. This is a good indicator/reminder to me that when I move the brake to a pedal on the right side, I need to be sure to implement a way to lock it in place.
It took less than 3 hours for the front tires to completely air down. Luckily I found cheap innertubes for those. I'll remove the back tires from the rims. Clean up both the tires and the rims, on the insides. Paint the complete insides of tires and rims with that red 'thorn sealant' stuff. Let that dry, then put them back together. Using the red stuff again, as a replacement for "gorilla snot", on the beads when I put them back on. Having no 'tire tools', this is going to be a challenge, to say the least.
I did find most of the things I need, to be able to implement my 'security' measures. (So I can just park the tractor at the bottom and lock it to a tree or something, while I get a ride to town.) Completely boxing and hiding the battery. Completely locking and armoring the gas tank and lines. Setting the electrical system up so I can completely disconnect everything except the charging circuit, when I park it.
Leaving a quick connector on the outside, that I can quickly connect a battery charger to. The two wires from the engine, that are supposed to charge the battery, and run the lights, both put out pitifully small amounts of voltage, (1.2vac, and 4.3vdc.) so I will be having to run a car sized battery, and put it on the trickle charger at night.
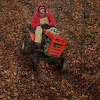
When I got home I had several bags of hardware and parts. A car battery. Two bedrails. (Angle iron for fabricationg racks.) About 40 pounds of various other angle iron. An air compressor. And a bunch of other stuff. Somehow I got it all packed onto the tractor and tied down. Got a running start at the steepest part of the hill... And it just plain shot, up that trail!. I am thinking that all the extra weight actually helped.
~~~~~~~
A couple of days ago, I put an extra spring on the clutch return.
That helped for about half a dozen presses of the clutch. Now it is back to my having to pull the clutch back up with my toe, every time I depress it. So it's back to the drawing board for that.
I may wait to get to that, until I am ready to fab up some kind of foot pedal for the brake. Then separate the two functions. That should make it easier to fab a better clutch.
~~~~~~~
For now, I will be working on the mods that I bought the parts and materials for, yesterday.
Plus, I'll be cutting every other knob off of the tread on the outside edge of the back tires. And making up some chains for them out of used car chains.
I'll try to take some pics along the way, but I am terrible about getting carried away with the work, and forgetting to use the camera.
~~~~~~~
Aside from traction and weight, my two other projects will be to 1.) move the steering a bit farther forward, if possible. It's just too close, right now. Or maybe I'll have to move myself farther back. But with my weight, the tractor is already a bit rear heavy...
And 2.) to make the stance wider. There are a few spots on that trail where it feels like the tractor gets a bit tippy. If I am not carefull, I am going to end up rolling this thing off the trail. And that could very easily become fatal.
~~~~~~~
If you have any suggestions for ways to widen the stance, and/or move the steering, etc... Please share them.
Keeping in mind my basic driving principles...
K.I.S.S (Keep It Simple, Stupid.)
And whatever I do has to be cheap, easy and reliable.
I need to do this as much as possible, using whatever I already have on hand, or can get for free.
Thanks for reading.
| |
| | | | Angchor
Member
Age : 67
Join date : 2014-04-14
Points : 4302
Posts : 491
Location : Index, Washington
| | Subject: Re: Hill climbing BEAST May 22nd 2014, 2:30 pm | |
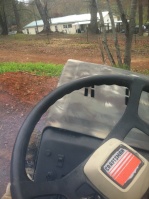
| Things I did this past week.  The big red button has stayed the same. Pull on that button, and you disconnect the kill wire from the coil, and at the same time turn on power to the carb solenoid, the fuel pump, and the ignition switch. Push on that button, and you simultaneously disconnect the power to those three things, and you ground the kill wire to the coil. Cool enough by itself. But I need to be able to park this in a public place, and leave it while I go to town. Had I used the original ignition switch, and this button, and nothing else... For one, everybody and his brother Daryl, and his other brother Daryl, has a key to that factory ignition switch. If they don't, a pen knife, or screwdriver, or possibly even a stick, will suffice. So, I installed a garage door opener for the ignition switch. It is a keyed, "momentary on" switch. Costs about the same as the standard ignition switch. And since I am using the red button for all the other stuff, all I needed an ignition switch for, was to trigger the starter solenoid. The beauty of it is that the key is unique enough that not everyone has one. And you do have to have the key, to get it started. A screwdriver, penknife, etc, will not work. For another, even if they had been too simple minded to figure out the old switch will work with almost any key, etc... They probably would have pulled on the red button, and just left it on. Then I would come back to a dead battery. So, I installed a battery cutoff switch. The kind with the removeable red "flag" for a key. (It is near the bottom of the picture.) Now, when I park it, I just remove both keys, and no one can turn anything on, or run the battery down. And yes, I understand the battery cutoff switch is fairly easy to 'bypass' as well. But I don't think the average "tweaker" around here, will figure that out. The only things I was concerned about someone trying to steal would be the battery, and the gas. (That is, if they couldn't just start it up and steal the entire thing. LOL) So I needed to arrange to either take those with me, or lock them up. Well, the hood is now bolted down. Yes, it can be torn up, to get to the battery, but I don't think anyone will go to that trouble in a public place. Especially when there are ATVs nearby that are easier to access... So, the battery is 'secure'. I'll just take the tiny gas tank with me, when I go to town. I put a shutoff right at the tank. I'll shut it off, make sure the lid is on tight, and then wrap it in a thick plastic garbage bag to keep friend's cars from smelling like gas. Back to the hood/battery... With it bolted down, there is no getting to the battery for maintenance, etc, without undoing the hood bolts. And the charging circuit on this engine does not work. So, I wired a two-prong trailer connector directly to the battery. (It's the black connector with the red and white wires on it.)  Now, when I park it, all I have to do is to turn off the electrical parts with the battery disconnect switch, and then plug in the trickle charger. The tiny gas tank easily holds enough gas for a trip down the hill, and back up. Grab a gallon gas can as well, to carry along, and you can do 4 to 5 trips without having to go get more gas. And the battery is good for more than 5 trips down and back up, when fully charged. (That is even though it runs the carb solenoid and the electric fuel pump constantly. Plus starting it back up, before all 5 trips back uphill.) Last, the tractor itself. I ran a heavy chain up inside the body of the tractor, and bolted it inside the frame. Where no one can get to the bolt without taking the back end of the tractor apart to get to it. Now I can ust use the chain to lock the tractor to a telephone pole, or a jersey barrier, (they have coils of steel cable sticking out of them, that are perfect for padlocking to.), or the nearest tree. So the BEAST is now ready for service. Unfortunately I re-injured my back and now I can barely move. LOL So me and the BEAST are probably going to be just kind of sitting here for a while. What little work I can do from this point on, for a while, will be trying to make a trailer. Working on the replacement BEAST. And working on improving my "garage/work area"... Bottom line, this one is done well enough. The replacement BEAST takes care of most of the problems I was worried about with this one. It is much more stable on the hill. I won't have to widen the stance, or move the steering wheel, or anything like that. If I do the same things to it that I had planned for this one, I'll have a better machine in the end. I think this one will work reliably enough until the other is done. Then this one will still be reliable enough to be the backup, in case the other one breaks down. | |
| | | | Stretch44875
Administrator

Age : 49
Join date : 2012-04-05
Points : 5584
Posts : 959
Location : Mansfield, Ohio
| | Subject: Re: Hill climbing BEAST May 22nd 2014, 6:15 pm | |
| Been busy I see.. Different direction then most of the mudder crowd here. | |
| | | | Angchor
Member
Age : 67
Join date : 2014-04-14
Points : 4302
Posts : 491
Location : Index, Washington
| | Subject: Re: Hill climbing BEAST May 22nd 2014, 7:12 pm | |
| - Stretch44875 wrote:
- Been busy I see.. Different direction then most of the mudder crowd here.
Yup. You might call it a kind of hillbilly all-terrain mobility scooter! LOL A mobility scooter to carry my disabled butt down, and me and my supplies back up, a 1/2 mile or so of unfriendly terrain, that I can't walk, on my own.  Once we put in the new bridge and I can just drive out like everyone else... I'll still need my hillbilly all terrain mobility scooter, just to get work accomplished around my property. That's why I am building it more like Doc's mule, than anything else. I want it to be stable, strong, and reliable. | |
| | | | Doc Sprocket
Site VIP
2018 Build-Off Entrant
2018 Build-Off Entrant
2021 Winner of Winners
2021 Winner of Winners
1st Place Build-Off 2016
1st Place Build-Off Winner 2016
Age : 51
Join date : 2013-04-21
Points : 7201
Posts : 2914
Location : Ontario Canada
| | Subject: Re: Hill climbing BEAST May 23rd 2014, 8:11 am | |
| Well done!
Short of repairing the charging circuit, you can slightly lessen the electrical demand by defeating the anti afterfire solenoid on the carb. To do so, unplug and remove it. Using snips, hacksaw, grinder etc, cut the plunger tip off flush with the threaded body, clean, and reinstall. They don't do anything particularly useful anyhow, other than justify some EPA treehugger's paycheck. | |
| | | | Creepycrawler
Established Member

2024 Build-Off Entrant
2024 Build-Off Entrant
Age : 37
Join date : 2013-07-02
Points : 4902
Posts : 731
Location : Logan Ohio
| | Subject: Re: Hill climbing BEAST May 23rd 2014, 9:20 am | |
| I like what your doing here! Lots of planning and thinking ahead, good work | |
| | | | Thunderdivine
Veteran Member

Join date : 2012-12-21
Points : 6426
Posts : 2101
Location : Norway, Europe
| | | | | Angchor
Member
Age : 67
Join date : 2014-04-14
Points : 4302
Posts : 491
Location : Index, Washington
| | Subject: Re: Hill climbing BEAST May 23rd 2014, 2:39 pm | |
| Thanks everyone! - Doc Sprocket wrote:
- Well done!
Short of repairing the charging circuit, you can slightly lessen the electrical demand by defeating the anti afterfire solenoid on the carb. To do so, unplug and remove it. Using snips, hacksaw, grinder etc, cut the plunger tip off flush with the threaded body, clean, and reinstall. They don't do anything particularly useful anyhow, other than justify some EPA treehugger's paycheck. Doc, I think you have gotten the gist of this. The charging circuit will not likely be getting fixed. Possibly ever. But if so, it will be quite a while. Because I am moving on to the next project. Howsomever, I'll address the Carberator Anti Backfire Valve issue, here. This is a Kohler Command engine. When they designed the CABV, they did so in such a way as to make it impossible to just snip the end off and go about your business. (For TD, "wall of text" alert! Look away now, if you don't want to read a long post! LOL)It's a rainy day here, and I am still dealing with mobility problems so I have taken some time and drawn up a cross section of the business end of the CABV on this carb. I don't have any photos, and I don't know that a photo would work anyway. You probably couldn't see what I need to show. So... here's a drawing. Don't hoot too much about my drawing skills. I just use GIMP, the drawing program that comes with Linux.  Most of the CABVs are just a plunger that rides up into a tube in the center of the carb, and enter the bottom of the main jet. The 'business end' on this thing incorporates both that tube, and the main jet. In the image, the brass color is the main jet on the top, and the brass plunger that rides inside the tube. There is a hole drilled straight across the tube, where the gasoline is allowed to enter the tube from the bowl. The plunger then works the same as any other CABV, and allows or disallows the gas to continue through the main jet. To disable this, I would have to either make my own part... Find a part to replace it... Or figure out some way to get the small plunger cut out of the inside of that tube, without somehow damaging the tube. After considering the options... 1.Find a bolt of the right size and thread pitch. Drill a hole down the center. Tap that hole for the main jet. Drill another hole crosswise to allow the gas in. 2.Very very carefully drill through the cross-wise hole, and hope that I will thereby cut off the brass plunger, but not damage anything else. I decided that if I ever decide to bypass this one, I will look for a ready-made part. But I doubt if I will ever find one. If they went to all this trouble to make sure that you couldn't disable it, they certainly aren't going to make a part that will allow you to just replace the part and completely bypass their 'paycheck'... Bottom line, I was just trying to get this done as quickly as possible, and as cheaply as possible. I'll use the BEAST as it is, until I get the next project done. It's easy enough to just keep it on the trickle/float charger while I have it parked. And I already know that the battery will run this thing for at least half a dozen trips up and down the hill before it even begins to be difficult to start. | |
| | | | kawasaki220
Established Member
2014 Build-Off Entrant
2014 Build-Off Entrant
Age : 23
Join date : 2014-01-22
Points : 4454
Posts : 546
Location : north carolina
| | | | | Angchor
Member
Age : 67
Join date : 2014-04-14
Points : 4302
Posts : 491
Location : Index, Washington
| | Subject: Re: Hill climbing BEAST July 3rd 2014, 5:56 pm | |
| - kawasaki220 wrote:
- angchor what ever hapend to this
I am using this to make the trips up and down the hill, while I am working on the WHAMS. It's running. But it seems to feel more dangerous every time I go down that hill. I'll be glad when the WHAMS can take it's place. | |
| | | | Angchor
Member
Age : 67
Join date : 2014-04-14
Points : 4302
Posts : 491
Location : Index, Washington
| | Subject: Re: Hill climbing BEAST July 8th 2014, 3:02 am | |
| My groceries are full of gravel!!!!!
I made a trip to town today. Brought back so much stuff, that I decided to bring down the trailer, to carry it all back up.
Well, next time, I think I'll cover the trailer with a tarp before I come back up. Because the tractor almost didn't make it back up the hill. And in trying... It tossed a LOT of gravel all over my groceries!
But hey, it did finally make it up the hill. Just had to make a loooong run at it. | |
| | | | LAWN MOWER MUDDER
Established Member

2014 Build-Off Top 3 Winner
2014 Build-Off Top 3 Winner
Age : 23
Join date : 2013-04-08
Points : 5092
Posts : 913
Location : Central Pa
| | | | | Angchor
Member
Age : 67
Join date : 2014-04-14
Points : 4302
Posts : 491
Location : Index, Washington
| | Subject: Re: Hill climbing BEAST July 17th 2014, 8:09 pm | |
| This tractor is DEAD!!!
If it tries to move again, I will SHOOT it!!!!
It tried to kill me again today.
People have done some major damage to the ATV trail, by driving their cars and trucks up and down the trail.
Today, the front wheel of the tractor was caught in soem of the trail damage at the most steep part of the top end of the trail, and it tipped over directly on top of me.
If I were not as strong as I am, it would have killed me by crushing my head. I used my arm to deflect it just enough for that not to happen.
Think wheelie, but it just continues right on over, exactly on top of you... And you are more trapped underneath it that you would be on level ground, because when you hit the ground, you are downhill of the rear wheels, and the trtactor is instantly behind you, and on top of you.
I was stuck for a while. I thought my leg was broken because it was all twisted and trapped. I yelled and got no help. So I dug through the gravel until I freed my leg enough that I could then lift the tracter enough with one hand, and able to drag myself out from underneath.
The BEAST tractor is so damaged that I am not even going to try to get it back on the road. I will now spend all my time on the WHAMS tractor... | |
| | | | Sponsored content
| | | | | | | Hill climbing BEAST | |
|
Similar topics |  |
|
| | Permissions in this forum: | You cannot reply to topics in this forum
| |
| |
| | Who is online? | In total there are 40 users online :: 0 Registered, 0 Hidden and 40 Guests
None
Most users ever online was 412 on January 7th 2023, 7:59 am
|
|